Windcave Terminal Gateway
The till sends the order total to a Windcave terminal, the customer pays on the terminal, and the sale finishes on its own when Windcave approves it. The extension needs WCPOS Pro, both to install it and to use it at the till. This page is in two parts: taking a payment at the till, and setting it up in WP Admin.
For test payments only. Don't take real customer payments with it yet: run it with Windcave's UAT (test) credentials only.
Why, and what hasn't been tested
Windcave requires every point-of-sale integration to pass its QA certification before it takes real payments. This one hasn't passed yet. It also hasn't yet been run against a Windcave account or on a physical terminal: the steps below come from Windcave's HIT documentation and the extension's code.
Take a payment
Before you start: your store needs to be online, because the payment runs on your store's own payment page inside the POS, and someone with WP Admin access has to set the gateway up. With Open and close the register switched on, open the register first.
The terminal is always charged the whole order, so it can't share a sale with another method.
-
Build the cart and press Checkout.
-
Open the Legacy tab. Your store's payment page opens inside the POS. See The Legacy Tab.
The tab says Whole bill only
A payment has already been taken on the order, so the tab won't open the payment page. To use Windcave, cancel that payment first.
-
Choose Windcave Terminal. Your store may have given it another name.
-
Pick the terminal under Terminal. With one terminal, or a locked default, it is already chosen. With two or more and no default, you must pick one.
-
Press Start Terminal Payment. The panel says Sending to terminal… and the full order total goes to that terminal.
-
The customer taps, inserts or swipes their card on the terminal. Whatever the terminal shows appears in the panel too, with its buttons. When the terminal asks you to check a signature, answer YES or NO in the panel.
-
When Windcave approves, the panel says Payment complete — finishing order… and the POS moves on to the receipt.
You don't need Process Payment at the foot of the Legacy tab: the sale finishes on its own when the terminal approves.
Stop or set aside a payment
Before you take payment another way, look at the terminal. If it shows the payment approved, don't charge the customer again. If you can't tell, ask your manager.
- Cancel Terminal Payment replaces Start Terminal Payment while a payment runs. It presses CANCEL on the terminal when the terminal offers it. When it doesn't, the panel says so: cancel on the terminal itself, or set the payment aside.
- Set payment aside appears when a payment has run for 5 minutes with no answer, or when the terminal won't cancel. It does not cancel the payment at Windcave. Before you take payment another way, make sure the terminal shows the payment declined or cancelled. If it is still waiting, blank or unclear, ask your manager to check the Windcave portal first.
- Reloading the page picks up the payment already in progress, with Cancel Terminal Payment showing.
What happens after you set a payment aside
A check on your store keeps following the payment up with Windcave every 10 minutes, even after the till is closed. If Windcave approves it after the order was paid another way, the order gets a note saying so: refund that payment in the Windcave portal.
If something goes wrong
These messages can mean the customer has already paid. Read them before you take payment again.
Timed out waiting for the terminal
Five minutes passed with no result, and the panel has stopped checking. Look at the terminal before you do anything else:
- It shows the payment approved. Don't charge again. Reload the page, and the panel picks the payment up and finishes the sale. If the sale still doesn't finish, ask your manager to check the order notes and the Windcave portal.
- It shows the payment declined or cancelled. Press Cancel Terminal Payment, or Set payment aside, then take payment again.
- It's blank, still waiting, or you can't tell. Don't take another payment yet. Ask your manager to check the Windcave portal first. See the warning.
This order was already paid by another payment
The terminal approved, but the order had already been paid another way, so the customer has paid twice. Don't try again. Refund the terminal payment in the Windcave portal; the order notes name it.
The terminal payment could not be verified
Windcave approved a payment that couldn't be applied to this order, for example because the order's total changed. Don't charge the card again: Start shows the same message until it is sorted out. Check the order notes and the Windcave portal first, and call your manager.
Declined, terminal busy, no terminal chosen, and other messages
Select a terminal first. Pick a terminal under Terminal, then press Start Terminal Payment again.
The payment was declined, or the terminal's own decline text, or Windcave refused the payment (code …). Press Start Terminal Payment to try again, or take another method.
The terminal is still finishing an earlier transaction. Finish or cancel that transaction on the terminal, then start again.
Windcave has no record of this transaction. Start the payment again. The payment never reached Windcave. Press Start Terminal Payment again.
Windcave reported code …: Check the Station ID and HIT settings. Windcave refused the request, often because a Station ID is wrong. Ask whoever set up the gateway to check the settings, or set the payment aside.
This payment was started in UAT (or production). Someone changed Environment while the payment was running. Switch it back to finish the payment, or check it in the Windcave portal.
Messages while setting up
Windcave HIT credentials are not configured. The HIT username or HIT key is empty. Enter both and save, and check Environment matches them.
No Station IDs configured in the Terminal list. Add the Station IDs Windcave gave you, one per line, and save.
Activation is refused. The server needs PHP 7.4 or newer and the PHP DOM extension (php-xml). Ask your host to enable it.
After the sale
When Windcave sends receipt text from the terminal, it is saved to the order as a private note. The POS still shows its own receipt as usual.
Refunds
Refunds from WooCommerce aren't supported in this version. Refund in the Windcave portal (Payline) or on the terminal, then record the refund on the order in WooCommerce by hand. See Refunds.
Set it up
This part is for whoever runs the store's WP Admin. Do these four in order:
- Install the extension from the extension directory.
- Get HIT credentials from Windcave.
- Fill in the gateway settings.
- Turn it on for the POS.
Install the extension
Open WP Admin > POS > Settings > Extensions, find Windcave Terminal for WooCommerce and click Install. WCPOS downloads it, installs it and activates it in one go. See Installing an Extension.
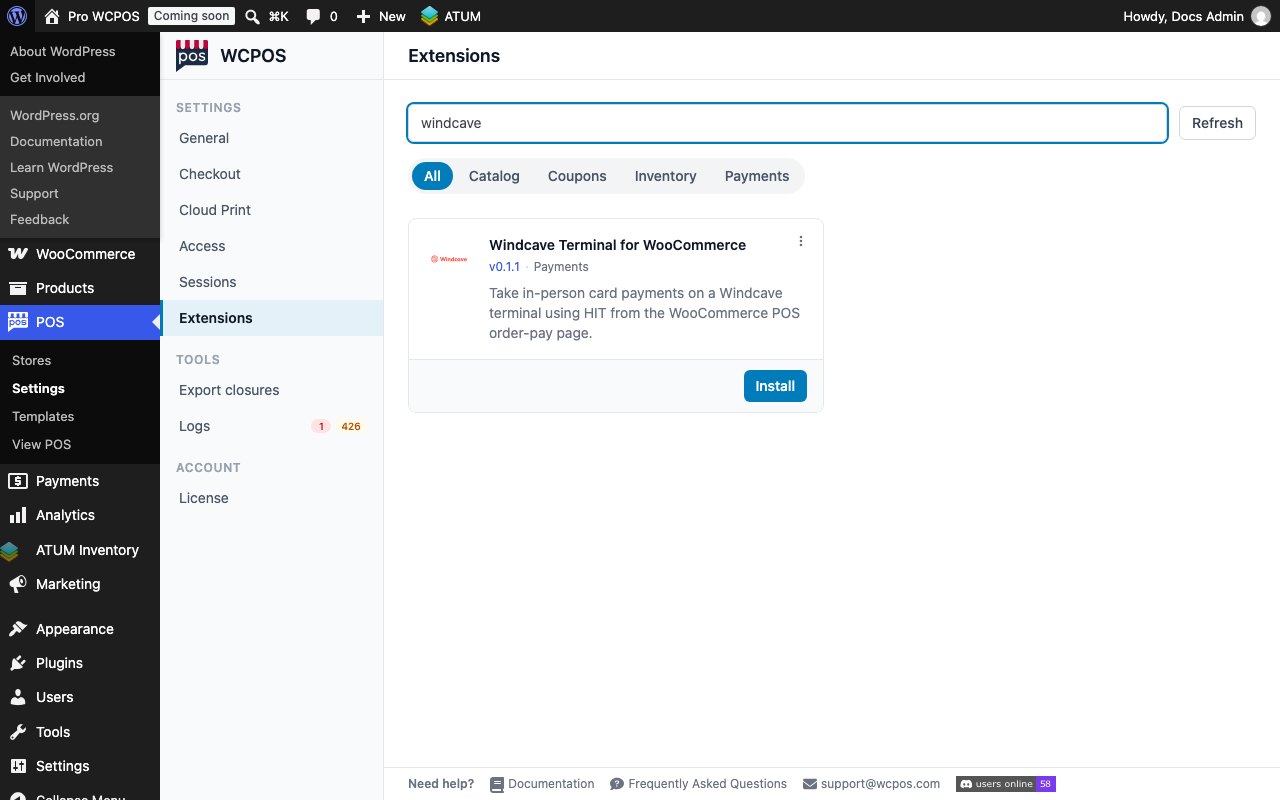
- Search extensions — type
windcaveto find the card. - Windcave Terminal for WooCommerce — the extension, with the version the directory installs.
- Install — downloads, installs and activates it. It needs WCPOS Pro.
Without the directory, download the plugin zip (not the source-code zip) from the GitHub releases page, upload it with Upload Plugin in Plugins > Add Plugin, then activate it. WooCommerce must be active.
Get HIT credentials from Windcave
Ask Windcave for a HIT username, a HIT key and one Station ID for each terminal. For a development account, use Windcave's Integration Requirements form.
UAT and production credentials are separate. Use UAT ones until Windcave certifies this integration.
Fill in the gateway settings
- Go to
WP Admin > WooCommerce > Settings > Paymentsand open Windcave Terminal. - Leave Environment on UAT (testing), the default. Production is for after certification, with production credentials.
- Enter the HIT username and HIT key.
- Enter your Station IDs, one per line.
- Optional: set a Default Station ID, and tick Lock terminal selection so cashiers always use it.
- Leave Vendor ID empty. Windcave issues one during certification.
- Optional: tick Result notifications (FPRN), so Windcave also tells your store when a result is ready, as a backup to the till's own checks.
- Save.
There is no test-connection button. The credentials and Station IDs are checked by the first payment, so run a test payment on a UAT terminal.
Turn it on for the POS
Go to WP Admin > POS > Settings > Checkout, find Windcave Terminal and switch Enabled on. See Enabling a Gateway.
Leave Enable/Disable in the WooCommerce settings off. The POS uses the gateway once Enabled is on here, whether that box is ticked or not.
Settings reference
On WP Admin > WooCommerce > Settings > Payments > Windcave Terminal. The steps above cover the ones you need; open the list for every setting and its default.
All 15 settings
| Setting | What it does |
|---|---|
| Enable/Disable | Lists the gateway on the online store too. Leave it off: online, it can only take payment on an existing order's payment page, not at the normal checkout. Off by default. The POS has its own switch, under POS > Settings > Checkout |
| Title | The name cashiers choose on the payment page. Defaults to Windcave Terminal |
| Description | The line shown under the title. Defaults to Pay in person on the Windcave terminal. |
| Environment | UAT (testing) (default) or Production. Each has its own HIT credentials; production needs Windcave certification |
| HIT username | Issued by Windcave, for the environment you chose |
| HIT key | Issued by Windcave, for the environment you chose |
| Station IDs | One Station ID per line, one per terminal. Windcave issues them; they aren't found automatically |
| Default Station ID | The terminal chosen at the start, and the one used when none is picked |
| Lock terminal selection | Cashiers can't change the terminal: the default is always used. Works only when a default is set |
| Vendor ID | Issued by Windcave during certification. Leave it empty until then |
| POS name | The name your POS goes by at Windcave. Defaults to WCPOS |
| Result notifications (FPRN) | Windcave also tells your store when a result is ready, as a backup to the till's checks. Off by default |
| Checkout logs | Shows Show logs, Copy and Clear on the payment panel. Off by default |
| Log level | Off, Errors only or Debug (the default) |
| Support | Download support bundle, and a link to the logs |
Logs and support bundle
Logs are in WP Admin > WooCommerce > Status > Logs, under the source windcave-terminal. Log level starts on Debug, which records every request to Windcave and every answer, with the HIT key and card numbers masked.
When a payment fails, click Download support bundle on the gateway's settings page and send the .json file to support with the order number.
What the support bundle holds
- Your store's setup: the WordPress, WooCommerce, PHP and extension versions, the environment and the number of terminals.
- The gateway settings, with the HIT key masked and the HIT username cut to its first three characters.
- Payment attempts from up to 20 recent orders, without receipts.
- The last 1,000 lines of the two newest
windcave-terminallog files. These can hold terminal receipt text, with card numbers masked.
If WooCommerce keeps its logs in the database, the bundle has no log lines: export them from WooCommerce > Status > Logs and send them too.
Requirements
What it doesn't do
- Refunds from WooCommerce.
- Tips, surcharges and cash-out.
- Currencies without two decimal places.
- Part-payments: the terminal is always charged the whole order.
- Finding terminals on its own: you type in each Station ID.
- The online store's normal checkout. Online, it can only take payment on an existing order's payment page.
How it works, for developers
The gateway uses Windcave HIT (Host Initiated Transaction) over HTTPS. Environment picks the UAT or production endpoint, and each terminal is addressed by its Station ID.
Starting a payment records a transaction reference on the order, then sends a Purchase for the order total and currency. The panel asks Windcave for the status every 1.5 seconds and mirrors the terminal's display lines and enabled buttons. With Result notifications (FPRN) on, Windcave also calls the store when a result is ready.
The order completes only when the result is approved and matches the attempt recorded on the order: the reference, the amount, the environment, and the order's total and currency. Windcave gets 30 seconds to register a new transaction before "no record" counts as declined. A scheduled check every 10 minutes follows up payments that went quiet or were set aside.
Related Documentation
- The Legacy Tab
- Checkout
- Checkout Settings
- Extensions
- Report an issue on GitHub. For your account, credentials and terminals, contact Windcave.