Add-ons
An extension is a WordPress plugin built for WCPOS: a card terminal, a multilingual catalog, store credit, stock by location. You find them all in one directory in WordPress, at WP Admin > POS > Settings > Extensions.
Installing from the directory takes one button, and needs WCPOS Pro and a WordPress administrator. Without Pro, Polylang, WPML and WP Multilang can be installed by hand.
Jump to: Install an extension · Install without Pro · If something goes wrong
What's in the directory
Each card below links to that extension's own page: what it does, what it needs and how to set it up.
By category: Payments · Languages · Coupons and store credit · Inventory
Payments
Take in-person payments on a card terminal, or let the customer pay from their phone or by email.
For the payment methods WCPOS has without an extension, see Payment Gateways.
Catalog: more than one language
If your store sells in several languages, these show the POS one language of each product, so translated copies don't fill search and the product grid.
Coupons and store credit
Inventory
Install an extension
Installing from the directory needs WCPOS Pro and a WordPress administrator: Shop Managers can't install plugins (see Access). On the free version, see Without Pro.
- In WordPress, go to WP Admin > POS > Settings and choose Extensions.
- Find the extension. Type in Search extensions... (it matches the name, description and tags), or pick a tab: All, Catalog, Coupons, Inventory, Payments.
- Press Install on its card. WCPOS downloads it, installs it and activates it in one go, and turns on Auto-update. The card now says Active.
- Set it up. If the card's ⋮ (More actions) menu has Settings, choose it. The extension's own page above says what to fill in.
No Settings in the menu, or another way in
- Settings is in the menu only when the directory lists a settings page for that extension. Without it, follow the extension's own page.
- With WCPOS Pro, the same Settings link sits under the extension's name on WP Admin > Plugins.
- For a payment extension, Settings opens its page in WooCommerce's payment settings.
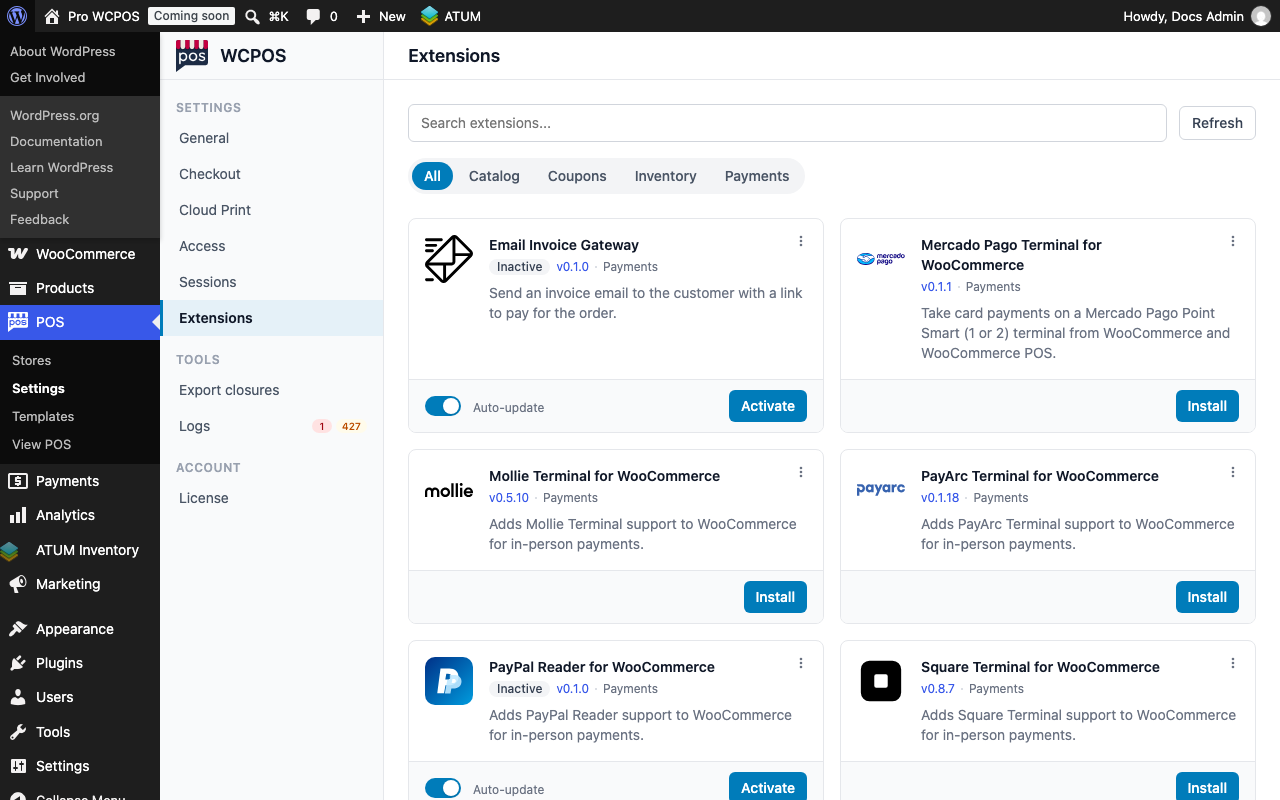
- Extensions — in the WCPOS settings menu. A number beside it counts the extensions with an update waiting.
- Search extensions... — matches the name, description and tags.
- Refresh — checks the directory for new versions now.
- Category tabs — All, or one category.
What a card shows
Each extension has a card with its icon, name and description. A puzzle piece stands in when the extension has no icon of its own. An installed extension's card:
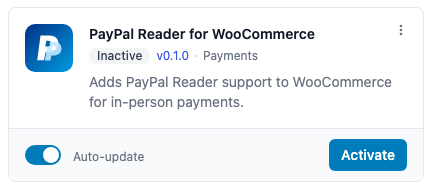
- Status — Active, Inactive (as here) or Update available.
- Version — the installed version. With an update waiting it reads v0.5.9 → v0.5.10. It links to the release on GitHub. The category after it is the tab the extension sits under.
- ⋮ More actions — View on GitHub, and Settings if the extension has a settings page.
- Auto-update — on or off for this extension.
- Activate — the button shows what comes next: Activate, Update, or both when a stopped extension has an update. Deactivate sits beside it while the extension is running.
One that isn't installed:
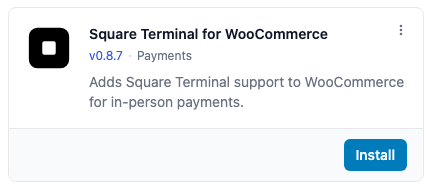
- Install — the card has no status and no Auto-update, and its version is the latest one.
Without Pro
The free version lists every extension, but Install is greyed out with Requires Pro to install. The three multilingual extensions, Polylang, WPML and WP Multilang, run without Pro, so you can install those by hand:
- On the extension's card, open ⋮ (More actions) and choose View on GitHub.
- Download the
.zipattached to the latest release. - In WP Admin > Plugins > Add Plugin, press Upload Plugin, choose the zip and activate it.
The directory then shows it as Active, and as Update available when a new release is out. Without Pro there's no Update button: upload the new release's zip the same way, and WordPress offers to replace the installed version.
Update, turn off or turn on
Without Pro, update an extension by hand: see Without Pro.
With WCPOS Pro, the buttons on an installed extension's card do this:
- Update — installs the new version. An extension that was running keeps running.
- Deactivate — stops the extension without removing it. Its settings and files stay, and Activate brings it back. Activate turns Auto-update on again.
Updates
When a new version is out, the version on the card reads v0.5.9 → v0.5.10, and a running extension's status changes to Update available (one that's turned off stays Inactive). With WCPOS Pro it also shows the Update button, and WordPress lists the same update on its Plugins screen, so you can update from either place. On the free version, update by hand: see Without Pro.
The directory checks for new versions once an hour. Press Refresh next to the search box to check now.
Auto-updates
Auto-update is on for every extension you install or activate from the directory. With it on, WordPress installs new versions in the background, the same way it does for any plugin with auto-updates on. Turn it off on the card if you'd rather update by hand, for example to test a new version first.
A new version that needs a newer WCPOS than your site runs isn't offered at all, by the card or by auto-update. Update WCPOS Pro first, and the extension's update appears.
Remove an extension
To remove an extension for good, deactivate and delete it on WP Admin > Plugins, like any other plugin. With WCPOS Pro you can deactivate it on its card first.
If something goes wrong
Install is greyed out and says "Requires Pro to install". You're on the free version: installing from the directory needs WCPOS Pro. The multilingual extensions can be installed by hand.
"You do not have permission to manage plugins." Your WordPress user can't install plugins. Ask an administrator.
"… needs WCPOS 2.1 or later; this site runs WCPOS 2.0. Update WCPOS Pro first." The version on offer is newer than your WCPOS supports. Update WCPOS Pro, then try again.
"Could not refresh extensions. Please try again." or "No extensions found." with nothing searched. Your site couldn't fetch the list of extensions. The list comes from GitHub, and some hosts stop websites from connecting out. Try again later, or ask your host to allow connections to GitHub.
The install fails with an error on the card. WordPress couldn't download or unpack the plugin, and the message on the card names the cause. Ask your host to check that WordPress can save files in its plugins folder (wp-content/plugins) and can connect to GitHub.
The card says Inactive after Install. WordPress installed the extension but couldn't turn it on, and it won't run until it is. Press Activate: if that fails, the message on the card names the cause.
A new version isn't showing. The directory keeps its list for an hour. Press Refresh.
The free version shows the whole directory, but the Install, Activate, Update, Deactivate and Auto-update controls come with Pro. See Free vs Pro.
Related Documentation
For developers
For building an extension or listing your own. Nothing below is needed to run a store.
Hook naming
From WCPOS 2.0 every hook WCPOS fires is named wcpos_*. The old woocommerce_pos_* names are deprecated: they still work, and are removed in 2.2 at the earliest.
Pro hooks, deprecation notices, and what keeps its name
WCPOS Pro's hooks are named wcpos_pro_*. The old names are aliases: they still fire, and log a deprecation notice under WP_DEBUG when something is attached. Only hooks change: options, meta keys and capabilities keep their names.
Hooks your code fires, and when to switch
Four hooks are fired by your code and heard by WCPOS: woocommerce_pos_invalidate (extensions), woocommerce_pos_receipt_head (saved PHP receipt templates), and woocommerce_pos_head / woocommerce_pos_footer (a theme's pos.php override). WCPOS keeps listening on those names until 2.2; switch to wcpos_invalidate, wcpos_receipt_head, wcpos_head and wcpos_footer.
Extensions: switch to the wcpos_ names in your first release after 2.0 and require WCPOS 2.0 or later. Never attach to both names; on 2.0 and 2.1 your callback would run twice. See ADR 0041.
Build an extension and list it in the directory
Creating a POS extension
A WCPOS extension is an ordinary WordPress plugin that uses WCPOS hooks and APIs. For a payment extension, start from the Gateway Template.
Adding to the POS screens
A plugin can't add its own panel or button to the POS screens today. The cart, product and customer screens show only what ships with the app. Checkout is the exception: a payment gateway shows its own payment page on the Legacy tab, or, through two filters, gets its own tile and fields on the Payments tab. See Declaring Fields for the Tender Pane.
So that the directory recognises your plugin once it's installed
- Folder name — the plugin's folder must be the catalog
slug, e.g.my-extension/my-extension.php. The directory finds installed extensions by that folder, and installs into it. - Text Domain or Plugin URI — one of them must match the
slugor the GitHub repository's name. Without a match, auto-updates and the WordPress Plugins screen don't offer your releases. The check stops a fork that reuses your folder name from receiving them.
Submitting to the directory
The directory reads catalog.json in the wcpos/extensions repository on GitHub. To list your extension, open a pull request there that adds an entry to catalog.json, and an icon under icons/ if you have one. Once it merges, WCPOS sites see it within about an hour.
Every field in a catalog entry
| Field | What it holds |
|---|---|
slug | The plugin's folder name. |
name, description, author | What the card shows. |
category | The tab it sits under: payments, catalog, coupons, inventory, or a new one. |
tags | Extra words the search matches. |
homepage | The GitHub repository, https://github.com/owner/repo. Releases are read from here. |
icon | URL of a square icon, usually the file you added under icons/. Without one the card shows a puzzle piece. |
requires_wp, requires_wc, requires_wcpos | The lowest WordPress, WooCommerce and WCPOS versions it runs on. Sites below requires_wcpos are never offered the release. |
requires_pro | Whether it needs WCPOS Pro to run. |
settings_url | Its settings page, relative to wp-admin/, e.g. admin.php?page=wc-settings&tab=checkout§ion=my_gateway. Fills Settings in the card's menu. |
Leave version, latest_version, download_url and released_at to the catalog: they're filled in from your releases.
GitHub release conventions
Publish a full GitHub release with the version as its tag and the plugin zip attached. Every hour the catalog reads the latest release of each listed repository and updates its entry.
What a release needs to reach WCPOS sites
- Tag it with the version,
v1.2.3. The leadingvis dropped for the version number, which must match the plugin header'sVersion. - Attach the plugin zip named after the slug,
my-extension.zip. Without that name, the first.zipon the release is used. WCPOS installs it into theslugfolder whatever the folder inside the zip is called. - Publish it as a full release. Drafts and pre-releases are skipped, so a pre-release is a safe way to share a test build.
- Raise
requires_wcposincatalog.jsonwhen a release needs a newer WCPOS, so older sites aren't sent a version that won't start.
Sites see the new version once their list is refreshed: within the hour, or straight away with Refresh. Sites with Auto-update on install it in the background.
To test a catalog of your own before submitting, point a site at it with the wcpos_extensions_catalog_url filter.