Products
The Products screen needs WCPOS Pro. Without Pro, the screen shows your products under a blur, with Upgrade to Pro and View Demo. You can still sell every product from the Product Panel.
The Products screen is where you look after your catalogue from the till: change stock and prices, fix a barcode, or check what a product looks like in your store. Open it from Products in the menu. Every change goes to your store, so it shows in WooCommerce and on every other till.
Go straight to: Change stock · Change prices · Edit a product · Edit a variation
Products screen or Product Panel
To add products to a sale, use the Product Panel. To change your catalogue, open Products; this needs WCPOS Pro.
Find your way around
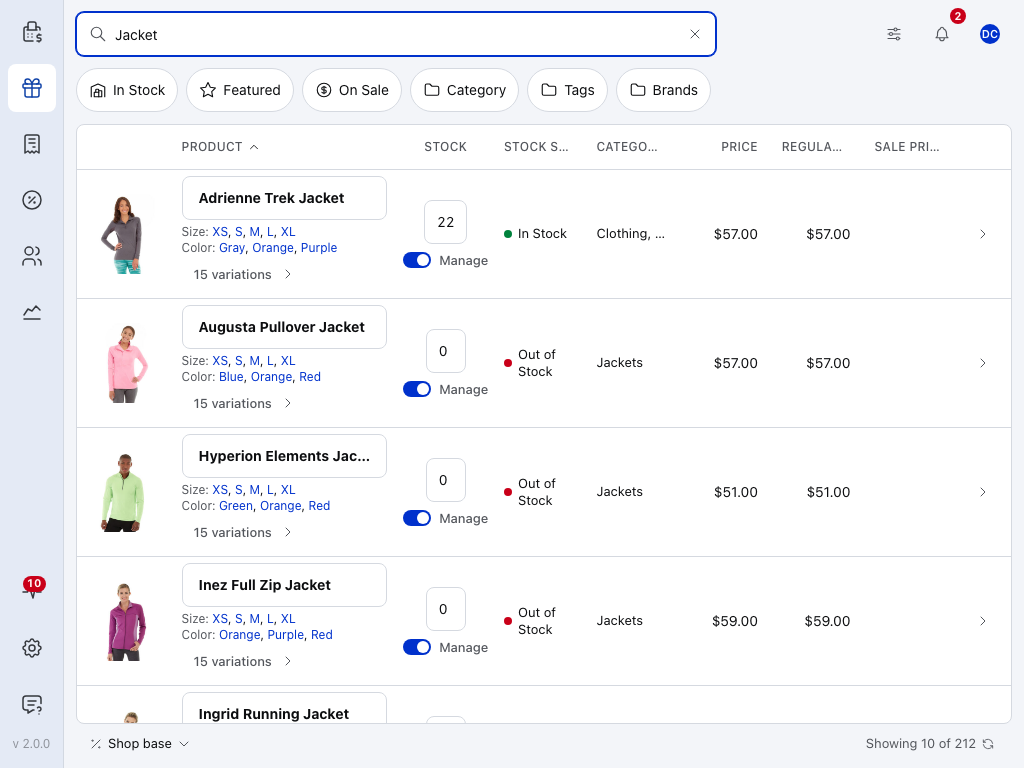
- Search products — finds products by name, SKU or barcode. See Find a product.
- Filters — In Stock, Featured, On Sale, Category, Tags and Brands.
- Product — the column the list is sorted by, with the arrow for its direction. Tap a heading to sort by it. See Sort and resize the columns.
- A heading's edge — drag it to make the column wider or narrower.
- Stock — tap it to change the quantity. The Manage switch under it turns stock tracking on or off. See Stock.
- Stock Status — In Stock, Out of Stock or On Backorder.
- 15 variations — opens the options of a variable product. See Variable products.
- › — opens the product's dialog. See Edit a product.
- Product Settings — the columns, and how variations open. See Display settings.
- Shop base — what your store calculates tax on. Tap it to see the tax rates in use.
- Showing 10 of 212 — how many products are on screen, out of those on this device that match, then the sync arrow. See The foot of the list.
Find a product
- Search — type a name, SKU or barcode. Search asks your store for anything that isn't on this device yet.
- Scan — with a barcode scanner, scan a product. The POS shows Barcode scanned with the code and how many products match, and puts the code in the search field. Which field counts as the barcode is set in Barcode Field.
- Filters — the buttons under the search field narrow the list: In Stock, Featured, On Sale, Category, Tags and Brands. In Stock, Category, Tags and Brands open a list to pick from; In Stock picks a stock status (In Stock, Out of Stock, On Backorder). Press the cross on an active filter to take it off.
Change stock, prices and names in the list
Each row's stock and prices can be changed in place, with the same keypads as the cart: tap the number and a keypad opens from it. A kept change goes to your store.
Stock
Tap the number under Stock and type the new quantity, or use − and +. Stock is a whole number, and − stops at 0. Tap the tick or press Enter to keep it; Escape leaves it as it was. In the iOS and Android apps, type the number into the box.
Manage
The Manage switch under the number turns stock tracking on or off for the product:
- On — your store counts the stock down as you sell. The number can be changed.
- Off — the stock isn't counted, and the number is greyed. Stock Status says whether the product can be sold.
To stop the till selling more of a product than you have, switch on Prevent overselling; it's off on a new store.
Prices
- Regular Price — tap it, type the new price, then tap the tick or press Enter to keep it. Escape leaves it as it was. In the iOS and Android apps, type the price into the box.
- Sale Price — can be changed only while the product is on sale. To put a product on sale, add a sale price in its dialog.
- Price — the price the till charges. It follows the other two and can't be changed itself.
A variable product's prices come from its options, so they can't be changed on its row. Change each option's price on the option's own row: see Variable products.
Name
Tap a product's name in the list, type the new name, then press Enter or tap outside the box to keep it.
Cost of Goods Sold
If your store uses WooCommerce's Cost of Goods Sold, turn on the Cost of Goods Sold column in Display settings to see each product's cost beside its prices. Tap a cost, type the new one, then tap the tick or press Enter to keep it. Escape leaves it as it was. In the iOS and Android apps, type the cost into the box.
Cost of Goods Sold is a WooCommerce feature. Turn it on in WooCommerce > Settings > Advanced > Features.
If you can't change a field
A greyed field whose tip says You don't have permission to edit products means your account can't change products. An administrator can grant it in WP Admin > POS > Settings > Access. Variations have their own permission, and so does deleting.
Edit a product
Press › at the end of a row to open the product's dialog.
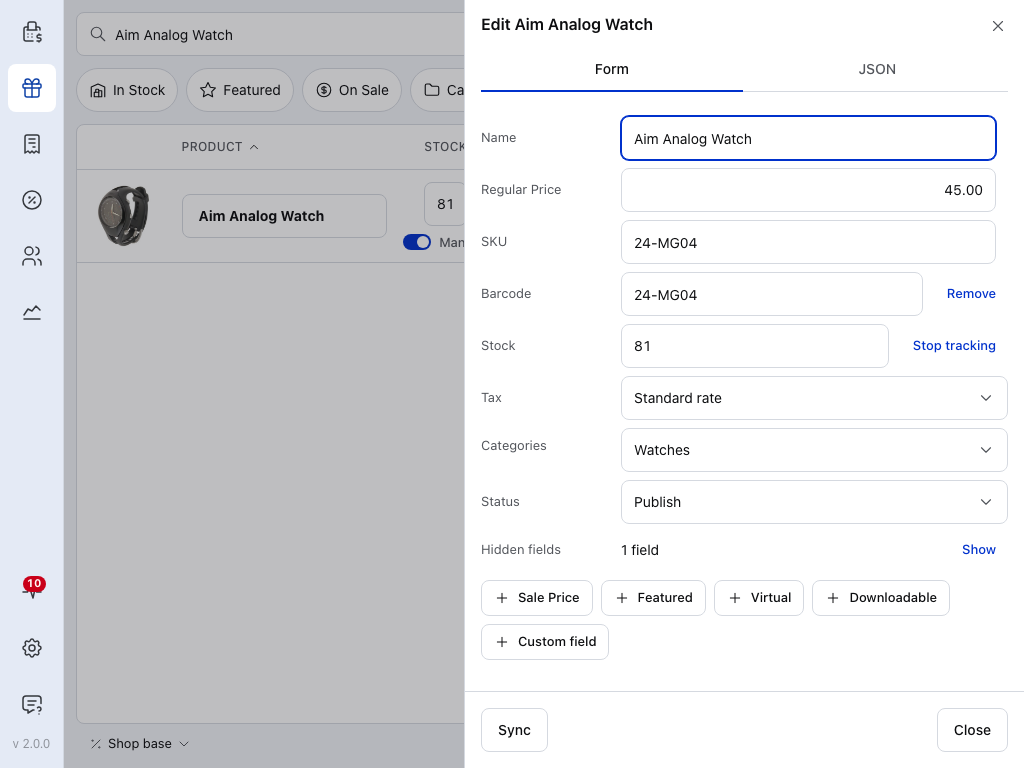
- Name — the product's name, as your store shows it.
- Regular Price — the price when it isn't on sale.
- Remove — takes the field off the product, and its button comes back at the bottom.
- Stop tracking — stops counting this product's stock. The row then reads Not tracked, with Track quantity to turn it back on.
- Tax — the product's tax class, or Not taxable.
- Show — lists the hidden fields. See Advanced fields.
- Sale Price — adds a field the product doesn't have yet. Featured, Virtual and Downloadable work the same way.
- Custom field — adds a field of your own. See Advanced fields.
- Sync — updates this till with the product as it's saved in your store. See Sync or delete.
- Close — closes the dialog. There's no Save button: each change saves as you make it.
Each change saves as you make it. Saved shows beside the field for a moment. If a change can't be saved, Not saved shows in red and stays there until your next change.
Advanced fields and troubleshooting
- Hidden fields — press Show to list them. They are custom fields that plugins keep for themselves. Change them only if you know what they're for.
- Custom field — adds a custom field of your own, with a name and a value.
- JSON — the tab at the top shows the product as this device holds it, for troubleshooting.
A variable product's dialog has a Variations row that reads Managed in the product list: you edit its options from its row in the list, not here. See Variable products.
Why can't I edit variations in this dialog?
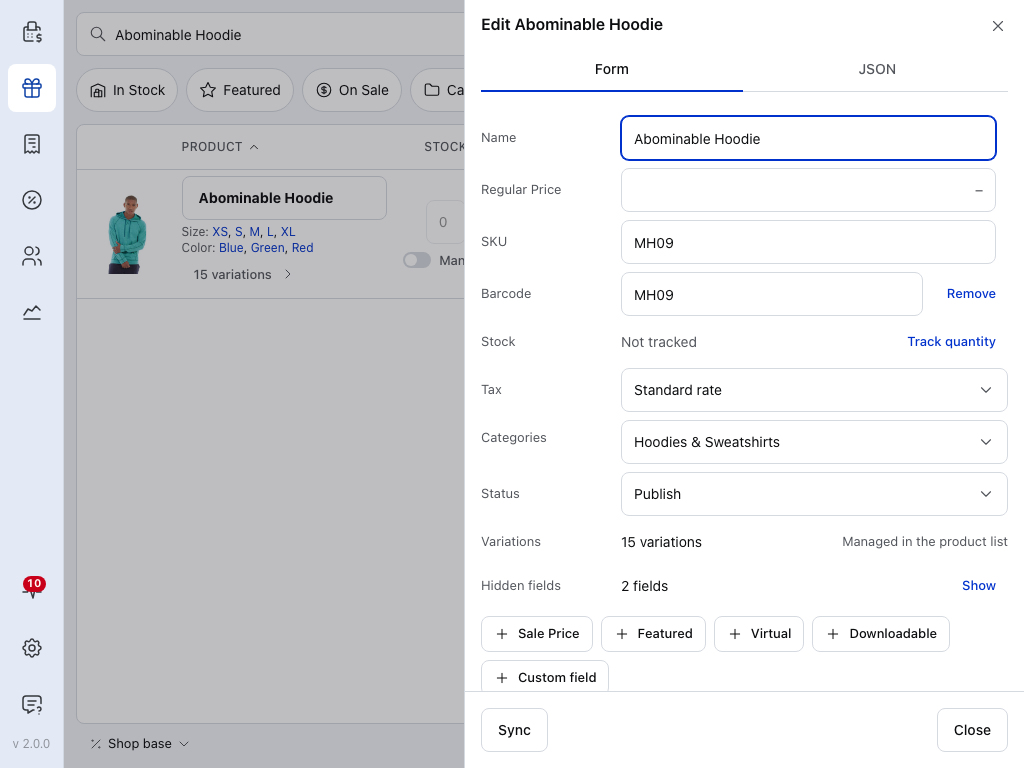
- Managed in the product list — the product's options are edited from its row in the list.
- Not tracked — the stock isn't counted at the product level. Track quantity turns it on.
- Sync — updates this till with the product as it's saved in your store.
In WooCommerce each option is a variation with its own price, stock and settings, so it has its own dialog. The product's dialog only counts them.
Variable products
A variable product, such as a hoodie in five sizes and three colours, has a row of its own and a row for each option. The row shows the product's sizes and colours, and how many options it has, such as 15 variations.
Tap 15 variations to open the options. How they open depends on Variations in Display settings:
- Open in place — the options fill the list, with Products above them to go back. This is where a new device starts.
- Expanded rows — the options open as rows under the product.
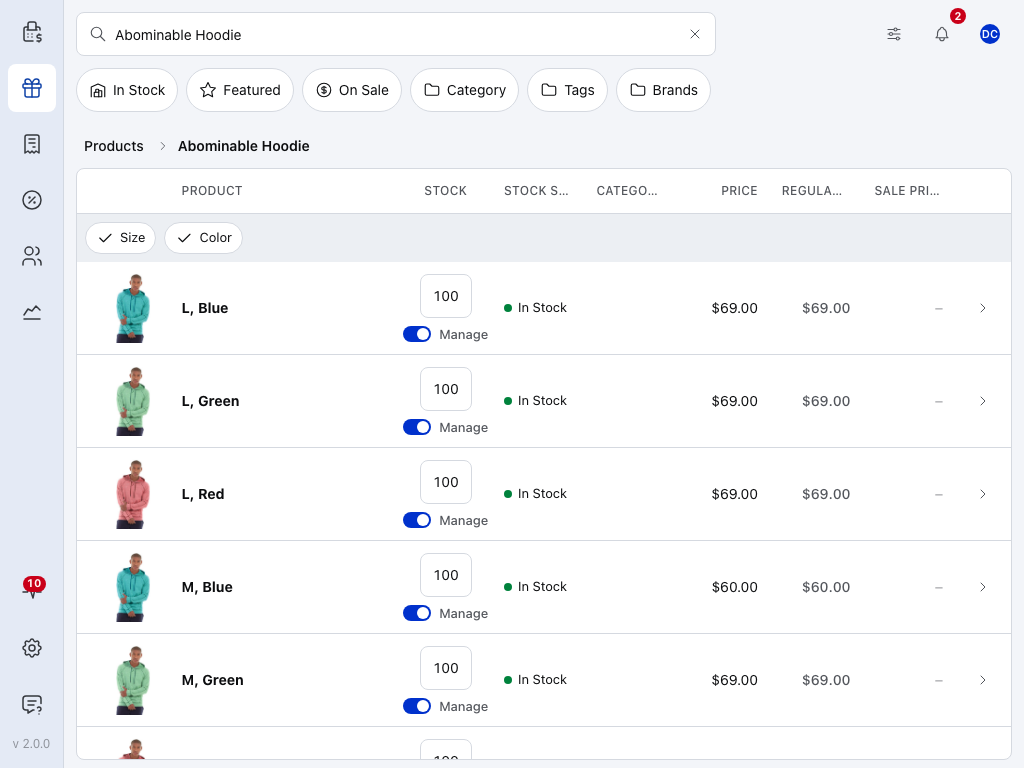
- Products — goes back to the list you came from.
- Abominable Hoodie — the product whose options you're looking at.
- Stock — each option has its own stock and Manage switch.
- › — opens the option's own dialog. See Edit a variation.
Each option's row has its own stock, Manage switch and prices, which you change the same way as a product's. Press › on an option to open its own dialog.
Edit a variation
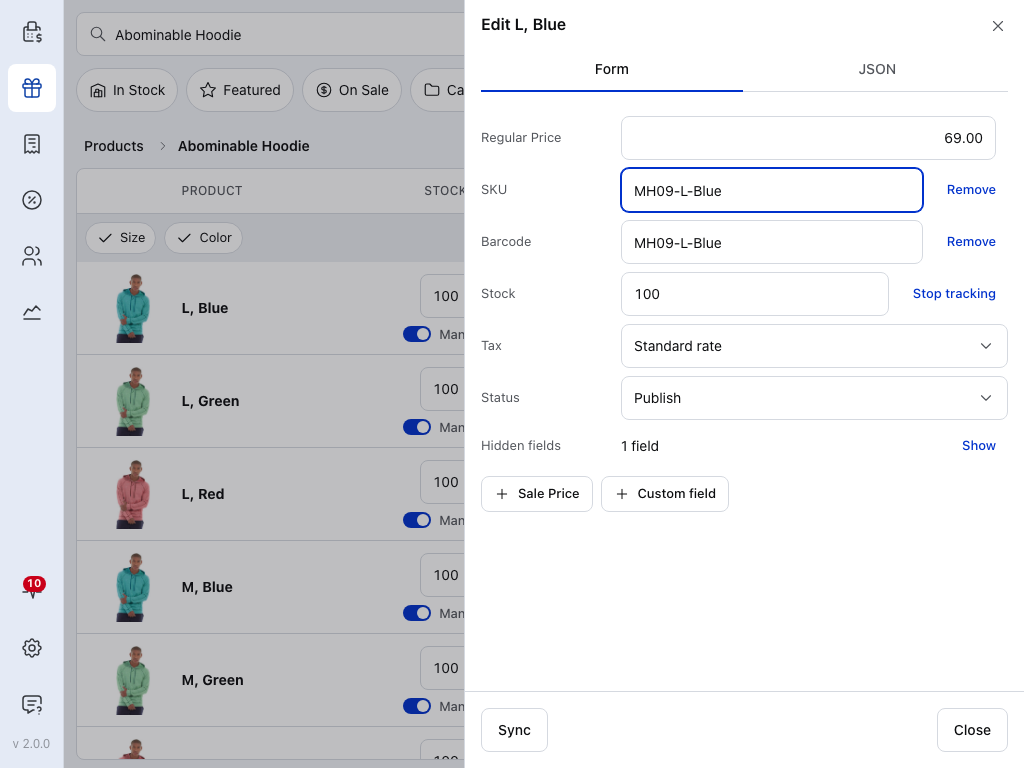
- Regular Price — this option's own price.
- Stop tracking — stops counting this option's stock.
- Tax — this option's tax class. See below for Same as parent.
- Show — lists the option's hidden fields.
- Sale Price — puts this option on sale.
- Sync — updates this till with the option as it's saved in your store.
An option has its own price, SKU, barcode, stock, tax and status. Its Tax row can follow the product: it then reads Same as parent, with the product's tax class beside it. Press Set for this variation to choose the option's own class. To follow the product again, choose Same as parent in the list.
Sync or delete
At the bottom of a product's or an option's dialog:
- Sync — updates this till with the product as it's saved in your store, in case it was changed somewhere else. A change you've just made in the dialog is saved first, and one that couldn't be saved isn't overwritten.
- Delete — asks first, then deletes it in your store.
Delete doesn't only remove it from this till:
- A product goes to the Trash in WooCommerce. The confirm reads: Are you sure you want to delete this product? Deleted products will be placed in the Trash on the server.
- A variation is deleted for good. The confirm reads: Are you sure you want to delete this variation? Deleting a variation is permanent, there is no Trash for variations.
Delete shows only for an account with the delete_products, delete_others_products and delete_published_products capabilities (a variation also needs delete_product). The Cashier role doesn't have them; an administrator can grant them in WP Admin → POS → Settings → Access.
A product deleted in WooCommerce also leaves every till at the next check for changes.
Sorting and the foot of the list
Sort and resize the columns
Tap a column heading to sort by it, and tap it again to reverse the order. Drag the right edge of a heading to make the column wider or narrower. To choose which columns show, see Display settings.
Which columns sort, and what is kept
- The arrow beside the heading shows which way the list is sorted.
- You can sort by Product, ID, Type, SKU, Barcode, Stock, Stock Status, Price and Date Created.
- A new device sorts by Product, A to Z. The sort you choose is kept on this device.
- A new column width isn't saved in your settings.
The foot of the list
- Tax basis, such as Shop base — what your store calculates tax on. Tap it to see the tax rates in use.
- Showing 10 of 212 — how many products are on screen, out of those on this device that match your search and filters. More load as you scroll.
- Sync arrow — tap it to check your store for changes now.
A low count, and starting over
- On a new device the second number can start low, while your catalogue is still downloading.
- Press and hold the sync arrow for Clear and Refresh, which clears the products on this device and downloads them again. It also clears the search and resets the filters. See Refresh, or start over.
Display settings
Press the settings button beside the search field to open Product Settings.
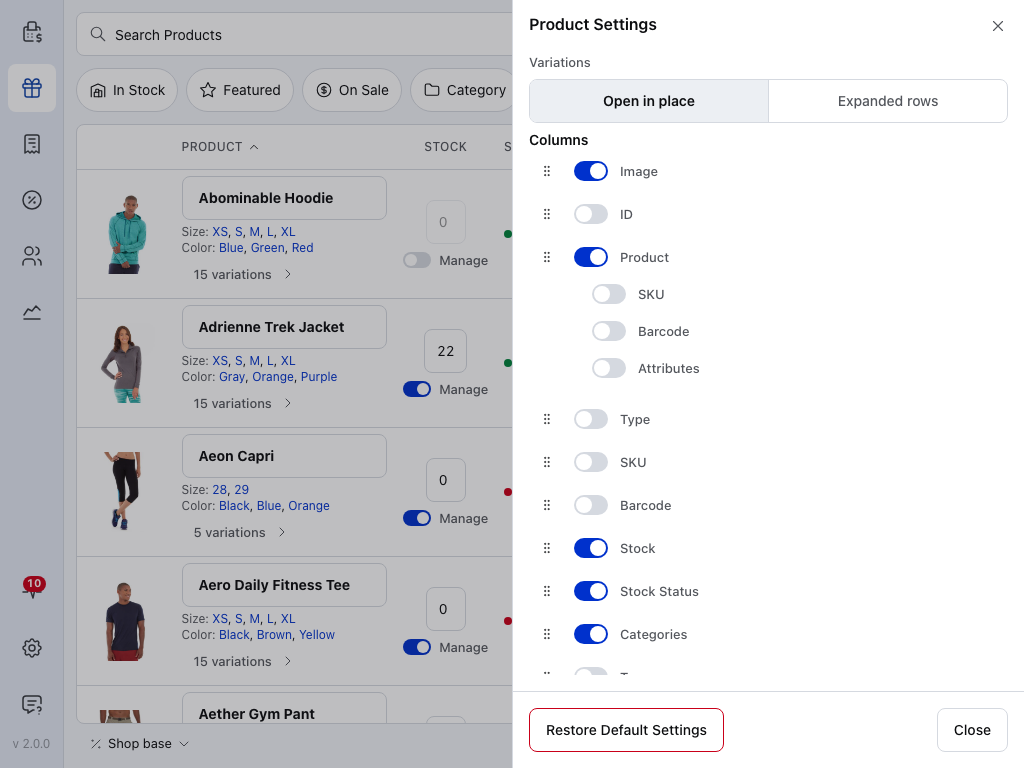
- Open in place — a variable product's options fill the list. Where a new device starts.
- Expanded rows — the options open as rows under the product.
- Restore Default Settings — puts the columns back. See Restore Default Settings.
- Close — your choices are kept.
Variations here is the same setting as on the Product Panel: change it in one place and the other follows. Your choices apply on this device only.
Columns
Each column has a row under Columns: the dotted handle at the left, then a switch, then the column's name. Turn the switch on to show the column, or off to hide it. Drag a row up or down by its handle to move that column left or right in the table. Product has three extra lines you can show under the name: SKU, Barcode and Attributes. Price, Regular Price and Sale Price can each show the tax as well.
Available columns and their defaults
| Column | Shows | On for a new device |
|---|---|---|
| Image | The product's picture | Yes |
| ID | The product's ID in WooCommerce | No |
| Product | The name, and for a variable product its options | Yes |
| Type | Simple, variable and so on | No |
| SKU | The SKU | No |
| Barcode | The barcode | No |
| Stock | The quantity, with the Manage switch | Yes |
| Stock Status | In stock, out of stock or on backorder | Yes |
| Categories | The product's categories | Yes |
| Tags | The product's tags | No |
| Brands | The product's brands | No |
| Cost of Goods Sold | The cost, if your store uses it | No |
| Price | The price the till charges | Yes |
| Regular Price | The price when not on sale | Yes |
| Sale Price | The sale price | Yes |
| Date Created | When the product was added | No |
| Date Modified | When it last changed | No |
| Actions | The › that opens the product's edit dialog | Yes |
Restore Default Settings
Restore Default Settings, at the bottom of Product Settings, puts the columns back as a new device has them.
If something goes wrong
- A product isn't in the list — check the filters, then search for it by name or SKU. A product marked online only never reaches the POS: see POS Only Products.
- A price or stock level looks out of date — open the product and press Sync, or tap the sync arrow under the list.
- Not saved — the change didn't reach the product. Check the value and try again. If it keeps failing, hover or press and hold the field: if its tip says You don't have permission to edit products, see If you can't change a field. If your store refuses a change, the POS puts the field back to the store's value and the log shows Reverted a change your store rejected.
- A field is greyed — your account isn't allowed to change it. See If you can't change a field.
- Sale Price can't be changed — the product isn't on sale. Add a sale price in its dialog.
- There's no Delete button — your account isn't allowed to delete products. The Cashier role isn't by default; an administrator can grant it in WP Admin → POS → Settings → Access.