Sell
The POS is where you sell. Products sit on one side, the cart on the other, and a menu runs down the edge for everything else. This page is a map of the screen: each part links to the page that explains it.
Jump to a task: Find a product · Take payment · Open the register · Open your cashier sheet
Find your way around
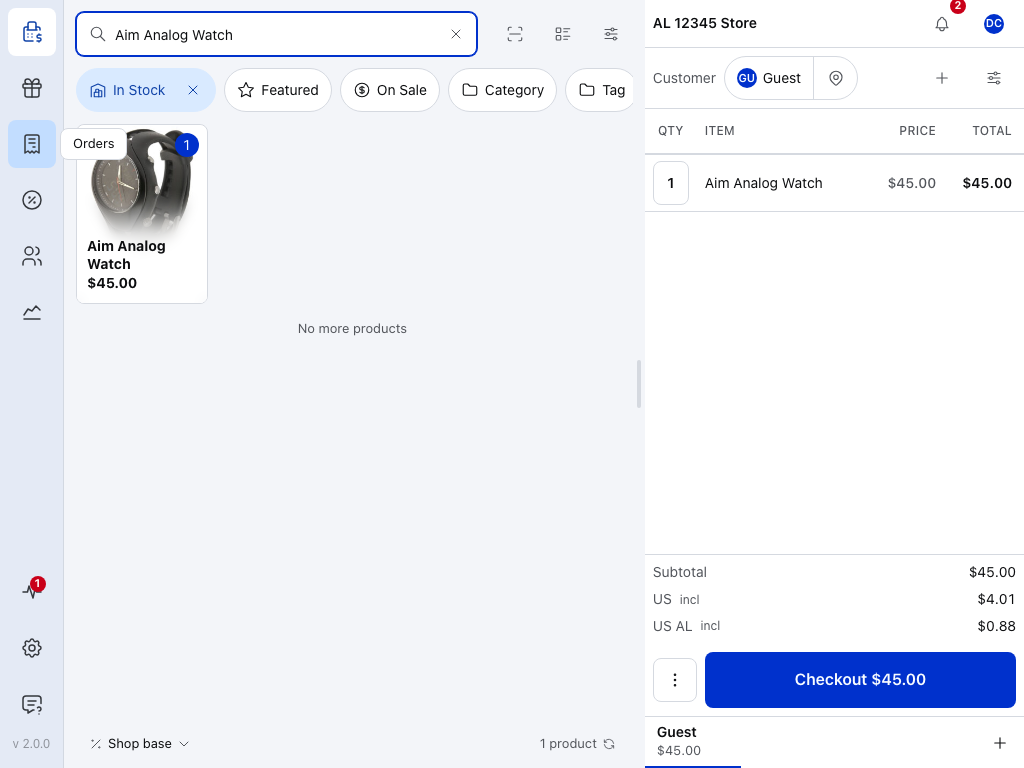
- The menu — one icon per screen. Point at an icon to see its name. See The menu.
- Store health — check how this device is keeping up with your store, and any problems it has logged. A red number means new errors in the logs. See Store Health.
- Settings — this device's settings: language and money format, tax display, printers, card readers, the customer display, scanners, the theme. See Settings.
- Support — the WCPOS Discord chat, inside the app. See Support.
- Product Panel — search, filter and tap a product to add it. See Product Panel.
- Divider — drag it to give the products or the cart more room. The POS remembers the width on this device.
- Cart — the sale you're ringing up, with the customer, the lines, the totals and Checkout. See The Cart.
- Register bar — the store you're selling for, and the register when the store has more than one. See The bar at the top.
- Bell — notices from WCPOS: plugin updates, licence reminders, announcements. See Notifications.
- Your avatar — opens your cashier sheet. See Your cashier sheet.
The version under the menu, v 2.0.0 here, opens About WCPOS.
The menu
On a tablet or a computer the menu is a rail of icons down the left edge, always on screen. On a phone it hides behind ☰ at the top left and slides over the screen with the names written out. Tap a name to go there.
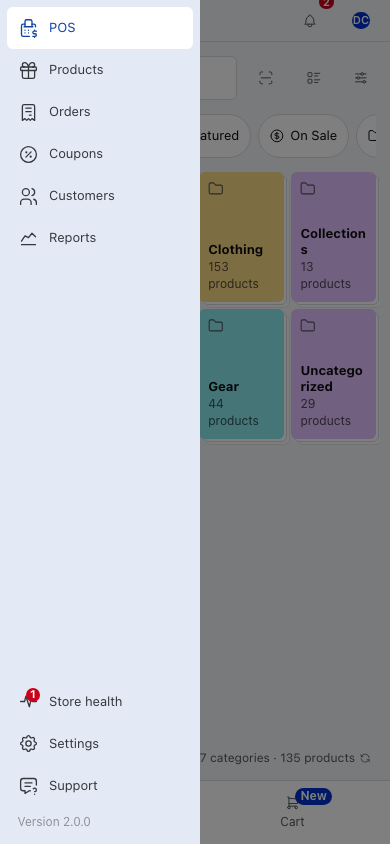
- POS — the till, where you sell. See Checkout.
- Products — stock, prices and product details. See Products.
- Orders — past orders: look one up, reprint the receipt, refund it. See Orders.
- Coupons — your store's coupons. See Coupons.
- Customers — add and edit customers. See Customers.
- Reports — the day's takings by payment method and cashier, and the register closures. See Reports.
- Store health — how this device is keeping up with your store, and any problems it has logged. See Store Health.
- Settings — this device's settings. See Settings.
- Support — the WCPOS Discord chat, inside the app. See Support.
On the free plugin, Products, Orders, Coupons and Customers are previews you can't change.
What changes with WCPOS Pro?
On the free plugin, Products, Orders, Coupons and Customers open as a blurred preview with an Upgrade to Pro panel. You can still pick a customer and apply a coupon in the cart. Reports shows today on your register.
With WCPOS Pro, Products, Orders, Coupons and Customers open for editing, Reports goes back beyond today, for every register and store you're allowed to see, and with several stores you switch between them from the bar or your cashier sheet.
See Free vs Pro.
About WCPOS
Tap the version at the foot of the menu. About WCPOS lists what this device is running, which is the first thing support will ask for.
Details to give support
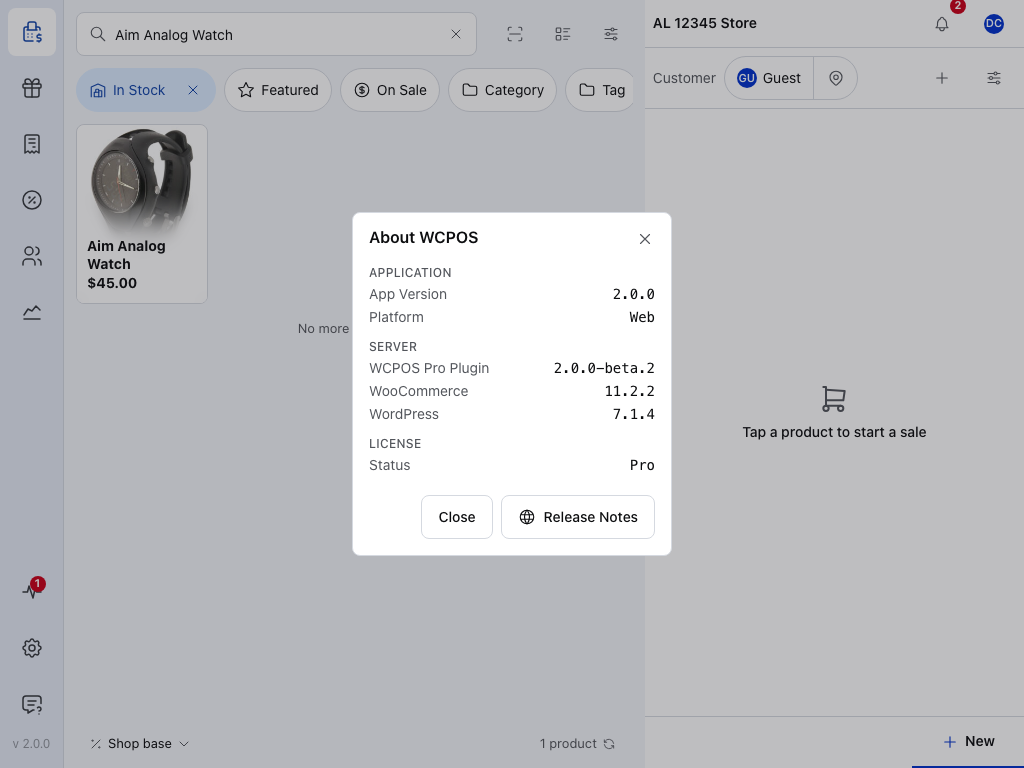
- Application — the app's version and where it runs: Web, Desktop, iOS or Android.
- Server — the version of the WCPOS plugin on your site (or WCPOS Pro, when it's installed), WooCommerce and WordPress.
- License — Free or Pro.
- Release Notes — what changed in each version, on wcpos.com.
On a phone
On a phone, or in a narrow browser window, products and cart sit on two tabs at the bottom. The bar keeps its place at the top, with ☰ for the menu.
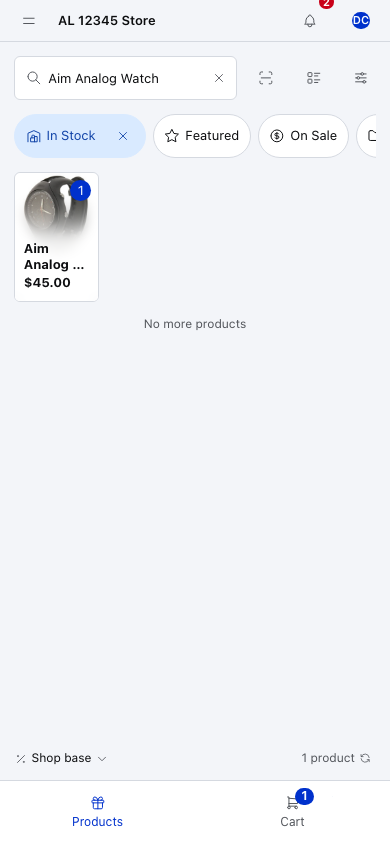
- ☰ Menu — opens the menu.
- Register bar — the store, and the register when there's more than one.
- Bell — notifications.
- Your avatar — your cashier sheet.
- Products — the Product Panel.
- Cart — the sale, with a count of what's in it. Checkout starts from here.
The other screens change shape too. On a touch screen, Products, Orders, Coupons and Customers list each record as a row with › at its end, where a mouse gets a table. On a phone, tapping a row opens the record as a page of its own; ✕ brings you back to the list.
See the Products list on a phone
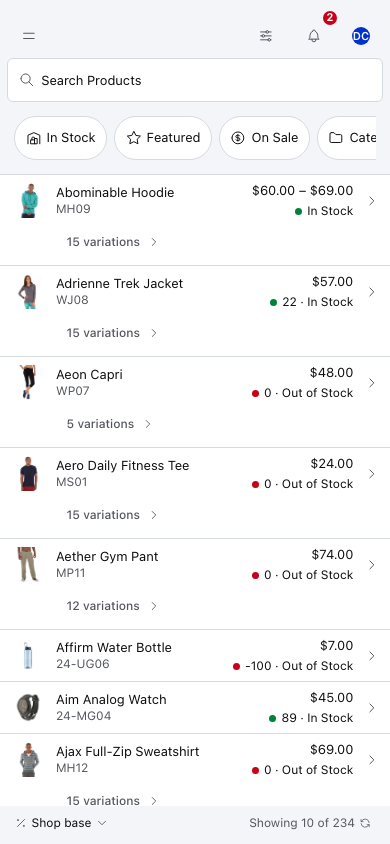
- ☰ Menu — every screen has it on a phone.
- Search — the box names the screen you're on: Search Products, Search Orders and so on.
The bar at the top
Every screen has a bar across the top, and the bell and your avatar are always at its end.
On the POS it's the register bar: the store you're selling for, and the register's name when the store has more than one. With WCPOS Pro and several stores, tap the store name to change store. When something needs your attention, a status sits beside the name.
What the register status means
- Closed, Counting, Approval needed or Overdue — where the register is in its day. See Open the Register.
- Choose register or No register — this device isn't on a register yet. See Choosing a store and a register.
- Offline, or Offline · 2 sales to send — see Offline in the bar below.
- 1 sale awaiting store — a sale the store hasn't confirmed yet. It goes by itself; there's nothing to do.
An open register with nothing to say shows no status.
The bar on other screens and the desktop app
On Products, Orders, Coupons and Customers, the search box takes the title's place and names the screen. Reports puts its store and register choice there instead.
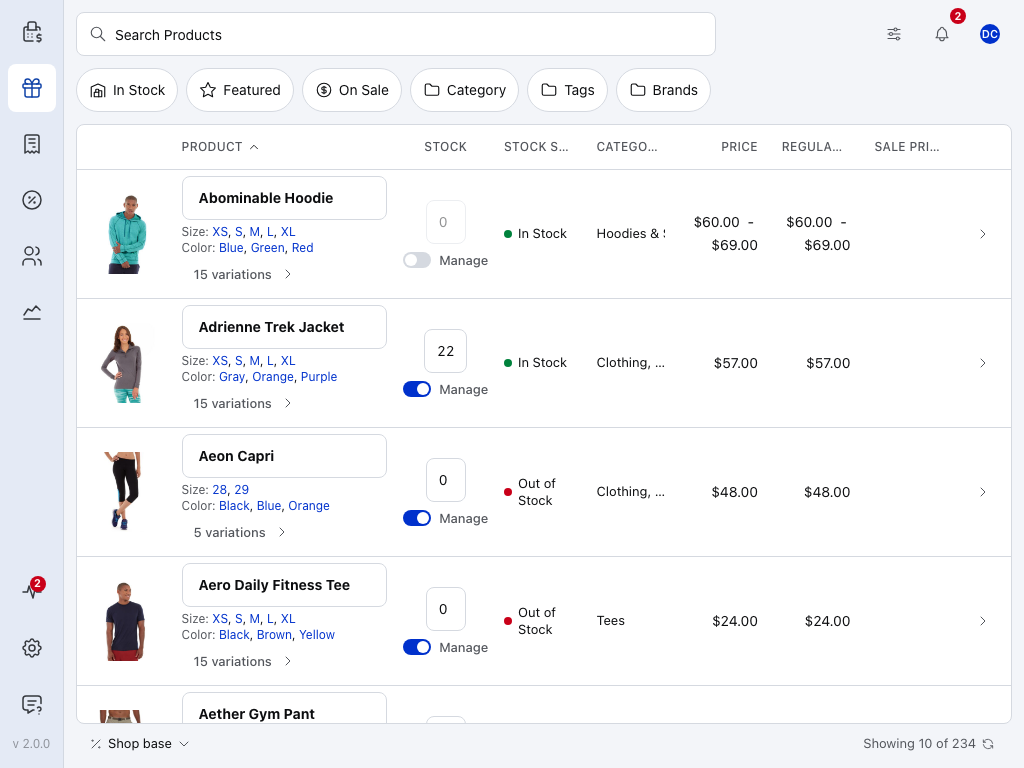
- Where you are — the lit icon in the menu.
- Search — finds records on this screen.
- Display options — which columns the list shows. See Display Settings.
- Bell — the same notifications as on the POS.
- Your avatar — the same cashier sheet, from any screen.
In the desktop app the store name, the status, the bell and your avatar move up into the window's title bar. They come back to the bar when the window is full screen.
Your cashier sheet
Tap your avatar on any screen and your cashier sheet slides in from the right. On a phone it fills the screen.
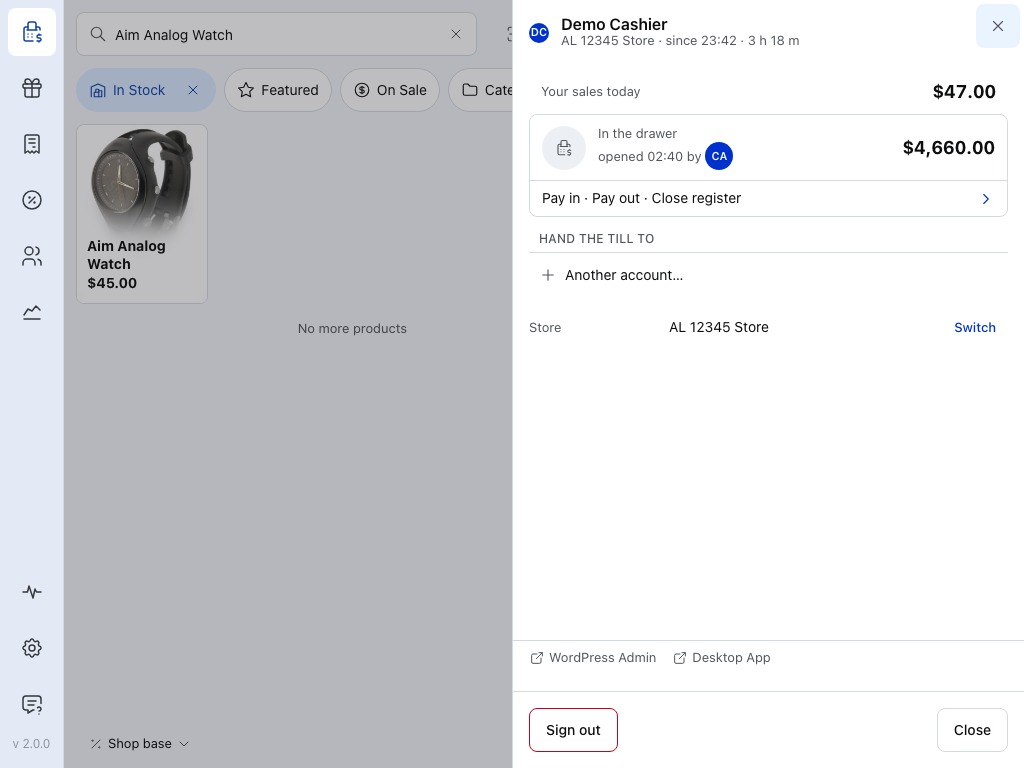
- Your sales today — what you've rung up.
- In the drawer — the cash the register expects. Without permission to view reports it shows a number of sales instead of money. Tap it for pay in, pay out and closing. See Open the Register.
- Hand the till to — pass the till to another cashier without closing the drawer. Tap their name, or Another account… to sign them in. See Open the Register.
- Store · Switch — move to another store (WCPOS Pro, with several stores). Register · Switch sits below it when the store has several registers.
- WordPress Admin — opens your site's admin in a new tab, for a manager who has access to it.
- Desktop App — the download page for the desktop app. These two links only show in a browser.
- Sign out — if the register is open, the POS asks whether to close it first.
Keyboard shortcuts
With a keyboard, in a browser or the desktop app, these work anywhere on the POS screen, even while you're typing in a field. On a Mac, hold Option (⌥) instead of Alt.
Show keyboard shortcuts
| Shortcut | What it does |
|---|---|
Alt + F | Search products |
Alt + P | Checkout |
Alt + N | New cart |
Alt + ← / Alt + → | Previous cart / next cart |
Alt + D | Add discount |
Alt + V | Void order |
Alt + / | Show the shortcuts |
Esc | Back from checkout to the cart, when you're not typing in a field |
A shortcut only does something when it makes sense: Checkout needs something in the cart. The keys can't be changed. See Keyboard Shortcuts.
If something goes wrong
Offline in the bar
This device can't reach your store: the internet is down, or your website isn't answering. Keep selling. Cash, and a card taken on your own terminal, still complete. The bar counts what's waiting as sales to send, and it goes to your store when it's reachable again. A card reader driven from the till and online gateways need the connection. See Offline Mode.
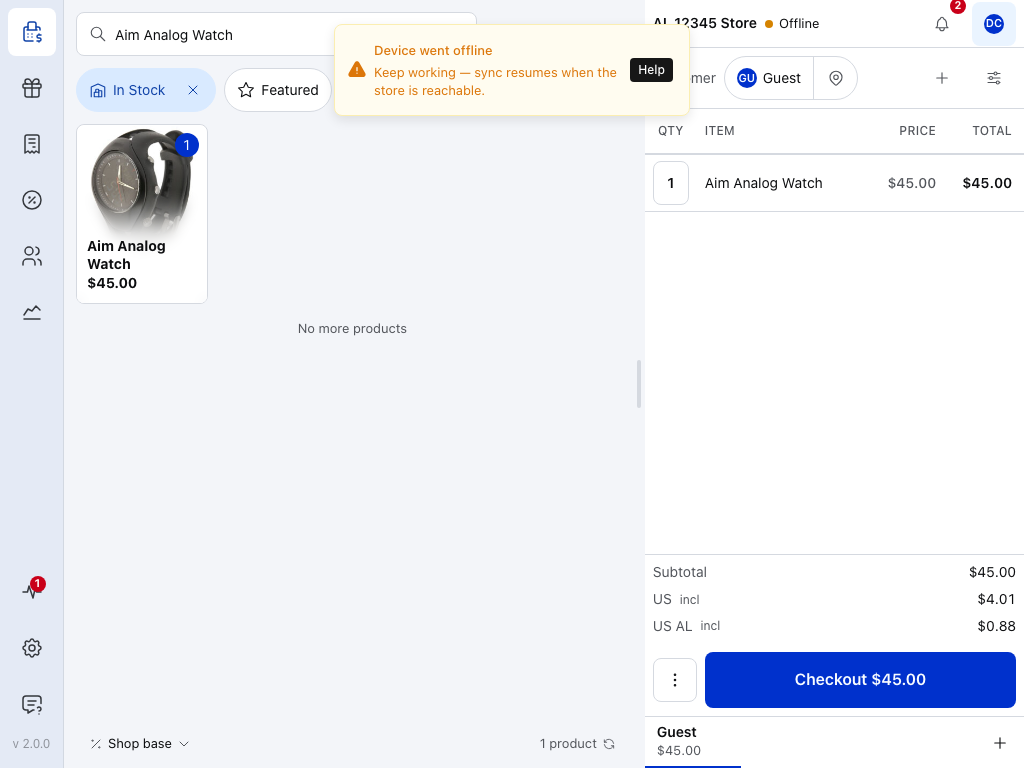
- Offline — stays until the store answers again.
- Store name — the store the sales will go to.
"Local database unavailable"
A banner over the products and in checkout says scanning, checkout, saving and voiding are blocked.
- Press Reload the app.
- If the app says it can't reload itself (some phone and tablet apps), close it completely and open it again.
- If it keeps happening, see Clear Local Data.
What went wrong
The device's own copy of your store has stopped working. View status on the banner opens the Database part of Store health.
A red number on Store health
New errors were logged on this device. Open Store health and its logs to read them; the number clears once you've opened the logs. See Logs.
"This screen doesn't exist"
The address is out of date, often an old bookmark. Press Back to the start: it goes to the POS, or to the screen where you connect your store if you're signed out.
A screen shows "Upgrade to Pro"
That screen needs WCPOS Pro. See What changes with WCPOS Pro? under The menu, or Free vs Pro.