Payment Gateways
WP admin: each gateway is a plugin you install in WordPress and turn on in WP Admin → POS → Settings → Checkout.
A payment gateway adds a way to pay at the till: a card terminal on the counter, a payment from the customer's phone, or an invoice they pay later. Each one is a WordPress plugin from WCPOS that you add to your store. To go straight to yours, see Choose a gateway.
For a customer who wants to pay with a method your online store offers, see Web Checkout; for Cash, Card and the other ways the till takes payment, see Payment Methods.
Gateways need WCPOS Pro. Without it, the till takes Cash and Card only.
Where a gateway shows at checkout
Press Checkout and the tender pane opens on Payments. A gateway marked Payments in the list below gets its own tile there, next to Cash and Card.
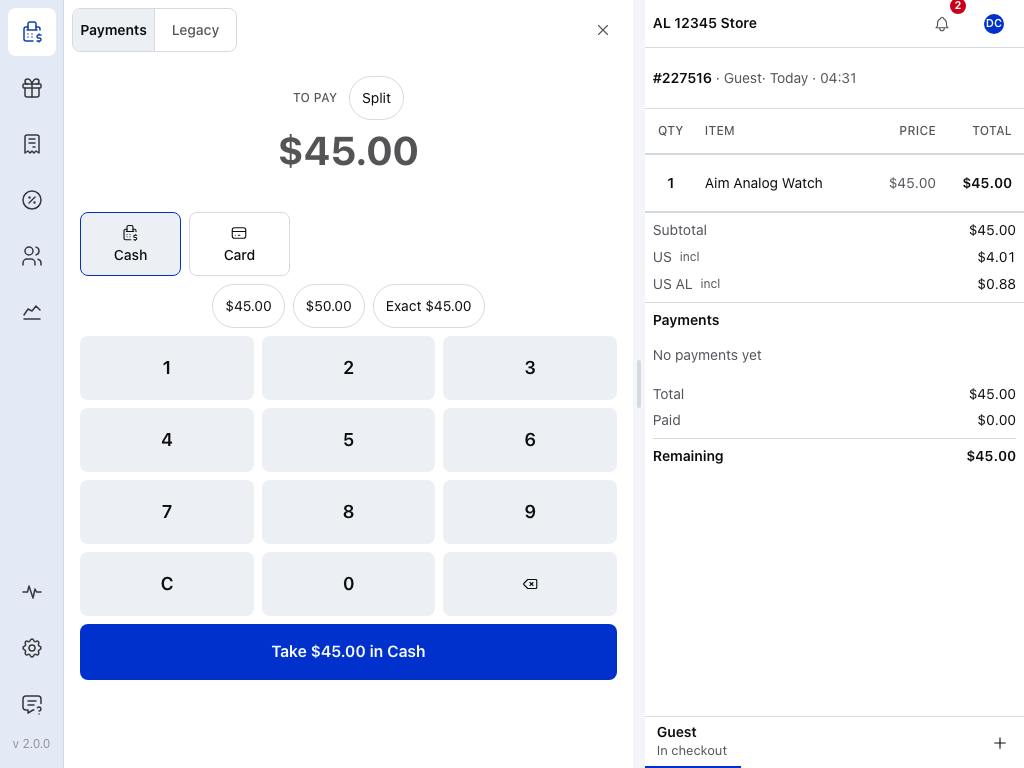
- Payments — the tender pane. Every payment method with a tile is here. See The Tender Pane.
- Cash — counts the change for you. Comes with every store.
- Card — for a card machine that isn't connected to the POS: take the card on the machine, then record it here. Comes with every store.
- Legacy — gateways that run on their own payment page. See The Legacy Tab.
Gateway tiles sit in the order set in Checkout Settings. A tile the till can't use right now folds into a line under the tiles: Stripe Terminal is not available right now, or 2 not available right now for more than one. Tap the line to see why.
WooCommerce's cash on delivery, bank transfer and cheque gateways get a tile too: you record them at the till, like Card. See Payment Methods at the Till. Any other gateway is on the Legacy tab, which opens your store's own pay page for the order inside the POS. A Legacy gateway takes the whole order, so it can't be one part of a split payment.
Taking a payment on the Legacy tab
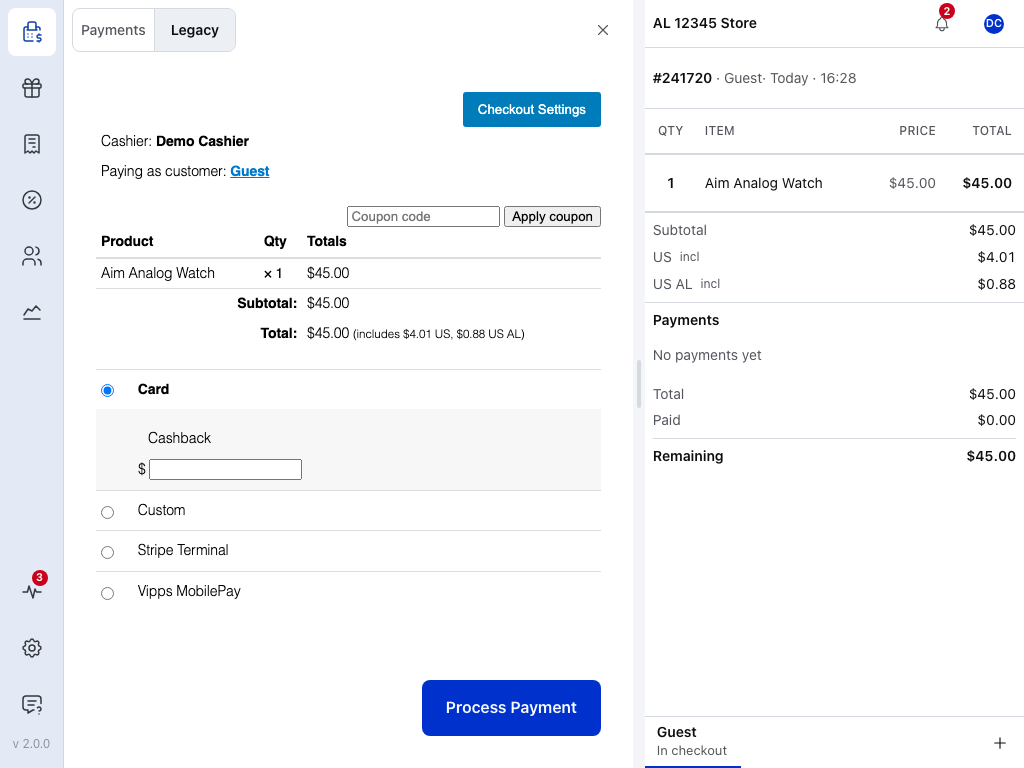
- Legacy — the tab is always there. With no gateway to offer, it says so.
- Payment page — your store's own pay page for this order. Choose the gateway and fill in what it asks for.
- Process Payment — sends the payment to the gateway.
Choose a gateway
Card terminals
The customer taps, inserts or swipes a card on a terminal from your payment provider. The till sends the amount to the terminal and records the payment when the provider confirms it.
| Gateway | At checkout |
|---|---|
| Stripe Terminal | Payments, 2.0+ |
| SumUp Terminal | Payments, 2.0+ |
| Mollie Terminal | Payments, 2.0+ |
| Square Terminal | Payments, 1.0+ |
| Mercado Pago Terminal (Point Smart) | Payments, 1.0+ |
| Windcave Terminal | Payments, 1.0+ |
| PayArc Terminal (PAX) | Payments, 1.0+ |
| PayPal Reader (Zettle) | Legacy, every version |
The number is the oldest version of the gateway plugin that has a tile. An older version is on the Legacy tab. Which readers work on which device is on Card reader compatibility.
Phone payments
- Vipps MobilePay — the customer scans a QR code on screen, or confirms a request on their phone, in the Vipps or MobilePay app. On the Legacy tab.
Pay later
The order is saved unpaid, and the customer pays it online afterwards.
- Email Invoice — the customer gets an email with a link to pay the order. On the Payments tab from version 0.1.0; an older version is on Legacy.
- Web Checkout — the customer pays on your web store's checkout. On the Legacy tab.
Add a gateway to your store
You do this once, in WordPress, as the store owner: install the gateway, connect your account, turn it on for the POS, then reload the POS. Each gateway's page has its own settings.
Store owner: install, enable or fix a greyed-out gateway
- Install it. In
WP Admin > POS > Settings > Extensions, find the gateway, press Install, then Activate. Or download the plugin zip from the gateway's GitHub releases page and upload it inPlugins > Add Plugin, then Upload Plugin. Web Checkout isn't in the Extensions list, so it's always a zip. See Extensions. - Connect your account. Open the gateway in
WP Admin > WooCommerce > Settings > Paymentsand enter the keys from your payment provider. If the gateway has a test mode, take a test payment before going live. - Turn it on for the POS. In
WP Admin > POS > Settings > Checkout, switch on Enabled for the gateway, and drag it to where you want its tile. It doesn't have to be switched on for your web store. See Checkout Settings. - Reload the POS. The till reads your payment methods each time it starts.
Install is greyed out, with Requires Pro to install. Installing from Extensions needs WCPOS Pro.
The Enabled switch is greyed out. Every gateway but Cash and Card needs WCPOS Pro, activated with your licence key. See Pro License.
If something goes wrong
The gateway isn't at checkout. Look on the Legacy tab first. If it isn't there either, check that Enabled is on in Checkout Settings, then reload the POS. If the switch is greyed out, open Store owner: install, enable or fix a greyed-out gateway under Add a gateway to your store.
It's on the Legacy tab, not a tile. That's where PayPal Reader, Vipps MobilePay and Web Checkout always go. For a terminal listed above with a version, check the installed version against the table. If it's older, update it: its card in Extensions shows Update available when there's a newer one.
The tile is under "not available right now". Tap the line: each gateway shows why, such as Needs a connection while you're offline. Finish the sale with another method meanwhile.
A payment fails. If the till names PAYMENT301, the store refused the gateway: it isn't enabled for the POS, or it's gone. See PAYMENT301. A failure on the terminal or at the provider is on the gateway's own page, with its error messages and fixes. To report a fault, see Support.
Build your own gateway
For developers: any WooCommerce payment plugin can be wrapped for the POS. Start from the Gateway Template.