General
WP admin: WP Admin → POS → Settings → General, for every till.
General is the first screen of the POS settings in WordPress: WP Admin > POS > Settings > General. It holds the store-wide choices every cashier's POS works with. Each change saves as soon as you make it, and a Saved message confirms it. There's no Save button.
A user with Manage POS settings (an Administrator or Shop Manager by default) can open this screen. A cashier can't. See Accessing the POS.
Where these settings show up in the POS
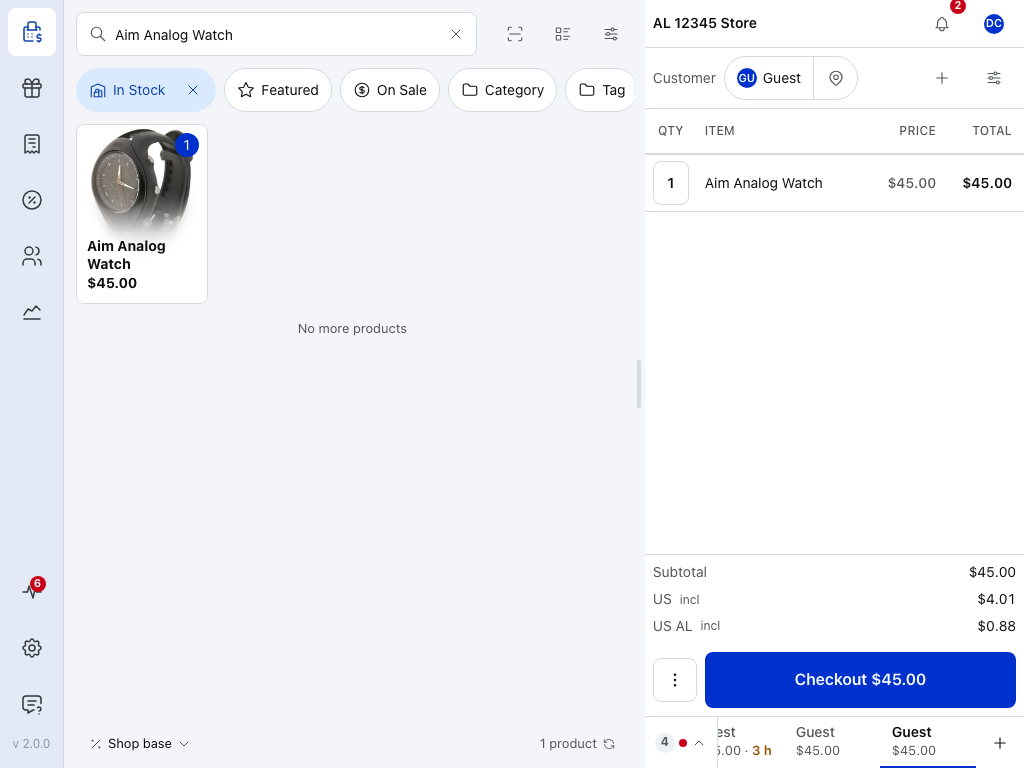
- Register bar — your store, plus the register's status while Open and close the register is on.
- Search — scans find products by the field set in Barcode Field.
- Products — Online Only products stay out while POS only products is on.
- Customer — the Default POS customer, here Guest; tap to choose someone else.
- Quantity — takes a fraction such as 0.5 only with decimal quantities on.
The screen runs from top to bottom in the order below: Store details, Register, Products, Customers, Privacy and Advanced. Here is the top of it on the free plugin:
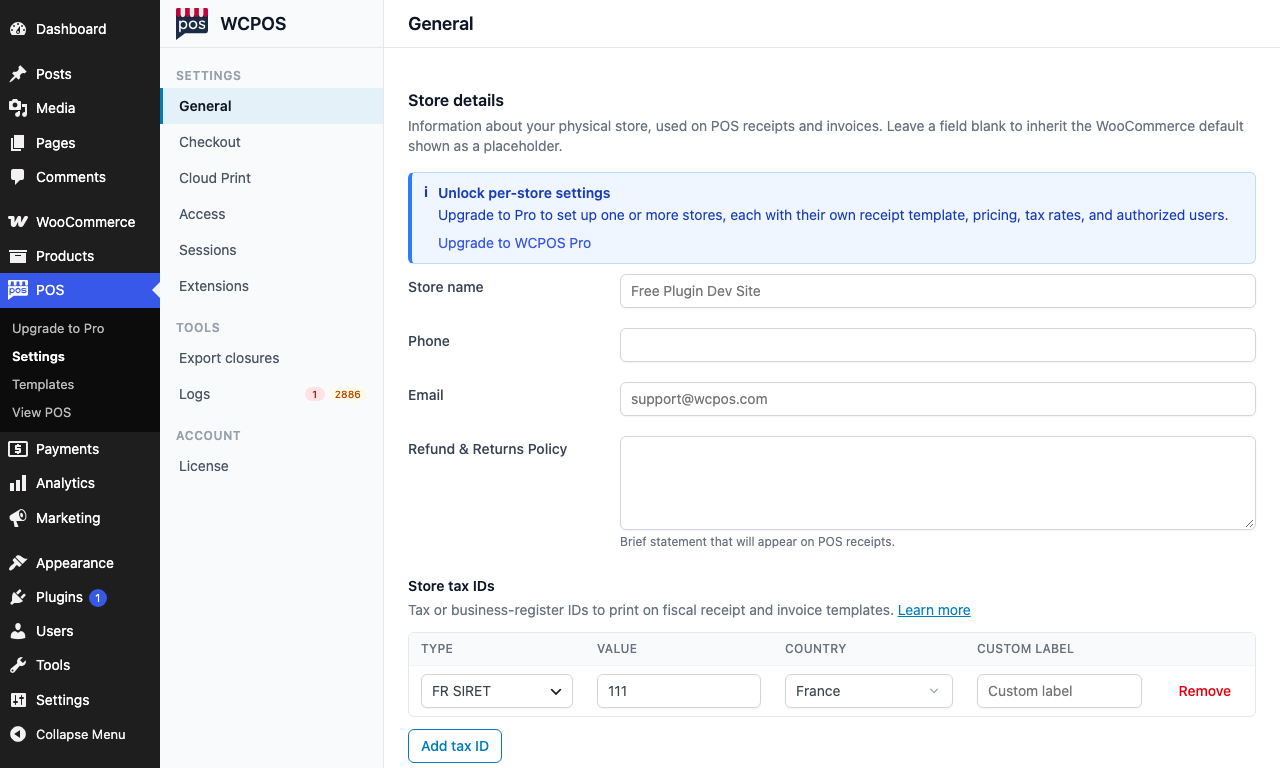
- General — the first screen under Settings in the WCPOS menu.
- Store details — the name, phone, email and returns policy your receipts print. See Store details.
- Store tax IDs — your business's tax numbers. See Store Tax IDs.
- Add tax ID — adds a number to the list.
Store details
Who your store is on POS receipts and invoices: Store name, Phone, Email and Refund & Returns Policy, a short statement printed on POS receipts.
Leave a field blank to use the default shown in grey inside it. If that field is filled in under WooCommerce's own Point of Sale settings (WooCommerce 10.5 and later), that value is the default. Otherwise:
| Field | Default when left blank |
|---|---|
| Store name | Your WordPress site title |
| Phone | None |
| The "From" address of your WooCommerce emails, then the WordPress admin email | |
| Refund & Returns Policy | None |
Store tax IDs sit below these fields: the VAT number, ABN, GSTIN or other business numbers that print on receipts and invoices. See Store Tax IDs.
Once you've created stores, this block becomes a Stores list, and each store keeps its own details, receipt template, prices, tax rates and users. See Setting up stores.
Register
Open and close the register turns register sessions on: cashiers open with a float, record cash in and out, and count the drawer at close. Off, the POS sells without a session.
While it's on, three more lines appear: Opening float, Ask a manager when the count is out by more than … and Remind the cashier to close at …. Register settings explains each one. The free plugin has one register; More registers and stores with Pro links to the upgrade.
Products
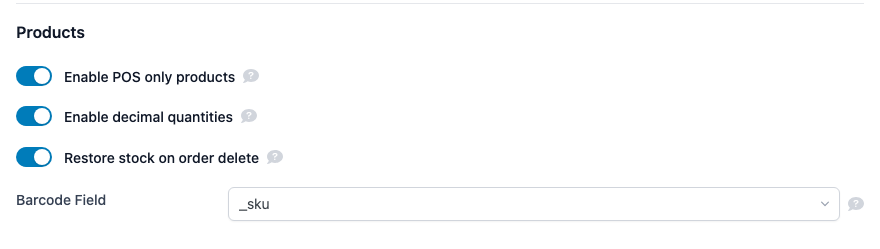
- Enable POS only products — adds the POS-only visibility choice to products. See below.
- Enable decimal quantities — lets a line's quantity be a fraction. See below.
- Restore stock on order delete — puts stock back when the POS deletes an order. See below.
- Barcode Field — where scans look for the barcode, here
_sku. See Barcode Field.
Enable POS only products
Adds a visibility choice to every product in WP Admin: POS & Online, POS Only or Online Only. A POS Only product is hidden from your online store, and an Online Only product is hidden from the POS.
Leave it off if every product sells in both places. Switching it off hides nothing, and each product keeps its choice for when you switch it back on. See POS Only Products to set visibility on one product or many.
Enable decimal quantities
Lets a line's quantity be a fraction, such as 0.25, 1.5 or 2.75. Use it for things sold by weight, length or time: 0.5 kg of coffee beans, 1.5 hours of labour.
With it on, the quantity keypad in the cart gets a decimal point. With it off, there's no decimal point, and your store refuses an order that has a fractional quantity.
WCPOS doesn't connect to a weighing scale or read weights from one. Weigh the item, then type the weight as the line's quantity: for a product priced per kilogram, 350 g is a quantity of 0.35.
WCPOS also doesn't read the weight or price encoded in the barcode labels that some scales print.
Restore stock on order delete
On by default. When an order is moved to the trash or deleted from the POS, the stock of its products goes back up, so removing a mistaken sale puts the items back on the shelf.
Orders deleted in WP Admin don't get their stock back. Restoring an order from the trash doesn't take the stock back out.
Turn it off if you count stock another way and don't want deleted orders to change it.
Barcode Field
Choose where your product barcode numbers are saved. When a cashier scans a barcode or types one into Search products, the POS finds the product whose barcode is in that place.
Pick that place from the Barcode Field list. Most stores use one of two:
- WooCommerce's barcode field, the default. It's the GTIN, UPC, EAN or ISBN box on the product's Inventory tab, and the one to use on a new store. The list shows it as
_global_unique_id. - The product's SKU, if your barcodes are your SKUs. The list shows it as
_sku.
If a barcode plugin saves your codes, choose that plugin's field instead. If your plugin's field isn't listed, open Plugin and custom barcode fields below to find the name to enter.
Plugin and custom barcode fields
Common plugins → meta key
If a barcode plugin stores your codes, use its meta key instead:
| Plugin or field | Meta key |
|---|---|
| WooCommerce GTIN, UPC, EAN or ISBN (default) | _global_unique_id |
| Product SKU | _sku |
| EAN plugins (European Article Number) | _ean, _ean13, _ean8 |
| EAN for WooCommerce (WPFactory's EAN Barcode Generator) | _alg_ean, unless you changed Meta key in its Advanced settings |
| UPC plugins (Universal Product Code) | _upc, _upc_code |
| GTIN plugins (Global Trade Item Number) | _gtin, _gtin13, _gtin14 |
| Generic barcode fields | _barcode, _product_barcode |
| WooCommerce Product Barcodes | _barcode_text |
| ATUM Inventory | _atum_barcode |
The Barcode Field list offers every meta key your products and variations already use, plus _sku and _global_unique_id. A field that isn't listed needs its exact stored name (the meta key), not the name the plugin shows on screen. Type it exactly, including a leading underscore if it has one, and choose Create "…".
Finding your plugin's meta key
- Edit a product in WP Admin and give it a barcode with your plugin.
- Look up the meta key name in the plugin's documentation.
- Or look in the
wp_postmetatable of your database for the key that was created for that product.
When you change the field, the POS rebuilds its barcode lookups on its next sync, so scans match the new field. You don't need to clear anything by hand.
Customers
Automatically generate username from customer email
On by default. When a cashier adds a customer in the POS, WooCommerce makes the username from the customer's email address. Off, the cashier types a username in the customer form. The POS setting applies only to customers added in the POS; your online checkout keeps its own WooCommerce setting.
Default POS customer
The customer every new cart starts with, and the details it fills in. Guest means the order belongs to no account. Search the dropdown to pick any WordPress user instead, for example a "Walk-in customer" account you made for counter sales. If the dropdown is greyed out, turn off Use cashier account below.
The cashier can always change the customer in the cart. See Choose the customer.
Each POS copies Default POS customer and Use cashier account when it first loads your store, and each device can change both in its own Settings. A device that has already loaded your store keeps its copy: to give it a new choice made here, use Restore server settings on that device.
Use cashier account
Tick it to start every new cart with the cashier who is signed in as the customer. While it's ticked, Default POS customer is greyed out.
Let customers download receipts
Off by default. On, your online store's My Account > Orders gets a Receipt button, so customers can download their own receipt as a PDF made with your WCPOS receipt template. It shows on orders that are processing, completed or refunded.
Turning it on shows Receipt template for customers. It starts on Use active receipt template, so customers get the same receipt as the POS; pick another template to give them a different one, such as a full-page invoice. See Online Store Receipts.
Tax IDs
WCPOS saves a customer's tax number on their account and copies it onto their orders at checkout. Check this section to see which tax plugin it found: Auto-detected names the plugin and needs nothing from you; No plugin detected means WCPOS uses its own built-in field. Only if your plugin uses a custom field name, set it under Advanced: use a different field name. See Customer Tax IDs.
Privacy
Allow anonymous usage data and error reports lets WCPOS learn about your setup and what goes wrong, to find bugs. Until you choose, the section asks you with Allow and No thanks. You can change your answer at any time.
Learn what's collected opens the full list on the screen.
What's collected
- Collected: your setup (PHP and WooCommerce versions, country, currency), your store's size (roughly how many products, orders and POS users), which screens and features you use, and errors with the versions involved.
- Never collected: customer details, order contents, prices, your site address, or anything that could identify you or your customers.
Advanced: Force SSL
On by default. It keeps the POS on a secure connection, so leave it on.
What Force SSL does
The POS opens over HTTPS: someone who goes to your POS page over plain http:// is sent to https://, and the POS links WCPOS builds use https://. Turn it off only if your site has no SSL certificate.
If something goes wrong
"Your store is behind Cloudflare" at the top of the screen : Your site runs through Cloudflare, and its security checks can stop the POS reaching your store. If the POS shows HOST121 or a security check, follow How to add the rule. See Cloudflare.
Scans don't find products after you change Barcode Field : The POS rebuilds its barcode lookups on its next sync. To start over now, press and hold the sync arrow beside the product count in the POS and choose Clear and Refresh. See Refresh, or start over.
An order with a quantity like 0.5 won't save : Turn on Enable decimal quantities.