# Customise Your Receipt
**WP admin:** `WP Admin → POS → Templates`.
Your receipt comes from a template. To change how it looks, pick another template, have AI change one for you, or edit one by hand. Start with the first: most stores never need the other two.
Need a different receipt for one sale only? The cashier chooses it under **Template** on the receipt screen: see [What cashiers see at the till](#at-the-till).
## Three ways to customise[](#three-ways-to-customise "رابط مباشر إلى Three ways to customise")
All three start in WP Admin at **POS → Templates**. The **Receipts** tab has two parts: **Your Templates** at the top, the ones cashiers can print, and the **Template Gallery** below it, the ready-made starters.
Changing your logo, thank-you line or footer? Start with your settings, not the template: see [Common customisations](#common-customisations).
* **[Pick a different template](#option-1--pick-a-different-template)**: a ready-made template from the gallery, **no code at all**. Best for a different layout, hiding prices, an A4 invoice or a kitchen ticket.
* **[Ask AI to tweak it](#option-2--ask-ai-to-tweak-it)**: paste the template into ChatGPT or Claude and say what you want in plain words, **no coding needed**. Best for wording, colours and moving things around.
* **[Edit it by hand](#option-3--edit-it-by-hand)**: change the template in the editor, with a live preview. Best for precise control, or if you already know HTML.
## Option 1 — Pick a different template[](#option-1--pick-a-different-template "رابط مباشر إلى Option 1 — Pick a different template")
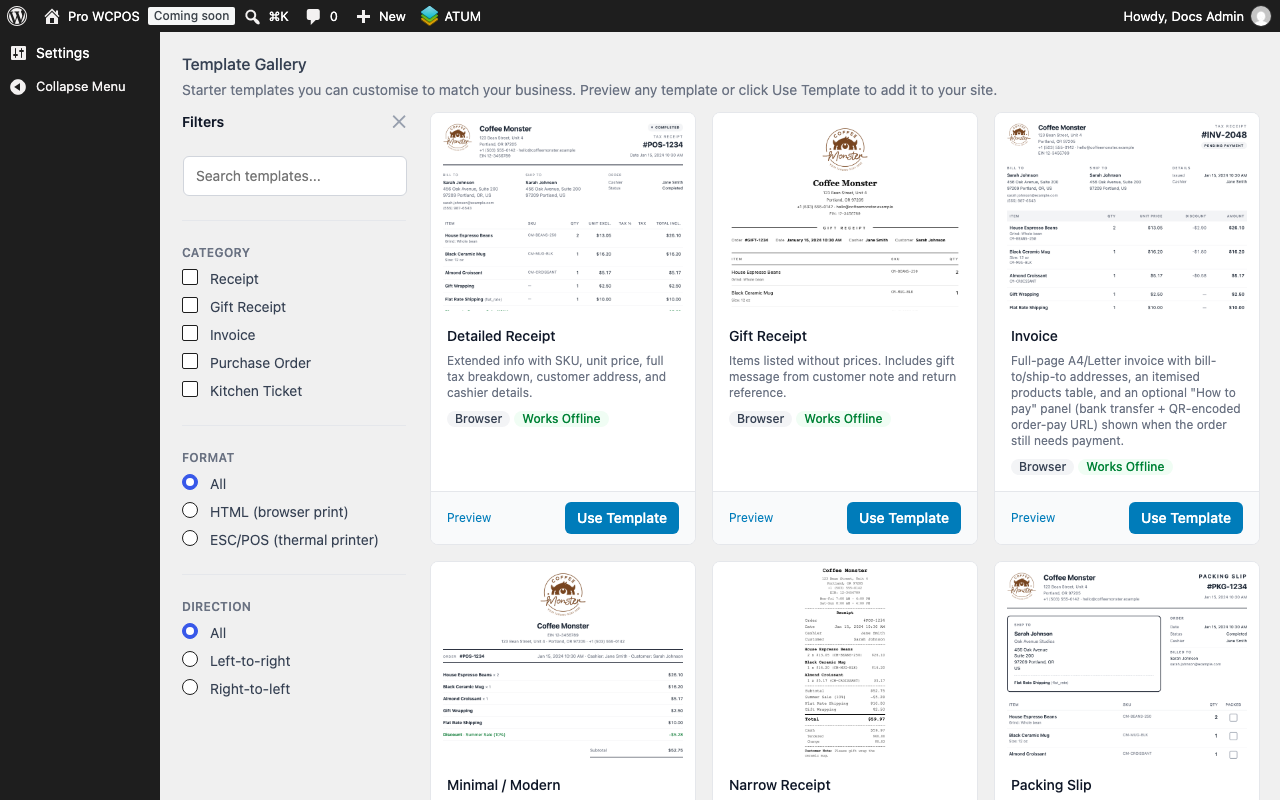
The **Template Gallery** sits below **Your Templates** on the **Receipts** tab:
12345678
1. **Template Gallery** — the ready-made starters. Using one never changes it.
2. **Search templates...** — finds a template by name.
3. **Category** — receipts, gift receipts, invoices, purchase orders or kitchen tickets. **Format** and **Direction** sit below it.
4. **Format** — browser or PDF, or a receipt printer: **HTML (browser print)** or **ESC/POS (thermal printer)**.
5. **The card's picture** — click it to see the template filled in.
6. **Tags** — how it prints, and **Works Offline** when the till can make it without reaching your site.
7. **Preview** — the same preview, with **Sample Data** or your latest **Order**.
8. **Use Template** — copies it into **Your Templates**, switched on.
1) In WP Admin, go to **POS → Templates** and scroll down to the **Template Gallery**.
2) Narrow the gallery with **Search templates...** or the filters beside it.
3) Click a card's picture, or **Preview** under it, to see the template filled in. **Sample Data** shows made-up items; **Order** shows your latest POS order.
4) Click **Use Template**. A copy lands in **Your Templates**, already switched on, and cashiers can print it from their next receipt.
**Your Templates**, at the top of the same tab, lists the templates cashiers can print. The one on top is the default, so while the built-in **Legacy PHP Template** is on top it stays the default until you move another template above it. Each row has:
* **≡ grip** — drag the row up or down.
* **Active** — the switch; off hides the template from cashiers.
* **↑ ↓** under **Actions** — move the row one place up or down.
* **Preview** — shows it filled in.
* **Edit** — opens the template in the editor. Only your own copies have it; the built-in **Legacy PHP Template** has no **Edit** or **Delete**.
* **Install new version** — with **Update available**, the gallery card has changed since you copied it. Adds the new version as a separate template and keeps your edits.
* **Delete** — removes your copy for good, after asking.
5. In **Your Templates**, put the one you want printed by default at the top: drag the ≡ grip on its row, or click its ↑ arrow under **Actions**. Turn **Active** off on any template cashiers shouldn't see.
Use Template never changes the original
Every click on **Use Template** makes a fresh copy, so the gallery card stays as it was. You can use the same card twice and try two versions side by side.
Search and filter options
* **Search templates...** — searches by template name.
* **Category** — **Receipt**, **Gift Receipt**, **Invoice**, **Purchase Order** or **Kitchen Ticket**.
* **Format** — **HTML (browser print)** or **ESC/POS (thermal printer)**.
* **Direction** — **Left-to-right** or **Right-to-left**.
* **Clear all filters** — starts again.
What each row in Your Templates shows
* **Category** — what the template is for, such as **Receipt** or **Invoice**.
* **Print** — **Receipt Printer** for a thermal template, **Browser** for an HTML one.
* **Paper** — the paper width the template is made for.
* **Mode** — **Offline** if the till builds it itself, **Server** if it needs your site.
* **Active** — on, and cashiers can print it.
* **Actions** — the ↑ and ↓ arrows move it up or down one place, which also works from the keyboard, and **Preview** shows it. Your own copies also have **Edit** and **Delete**. **Install new version** shows when the gallery has a newer version of the card you copied; it adds the new version as a separate template and keeps your edits.
What prints before you pick anything
Until you add a template, receipts use the built-in receipt, which shows in **Your Templates** as **Legacy PHP Template**. With WCPOS Pro and an active licence it's **Pro Receipt Template**, and if your theme overrides the receipt, **Theme Receipt Template** comes first. A gallery copy you switch on is a template like any other: put it at the top to make it the default.
### The bundled templates[](#the-bundled-templates "رابط مباشر إلى The bundled templates")
The gallery ships nine HTML templates, which print through the browser print window or as a PDF, and six thermal ones for a receipt printer. **Standard Receipt** covers most stores. See [Template engines](/ar/settings/receipt-templates.md#template-engines).
All 15 bundled templates, and what each is for
| Template | Format | What it's for |
| ------------------------------------- | ------- | --------------------------------------------------------------------------- |
| **Standard Receipt** | HTML | Logo, items, totals, payment. Covers most stores |
| **Standard Receipt (RTL)** | HTML | Same as Standard, mirrored for Arabic, Hebrew, Persian and Urdu |
| **Minimal / Modern** | HTML | Same information as Standard, in less space |
| **Detailed Receipt** | HTML | Full tax invoice: SKU column, unit price, tax by rate, addresses |
| **Gift Receipt** | HTML | Items only, prices hidden. Adds a gift message and the return policy |
| **Invoice** | HTML | Full-page A4 or Letter invoice. Adds a "How to pay" panel for unpaid orders |
| **Packing Slip** | HTML | Items and quantities, ship-to address, no prices |
| **Quote / Estimate** | HTML | Before the sale: prices and terms, no payment section |
| **Narrow Receipt** | HTML | Monospaced receipt for narrow paper or HTML-capable receipt printers |
| **Simple Thermal Receipt (58mm)** | Thermal | Clean 58 mm receipt |
| **Simple Thermal Receipt (80mm)** | Thermal | Clean 80 mm receipt, the most common size |
| **Simple Thermal Receipt 80mm (RTL)** | Thermal | Right-to-left 80 mm receipt. Needs a printer with an Arabic code page |
| **Detailed Thermal Receipt (58mm)** | Thermal | Adds tax breakdown, addresses, refunds, payments, terms and a barcode |
| **Detailed Thermal Receipt (80mm)** | Thermal | The same, on 80 mm paper |
| **Kitchen Ticket** | Thermal | Items only, large print, no prices, for the kitchen or prep station |
How the bundled templates show prices and tax
Bundled templates with prices follow **Display prices during cart and checkout** in **WooCommerce → Settings → Tax**. **Including tax** prints gross prices and a **Tax included** line; **Excluding tax** prints net prices with the tax on its own line. The **Detailed** templates always print a full tax summary.
### WP Overnight invoice and packing slip templates[](#wp-overnight-invoice-and-packing-slip-templates "رابط مباشر إلى WP Overnight invoice and packing slip templates")
If your site also runs [PDF Invoices & Packing Slips for WooCommerce](https://wordpress.org/plugins/woocommerce-pdf-invoices-packing-slips/) by WP Overnight, **Invoice (WP Overnight)** and **Packing Slip (WP Overnight)** appear in **Your Templates** too. They print only while the till can reach your site.
How the WP Overnight templates work
| Template | Format | What it's for |
| ------------------------------- | ----------------- | --------------------------------------------- |
| **Invoice (WP Overnight)** | Made on your site | WP Overnight's invoice for the POS order |
| **Packing Slip (WP Overnight)** | Made on your site | WP Overnight's packing slip for the POS order |
WP Overnight makes these documents itself, so invoice numbers, branding, tax fields and your WP Overnight layout match your online orders. They show only while that plugin is active, and open as a page in the WCPOS print screen, not as a PDF download.
In **Your Templates** their **Mode** is **Server**: the till must reach your site to print them. For printing offline, use a bundled HTML or thermal template.
## Option 2 — Ask AI to tweak it[](#option-2--ask-ai-to-tweak-it "رابط مباشر إلى Option 2 — Ask AI to tweak it")
If a gallery template is close but not quite right, an AI assistant can change it for you. You don't need to know HTML.
Keep your current receipt printing
The new copy starts switched on, so cashiers could print it while you're still editing. Step 1 switches it off first.
1. **Make a working copy.** Click **Use Template** on the gallery card you're starting from. In **Your Templates**, turn **Active** off on the new copy.
2. **Copy the template.** Click **Edit** on the working copy's row. Click in the code, select all (Ctrl/Cmd + A) and copy.
3. **Paste it into ChatGPT or Claude.** Open [ChatGPT](https://chat.openai.com) or [Claude](https://claude.ai) and paste the template.
4. **Say what to change**, in plain words, and ask it to keep everything in curly brackets unchanged. For example: *"Make the store name bigger and centred."*
5. **Paste the answer back and check the preview.** In the template editor, select all and paste the new version. The preview under the code updates as you paste: check that the store name, items, totals and payment still show. If something is missing or wrong, tell the AI what went wrong and try again.
6. **Save it.** Click **Update**.
7. **Switch it on.** In **Your Templates**, turn **Active** on for the new copy and move it to the top, with the ≡ grip or its ↑ arrow, to make it the default. Turn **Active** off on the receipt it replaces.
More example requests
* *"Add a thank-you message in italics at the bottom."*
* *"Hide the customer name. Put the phone number under the order number instead."*
* *"Add a QR code that links to my returns page."*
* *"Add the tagline 'Family-owned since 1987' under the store name."*
What about the bits in curly brackets?
`{{store.name}}` and `{{order.number}}` are **placeholders** for your real data. Ask the AI to keep them unchanged, then check that the receipt still shows the expected details. Every placeholder is listed in the [Receipt Data Reference](/ar/settings/receipt-templates/receipt-data.md).
## Option 3 — Edit it by hand[](#option-3--edit-it-by-hand "رابط مباشر إلى Option 3 — Edit it by hand")
If you know some HTML, or work with a developer, edit the template directly. Click **Edit** on its row in **Your Templates** to open the editor, or **Add New Template** at the top of the list to start from a blank one.
The editor shows the code, **Fields** on the left to search and insert placeholders, and a live preview under the code. Nothing is saved until you click **Update**.
Choose a template type:
* **[HTML Templates](/ar/settings/receipt-templates/html-templates.md)**: print from the browser or as a PDF. Plain HTML with `{{variable}}` placeholders, built on the till, so it works offline. **Recommended for most stores.**
* **[Thermal Templates](/ar/settings/receipt-templates/thermal-templates.md)**: print on a receipt printer. Written in XML; the same template gives the screen preview and the printout.
For the fields you can include, see the [Receipt Data Reference](/ar/settings/receipt-templates/receipt-data.md): every placeholder you can use, by section.
What the editor toolbar does
The code is coloured as you type. The toolbar has **Undo**, **Redo**, **Find** (with replace), **Word wrap**, **Format**, **Fold all** and **Unfold all**.
Legacy PHP templates
A receipt you override with a PHP file in your theme (`yourtheme/woocommerce-pos/receipt.php`) still works. It shows in **Your Templates** as **Theme Receipt Template** and is printed on your site, so the till needs a connection to print it. The plugin's own PHP receipt shows as **Legacy PHP Template**. For new work, use the gallery or the editor: those templates work offline and preview as you type.
## What cashiers see at the till[](#at-the-till "رابط مباشر إلى What cashiers see at the till")
However you made them, the till offers the templates that are on in **Your Templates**. On the receipt screen, **Template** lists every active template in the same order as **Your Templates**. The first is picked for each sale; the cashier can choose another for this receipt.
With only one active template, **Template** shows its name and there's nothing to choose. Offline, templates that need your site, such as the WP Overnight ones, are greyed out. Which printer each template goes to is set on each till; see [Print routing](/ar/hardware/receipt-printers.md#print-routing).
## Per-store assignments[](#per-store-assignments "رابط مباشر إلى Per-store assignments")
Pro Feature
More than one store needs [WCPOS Pro](/ar/getting-started/pro-license.md).
With several [stores](/ar/manage-store/stores.md), each store can offer its own templates, in its own order. The café runs a small thermal receipt, the warehouse a packing slip, the main shop the Standard Receipt, all from the same **Your Templates** list. With one store, skip this: every till uses **Your Templates**.
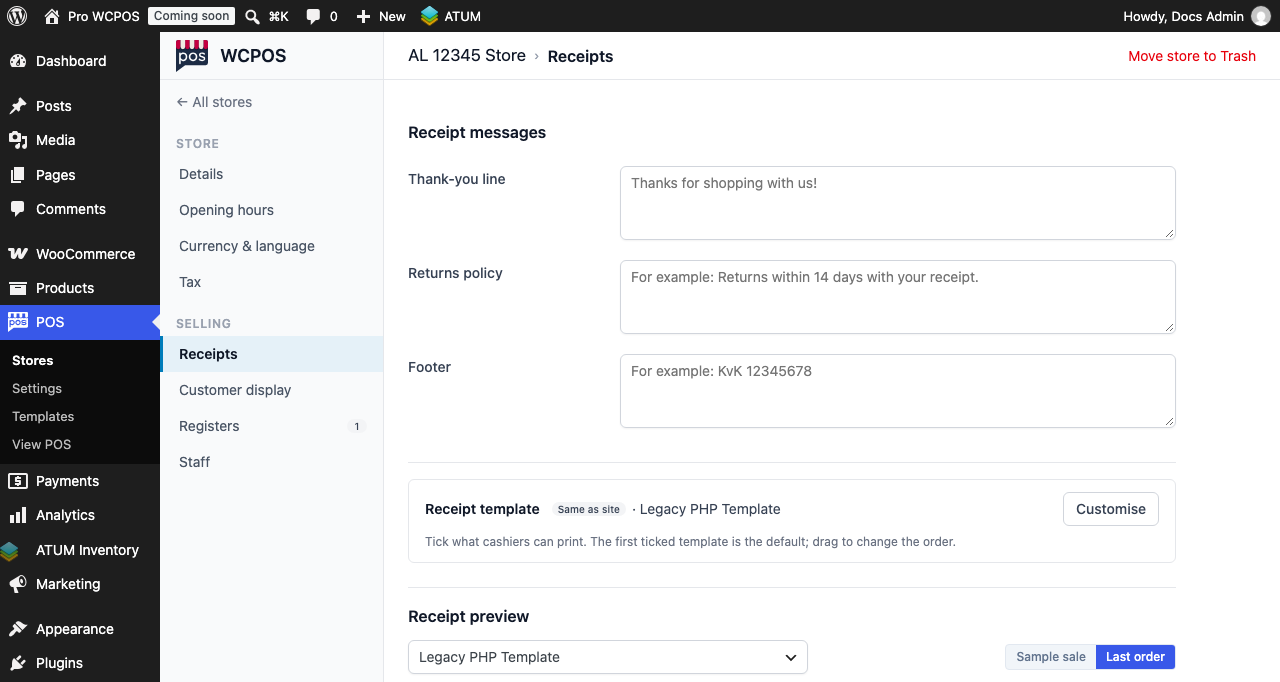
Each store's **Receipts** page, in **POS → Stores**:
12345678
1. **Receipts** — the store's receipt page, under **Selling**.
2. **Thank-you line** — this store's thank-you message on the receipt.
3. **Returns policy** — this store's returns terms.
4. **Footer** — the last line of the receipt, such as a company registration number.
5. **Same as site** — the store offers the site's templates. The default is named beside it.
6. **Customise** — choose this store's own templates and their order.
7. **Receipt preview** — pick a template to see this store's receipt.
8. **Sample sale** — preview with made-up items; **Last order** uses the store's latest order.
Use different receipts in different stores
1. In WP Admin, go to **POS → Stores** and click the store's name.
2. Open **Receipts** in the store's menu, under **Selling**.
3. Under **Receipt template**, the store says **Same as site** with the site's default template. Click **Customise**.
4. Tick the templates cashiers at this store can print. The first ticked is the default; drag the ≡ grip to change the order. The store now says **Customised for this store**.
The page saves as you go. **Use site template** goes back to the site's list.
A store can only offer templates that are active in **Your Templates**. One that's switched off there shows **Won't print**, and if none of the store's ticked templates is active, the store falls back to the site's list. When a cashier signs in at a store, only that store's templates appear under **Template**.
The same **Receipts** page holds the store's **Receipt messages**: **Thank-you line**, **Returns policy** and **Footer**. **Receipt preview** shows the result with a **Sample sale** or the store's **Last order**. The store's logo and address are on its **Details** page. The bundled templates print these per store, so one Standard Receipt carries each store's own branding. See [Setting Up Stores](/ar/manage-store/stores/set-up-stores.md#store-pages).
## Common customisations[](#common-customisations "رابط مباشر إلى Common customisations")
How do I add my store logo?
The logo comes from your settings, not from the template:
* **Without Pro:** receipts use your WordPress site logo, the one your theme shows.
* **With Pro:** each store has its own. In **POS → Stores**, open the store and go to **Details**, then **Logo and address**: upload a **Store Logo** or click **Use site logo**.
Every bundled template that shows a logo picks it up. To move the logo, edit the template and move the `{{#store.logo}} {{/store.logo}}` block.
How do I change the thank-you line or the footer?
With Pro, set it once per store: **POS → Stores**, open the store, **Receipts**, then **Thank-you line**, **Returns policy** and **Footer**. Bundled templates print them as `{{store.personal_notes}}`, `{{store.policies_and_conditions}}` and `{{store.footer_imprint}}`. With no thank-you line set, most bundled templates print *"Thank you for your purchase!"*.
Without Pro there is no thank-you line to set, so receipts print that default. Your returns policy goes in **POS → Settings → General**, under **Store details**, as **Refund & Returns Policy**.
To change the line in one template only, edit the template and replace `{{store.personal_notes}}`, or the text around it, with your own.
How do I add a tagline under the store name?
Edit the template and add a line under `{{store.name}}`:
```
Family-owned since 1987
```
In a thermal template:
```
Family-owned since 1987
```
How do I hide prices for a gift receipt?
Click **Use Template** on the **Gift Receipt** card. It hides every price and total, and still shows the items, SKUs, attributes and the gift message. No editing needed.
To make your own price-free receipt, copy any template and delete the `{{...total...}}`, `{{...price...}}` and `{{#totals}}...{{/totals}}` blocks.
How do I change the barcode to a QR code?
**Detailed Receipt**, **Packing Slip** and the Simple and Detailed thermal receipts print the order number as a Code 128 barcode. Find the `` element in the template and change its `type`:
```
{{order.number}}
{{order.number}}
https://example.com/returns?order={{order.number}}
```
The same `` element works in HTML and thermal templates. In the POS, HTML templates take any type [bwip-js supports](https://github.com/metafloor/bwip-js/wiki/Supported-Barcode-Types), such as `ean13` or `pdf417`. The template editor's preview and receipts your site renders, such as a PDF download, show any type outside the list below as a Code 128 barcode. For a receipt printer, keep to `code128`, `code39`, `code93`, `ean13`, `ean8`, `upca`, `upce`, `codabar`, `itf` or `qrcode`.
How do I send a template to a particular printer?
On each till, in **Settings → Printing**, **Receipt Templates** lists your active templates with a printer for each. **Auto** sends a thermal template to a receipt printer whose paper width suits it, and an HTML template to the print window. At print time, the cashier can choose another printer under **Printer** on the receipt screen. See [Print routing](/ar/hardware/receipt-printers.md#print-routing).
## If something goes wrong[](#goes-wrong "رابط مباشر إلى If something goes wrong")
**The receipt still shows the old version.** The editor doesn't save on its own. Click **Update** on the template's edit screen, then open the receipt again.
**The preview says "No POS orders found".** That's a **Legacy PHP** template: it previews only against a real POS order. Ring up one sale, even a $0 one, and the preview works. HTML and thermal templates preview with sample data, even on a new store. A **Legacy PHP** preview shows the last saved version, so click **Update** to refresh it.
**A template is missing from the till.** Check that **Active** is on for it in **Your Templates**. With Pro, if the store's **Receipts** page says **Customised for this store**, check that the template is ticked there.
**I made a mess and want to start over.** Three ways back:
1. **Undo** (Ctrl/Cmd + Z) for changes since you opened the editor.
2. **Revisions**, on the edit screen once a template has some, to compare and restore an earlier version.
3. If you started from the gallery, **Delete** your copy in **Your Templates**, then click **Use Template** on the same card for a fresh one.
## When to ask for help[](#when-to-ask-for-help "رابط مباشر إلى When to ask for help")
* The template editor won't load, or saves don't stick.
* The receipt prints well on one device but not on another.
* You need a receipt your country's fiscal rules require. Read [Fiscal Compliance](/ar/settings/tax/fiscal-compliance.md) first: certification for a particular country is not part of WCPOS 2.0.
* You want something custom and AI can't get it right.
Open a [support ticket](https://wcpos.com/support) and paste the template you're working on. That gives us what we need to help.
## Related Documentation[](#related-documentation "رابط مباشر إلى Related Documentation")
[Receipts and the Paid ScreenPrint, email or reprint a receipt at the till.](/ar/sell/print-email-receipts.md)
[Receipt Data ReferenceEvery placeholder a template can use.](/ar/settings/receipt-templates/receipt-data.md)
[PrintersAdd a printer and choose where each template prints.](/ar/hardware/receipt-printers.md)