Thermal Templates
WP admin: thermal templates are edited in WP Admin → POS → Templates.
A thermal template is a short text file, written in XML, that lays out a receipt for a receipt printer. The same file draws the preview on screen and tells the printer what to print, whichever Printer Language the printer uses: ESC/POS, StarPRNT or Star Line Mode. It fills in the order with the same {{placeholders}} as HTML templates. Every placeholder is listed in Receipt Data.
Use a thermal template for any receipt printer you set up in Printer Setup.
Jump to: Make a thermal template · The template and the printer · Tags you can use · Example: Simple 80mm Receipt · Template preview · If something goes wrong
Make a thermal template
Start from a gallery template and change it. You don't need to write one from scratch.
- Open the gallery. In WP Admin, go to POS → Templates. In the Template Gallery, filter the format to ESC/POS (thermal printer).
- Copy a template. Click Use Template on a card, such as Simple Thermal Receipt (80mm). Your copy appears in Your Templates. Turn on its Active toggle.
- Edit it. Open your copy. Change the XML on the left; the preview on the right follows as you type. Click Update to save. The editor doesn't save on its own.
- Send it to the receipt printer. In the POS, go to Settings → Printing. Under Receipt Templates, pick your receipt printer next to the template, or leave Auto.
- Print a receipt. In the receipt window, choose your template under Template and press Print receipt.
Example: change the thank-you line
First check the store's receipt footer note. If one is set, it prints instead of the thank-you line, so change the note in Customise a Receipt instead. If no note is set, carry on here.
In Simple Thermal Receipt (80mm), find {{i18n.thank_you_purchase}} in the editor, near the bottom. Replace only that placeholder with your own words.
Before:
{{i18n.thank_you_purchase}}
After:
See you again soon!
Leave everything before and after it on that line as it is.
The whole thank-you line, before and after
{{^store.personal_notes}}<text>{{i18n.thank_you_purchase}}</text>{{/store.personal_notes}}
{{^store.personal_notes}}<text>See you again soon!</text>{{/store.personal_notes}}
Click Update. The preview shows the new line at the bottom of the receipt.
The rest of this page explains what you can write in step 3. For more on the gallery, see Customise a Receipt.
- The template and the printer: what the printer's settings change.
- Tags you can use: every tag, its settings and what it does when you leave them out.
- Example: Simple 80mm Receipt: a whole template.
- Tips for writing templates and If something goes wrong.
The template and the printer
Some things are set on the printer, not in the template. In the POS, go to Settings → Printing and press Edit on the printer's row.
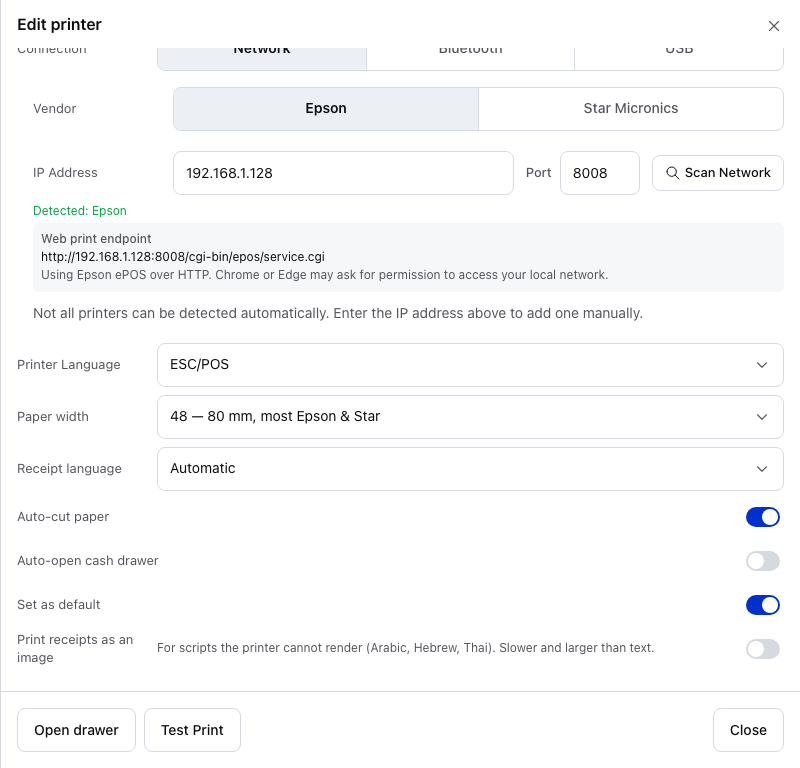
- Printer Language — ESC/POS here. The same template works with all three languages.
- Paper width — 48 here. On paper it replaces the template's
paper-width. - Receipt language — the set of letters and symbols the printer prints with. ESC/POS only.
- Print receipts as an image — prints the whole receipt as a picture.
With Auto-open cash drawer on, Cash drawer connector appears under it:
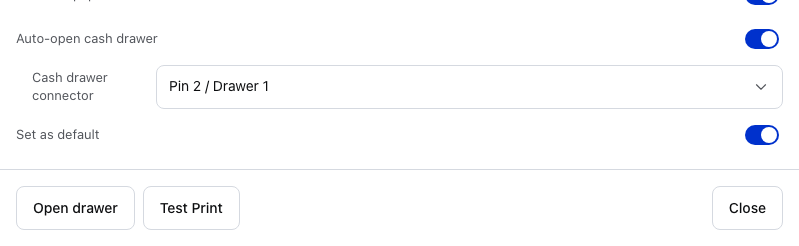
- Auto-open cash drawer — opens the drawer after the receipt, unless the template has its own
<drawer />. - Cash drawer connector — Pin 2 / Drawer 1 here.
<drawer />uses it when the tag names no connector. - Open drawer — opens the drawer once, without printing.
- Test Print — prints the app's test page, Printer Diagnostic, not your template. With Auto-open cash drawer on, as here, it opens the drawer too.
Watch Paper width most. The template's paper-width only sets the width of the preview. On paper, the printer's Paper width wins. A width="*" column takes the space left after the other columns (Columns that stretch). Check the result on each paper width you use (Receipt Width).
Printer settings that affect your receipt
| Printer setting | What it does to a thermal template |
|---|---|
| Paper width (32, 42, 48 or 64) | The number of characters per line on paper. It replaces the template's paper-width when you print. See Receipt Width. |
| Printer Language | ESC/POS, StarPRNT or Star Line Mode. The same template prints on all three. |
| Receipt language (ESC/POS only) | The set of letters and symbols the printer prints with. |
| Auto-open cash drawer | Opens the drawer after the receipt, unless the template has its own <drawer />. |
| Cash drawer connector | Pin 2 / Drawer 1 or Pin 5 / Drawer 2. Shown while Auto-open cash drawer is on. Used by <drawer /> when it doesn't name a connector. |
| Print receipts as an image | Prints the whole receipt as a picture. For scripts the printer can't print as text, such as Arabic, Hebrew and Thai. Slower than text. |
Tags you can use
Each tag has its own section below, with an example. The settings inside a tag, such as width="2", are optional unless marked required.
Every element and attribute in one table
| Tag | What it prints, and its settings (what you get if you leave one out) |
|---|---|
<receipt> | Required. Wraps the whole template.paper-width (48) |
<text> | One line of text. |
<bold>, <underline>, <invert> | Styled text. <invert> is white on black. |
<size> | Bigger text, 1–8 times.width (1), height (same as width) |
<align> | Lines up what is inside.mode: left, center, right (left) |
<row> + <col> | Columns side by side.width: a number or * (12); align: left, right (left) |
<line /> | A line across the paper.style: single, double, dashed, dotted (single) |
<feed /> | Blank lines.lines (1) |
<barcode> | A barcode of the text inside.type (code128), height (40) |
<qrcode> | A QR code of the text inside.size (4) |
<image /> | A logo or picture.src (required), width in printer dots (200) |
<cut /> | Cuts the paper.type: full, partial (partial) |
<drawer /> | Opens the cash drawer.connector: pin2, pin5 (the printer's setting) |
Numbers must be whole and above zero. Anything else, such as width="1.5" or lines="0", is ignored and the tag uses its usual value. A tag that isn't in this table is skipped, but the text inside it still prints.
The <receipt> tag
Every thermal template starts and ends with <receipt>:
<receipt paper-width="48">
  <!-- 48 characters = 80 mm paper on most Epson and Star printers -->
  <!-- 32 characters = 58 mm paper -->
</receipt>
paper-width sets the width of the preview, in characters. On paper the printer's Paper width replaces it (The template and the printer).
Bold, underlined and inverted text
<text>Plain text</text>
<bold><text>Bold text</text></bold>
<underline><text>Underlined text</text></underline>
<invert><text>Inverted (white on black)</text></invert>
A style tag on its own doesn't end the line, so put a <text> inside it. A <text> ends the line after its words (Wrap styled headings). Inside a centred or right-aligned <align> there is one exception (Centred styled headings).
Left, centre and right
<align mode="left"><text>Left aligned</text></align>
<align mode="center"><text>Centered</text></align>
<align mode="right"><text>Right aligned</text></align>
Any other mode prints on the left.
Bigger text
Make text wider, taller, or both:
<size width="2" height="2"><text>Double-size text</text></size>
<size width="2" height="1"><text>Wide text</text></size>
<size width="1" height="2"><text>Tall text</text></size>
If you leave out height, it matches width. ESC/POS printers go up to 8 times; Star printers stop at 6.
Columns
Use <row> and <col> to put text side by side in columns:
<row>
  <col width="16">Item name</col>
  <col width="4" align="right">Qty</col>
  <col width="12" align="right">Price</col>
</row>
These widths add up to 32, the narrowest paper, so the row fits every printer. On wider paper the rest of the line stays blank.
Column widths are counted in characters. Give a column width="*" and it takes the space left over, so the row fits the paper:
<row>
  <col width="*">{{name}}</col>
  <col width="12" align="right">{{line_total_display}}</col>
</row>
- A
<col>lines upleftorright. A column can't be centred. - A
<col>outside a<row>is skipped. - A column prints its text only. Styling inside a
<col>(<bold>,<size>and the rest) shows in the preview but not on paper, unless Print receipts as an image is on. The gallery templates bold the TOTAL this way (in Simple Thermal Receipt (80mm), for example), so their TOTAL prints plain. To print a whole row in bold, put the<bold>around the<row>.
Example: a TOTAL row that prints bold
<!-- Prints bold on paper -->
<bold>
  <row>
    <col width="*">{{i18n.total}}</col>
    <col width="16" align="right">{{totals.total_display}}</col>
  </row>
</bold>
Lines and blank space
<line />                       <!-- Single line -->
<line style="double" />        <!-- Double line -->
<line style="dashed" />        <!-- Dashed line -->
<line style="dotted" />        <!-- Dotted line -->
<feed lines="2" />             <!-- Two blank lines -->
The preview draws each style differently. On paper, single and dashed look the same.
How each line style prints on paper
singleanddashedboth print a row of-characters across the paper.dottedprints. . . .across the paper. On an Epson printer the app reaches over ePOS, Epson's own network connection (an Epson network printer in the browser, or on desktop when the printer answers on its ePOS port), it prints-likesingle.doubleprints a row of double-line characters. Over ePOS and through cloud printing it prints a row of=.
Cut the paper and open the drawer
<cut />                <!-- Partial cut (leaves a small tab) -->
<cut type="full" />    <!-- Full cut -->
<drawer />             <!-- Open the cash drawer -->
<drawer connector="pin5" /> <!-- Open the drawer on pin 5 -->
<cut />moves the paper up to the cutter first. The preview shows the cut as a dashed line with ✂. On an Epson printer the app reaches over ePOS,<cut />and<cut type="full" />make the same cut.<drawer />opens the drawer whatever Auto-open cash drawer says. When the template has its own<drawer />, the app doesn't open the drawer a second time. The preview shows nothing for it. See Cash Drawer.
Barcodes and QR codes
<barcode type="code128" height="40">{{order.number}}</barcode>
<qrcode size="4">{{fiscal.qr_payload}}</qrcode>
heightis the barcode height in printer dots.sizeis the size of each QR square: a bigger number makes a bigger code.
A QR code made with <barcode>
<barcode type="qrcode"> (or type="qr") also makes a QR code. Its size comes from height: height ÷ 10, kept between 2 and 10.
The preview draws barcodes and QR codes as pictures. The printer gets its own barcode commands, or a printed picture when the app has made one.
Example: Simple 80mm Receipt
A whole receipt, top to bottom: the store name and address, the order number, date and cashier, the items in three columns, the totals with a bold TOTAL row, each payment with tendered and change, a thank-you line, and a cut.
Show the full template (about 80 lines)
<receipt paper-width="48">
  <align mode="center">
    <bold><size height="2"><text>{{store.name}}</text></size></bold>
    {{#store.address_lines}}<text>{{.}}</text>{{/store.address_lines}}
    {{#store.phone}}<text>{{store.phone}}</text>{{/store.phone}}
  </align>
  <line />

  <text>Order: #{{order.number}}</text>
  <text>Date: {{order.created.datetime}}</text>
  {{#cashier.name}}<text>Cashier: {{cashier.name}}</text>{{/cashier.name}}
  <line />

  <!-- Column headers, bold on paper -->
  <bold>
    <row>
      <col width="*">Item</col>
      <col width="4" align="right">Qty</col>
      <col width="12" align="right">Total</col>
    </row>
  </bold>
  <line />

  <!-- Line items -->
  {{#lines}}
  <row>
    <col width="*">{{name}}</col>
    <col width="4" align="right">{{qty}}</col>
    <col width="12" align="right">{{line_total_display}}</col>
  </row>
  {{/lines}}

  <line />

  <!-- Totals -->
  <row>
    <col width="*">Subtotal</col>
    <col width="16" align="right">{{totals.subtotal_display}}</col>
  </row>
  {{#totals.tax_total}}
  <row>
    <col width="*">Tax</col>
    <col width="16" align="right">{{totals.tax_total_display}}</col>
  </row>
  {{/totals.tax_total}}
  <bold>
    <row>
      <col width="*">TOTAL</col>
      <col width="16" align="right">{{totals.total_display}}</col>
    </row>
  </bold>

  <line />

  {{#payments}}
  <row>
    <col width="*">{{method_title}}</col>
    <col width="16" align="right">{{amount_display}}</col>
  </row>
  {{#tendered}}
  <row>
    <col width="*">Tendered</col>
    <col width="16" align="right">{{tendered_display}}</col>
  </row>
  <row>
    <col width="*">Change</col>
    <col width="16" align="right">{{change_display}}</col>
  </row>
  {{/tendered}}
  {{/payments}}

  <feed lines="2" />
  <align mode="center">
    <text>Thank you for your purchase!</text>
  </align>
  <feed lines="3" />
  <cut />
</receipt>
The labels here are plain English. The gallery templates use {{i18n.*}} labels instead, so the receipt follows the store's language (i18n fields).
Columns that stretch
A width="*" column stretches with the paper. Instead of fixing every column for one paper size, give * to the column that should stretch:
<!-- Works on 58 mm (32 characters) AND 80 mm (48 characters) printers -->
<row>
  <col width="*">{{name}}</col>
  <col width="10" align="right">{{line_total_display}}</col>
</row>
On a 48-character printer the item name gets 38 characters. On a 32-character printer it gets 22. Fixed columns stay the same size on both.
More than one * column
The space left over is shared equally. The last * column takes any odd character. A * column is never narrower than 1 character.
Template preview
The template editor in WP Admin shows a live thermal preview as you type. It updates 300 ms after you stop typing. The receipt window in the POS shows the same kind of preview before you print. Both draw your template in fixed-width letters, as wide as paper-width.
The same template makes the preview and the printout. There is no separate print template. The preview is close to the paper, but not exact, so print a test receipt on each paper width you use before you rely on it.
How the preview differs from paper
| In the preview | On paper |
|---|---|
The width is paper-width | The width is the printer's Paper width |
<bold>, <size> inside a <col> show | The column prints plain text, unless Print receipts as an image is on |
<size> grows with width only, so a tall-only size looks normal | Width and height both apply |
| Single and dashed lines look different | Both print - characters |
<cut /> is a dashed line with ✂; <drawer /> shows nothing | The paper cuts; the drawer opens |
| Every script shows | Only letters the printer holds print, unless Print receipts as an image is on |
Tips for writing templates
Thermal printing has a few traps that HTML doesn't have. Here they are, with the fix for each.
Wrap styled headings in <text> for a line break
Style tags — <bold>, <size>, <underline>, <invert>, <align> — don't end the line by themselves. A <text> ends the line after its words, and so do whole-line tags such as <line />, <row> and <feed />. One exception: a styled heading placed directly inside a centred or right-aligned <align> ends its own line when another line follows (Centred styled headings).
<!-- ❌ Wrong: the heading runs into whatever follows -->
<bold>{{i18n.bill_to}}</bold>
{{customer.name}}

<!-- ✅ Right: put the words inside <text> -->
<bold><text>{{i18n.bill_to}}</text></bold>
<text>{{customer.name}}</text>
The 80 mm gallery templates do this for every heading.
Avoid <size width="2"> inside narrow rows
Double-width text takes twice the space per letter. A heading that fits on a 48-character printer can spill over on a 42-character one, and on 58 mm paper it only leaves 16 characters.
Size inside a <col> doesn't print anyway. For a big value (a large total, a kitchen order number), print it on its own line with <size> instead.
Example: a tall store name and a big total
<!-- For store names, prefer normal-width, double-height -->
<bold><size height="2"><text>{{store.name}}</text></size></bold>

<!-- For a big total, put it on its own line above the row -->
<align mode="right">
  <bold><size height="2"><text>{{totals.total_display}}</text></size></bold>
</align>
Use width="*" so rows fit any paper
A width="*" column takes the width left after the fixed columns. Rows built this way fit 32-, 42-, 48- and 64-character printers (Columns that stretch). Fixed columns and double-width text still take their full space, so check the result on each paper width you use.
If you do use fixed widths, make them add up to no more than the printer's Paper width: 32 on 58 mm paper. On 80 mm paper, use 42, not 48: many 80 mm printers print 42 characters a line, and a row that adds up to 48 wraps on them. Check your printer's number in Receipt Width.
Centred styled headings inside <align> blocks
Inside <align mode="center"> (or right), a styled heading placed directly inside the <align> — <bold>, <size>, <underline> or <invert> — ends its own line when another line follows. A centred, enlarged store name above a centred address prints cleanly even without the <text> wrap.
Outside an <align> block, keep the <text> wrap.
Dashes and curly quotes
On ESC/POS printers, dashes and curly quotes print as plain ones, so you can type them freely. On Star printers, use only letters and symbols the printer holds.
Exactly what changes, and on which printers
When Printer Language is ESC/POS, fancy punctuation is changed to plain keyboard characters before printing:
- Hyphens and dashes of every length (en dash, em dash, figure dash, minus sign) →
- - Curly quotes → straight quotes
So Mon–Sat 9:00–18:00 and “open” print correctly even on printers that don't hold those characters. Star printers (StarPRNT and Star Line Mode) keep the original dashes and quotes when the app prints to them, so use only characters the printer holds. Through cloud printing, Star receipts get the same change to plain characters.
On every printer, special spaces (non-breaking, narrow and thin spaces) print as a regular space.
Non-Latin and right-to-left scripts
A thermal printer prints text with its own built-in letters. Arabic, Hebrew, Persian, Urdu, Thai and other non-Latin scripts print correctly only when the printer holds that script. Otherwise you get blanks or the wrong letters.
The reliable fix is Print receipts as an image on the printer. It draws the whole receipt as a picture, so it prints as designed whatever letters the printer holds. A cut, feed or <drawer /> at the end of the template still works; one in the middle of the template is left out. For the other fixes, see Non-Latin Receipts.
A thermal printer can't print a full-page HTML template. The job has to become printer commands (ESC/POS or Star), and an HTML page can't be written that way. Use a thermal template for thermal hardware. For full-page A4/Letter HTML, print to a system or PDF printer, or through PrintNode.
Logos and images
Use <image /> to add a logo. The store logo is in {{store.logo}}:
<align mode="center">
  <image src="{{store.logo}}" width="200" />
</align>
The app turns the picture into printer dots on the device: it fills see-through parts with white, shrinks it to fit, and makes it black and white (as a pattern of dots, so a logo keeps its shading). Then it sends it to the printer as a picture. Use a high-contrast PNG; SVG doesn't print yet.
Image width, accepted sources and formats
- Width:
widthis in printer dots (200 if you leave it out). The picture never prints wider than the paper: 384 dots on 58 mm paper (32 characters or fewer), 576 dots on 80 mm. - Accepted sources:
data:image/pnganddata:image/jpegdata URLs,http(s)addresses, and paths on your own site that start with/. Addresses starting with//, and paths with backslashes or.., are refused. - Best format: a high-contrast PNG on a see-through or white background. JPEG works, but its blur can print as specks.
- SVG is not supported yet on thermal printers.
Tips
- Start from a gallery template. The thermal templates in the gallery use all the patterns above. There are 58 mm, 80 mm and right-to-left receipts, a kitchen ticket, and register closure, count slip and report versions.
- Test every paper width you use, even with
width="*"columns. Fixed columns and double-width text can still make a row wrap. - Use
_displayfields for money. They are already formatted for the store's currency (Currency fields). - Keep it simple. A thermal printer has fewer ways to style text than a web page. Build the receipt from
<text>,<row>and<col width="*">.
If something goes wrong
The editor preview says "Thermal template rendering error. Check your XML syntax." The template can't be read. Two causes:
- A tag isn't closed, or a bare
&or<is in the text. Close every tag (<line />, not<line>) and write&for a&. - The outermost tag isn't
<receipt>. Wrap the whole template in<receipt>…</receipt>.
A heading runs into the next line.
A style tag on its own doesn't end the line, so the next words follow on the same line. Put a <text> inside it (Wrap styled headings). A styled heading directly inside a centred or right-aligned <align> is the exception (Centred styled headings).
A row wraps onto two lines on paper.
The fixed widths add up to more than the printer's Paper width. Make one column width="*", or make the fixed widths add up to no more than the Paper width: 32 on 58 mm paper, 42 on many 80 mm printers (Use width="*").
The total is bold in the preview but plain on paper.
Styling inside a <col> doesn't print, and the gallery templates bold the TOTAL that way. Put the <bold> around the whole <row> (Columns), or turn on Print receipts as an image.
The preview is narrower or wider than the paper.
The paper follows the printer's Paper width, not paper-width. Set paper-width to the same number to preview what prints.
The cut leaves a tab.
<cut /> is a partial cut. Use <cut type="full" /> for a full cut. On an Epson printer reached over ePOS, both make the same cut, so type has no effect there.
The logo doesn't print.
Check the src is one of the accepted sources and isn't an SVG. In the browser, see Logo Missing in the Browser.
Question marks, blanks or wrong letters. The printer doesn't hold that script. Turn on Print receipts as an image (Non-Latin scripts).
The cash drawer opens on every receipt.
Either Auto-open cash drawer is on, or the template has a <drawer />, which opens the drawer whatever the setting says. To stop it, turn the setting off and take <drawer /> out of the template.
The cash drawer doesn't open.
If the template's <drawer /> has a connector, it overrides the printer. Take the connector out, so the printer's Cash drawer connector setting applies, then try the other pin there (the setting shows while Auto-open cash drawer is on). Also check Printer Language matches the printer, because the drawer command depends on it.
A template made for the old StarPRNT fixed layout prints nothing useful.
That layout was removed in version 1.10. Rebuild it with <row>, <col> and width="*", or start again from a gallery template.