Server Direct Print
The Epson is on, its own web page opens and its self-test prints, but nothing the POS sends comes out. Switching it off and on changes nothing. Check whether a printer setting called Server Direct Print is on.
In Settings → Printing, does this printer's row read Epson Server Direct Print · managed by WCPOS? Then leave Server Direct Print on: WCPOS Cloud Print sends receipts to the printer that way. Don't add the same printer again with Add printer. See Cloud Printing.
If you're adding this printer for the first time, or its row doesn't say that, check the setting on the printer's web page.
What the POS shows
When you add the printer in Settings → Printing → Add printer, its card says No connection and you can't pick it.
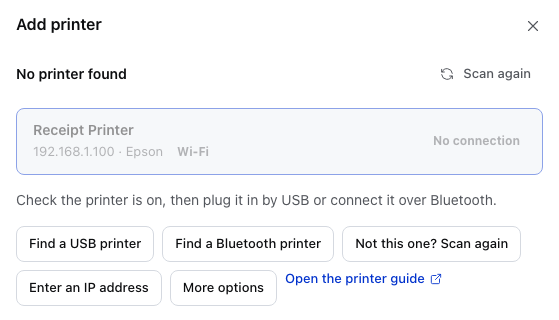
- The printer's card — its address and maker. No connection means the app found no way to print to it, so the card can't be picked.
- Scan again — searches the network again. Use it after you turn Server Direct Print off.
- Enter an IP address — checks one address directly. See Enter the address yourself.
- Open the printer guide — opens these printer pages.
You may also see one of these:
- Nothing printed after a test page, with "The printer is holding jobs. Turn it off and on again, then try again." If it still says so after a restart, check whether Server Direct Print is on. If it's off, see Epson Secure Printing, another Epson setting that stops jobs from the POS printing.
- Test Print on a printer you saved earlier fails, and so does every receipt.
Why it happens
With Server Direct Print on, the printer fetches its jobs from a server. While it's on, it turns away jobs sent straight to it on your network, which is how the POS prints to a network printer you added with Add printer. Its web page still works, so the printer looks healthy. It's a saved setting, so a restart doesn't clear it.
If you didn't turn it on, something else did: an earlier setup, a kitchen or online-order service, or another till.
Turn it off
If a kitchen display or an online-order service prints to this Epson through Server Direct Print, turning it off stops that service printing. Only one of the two can have the printer: give the POS its own printer, or move that service to another one.
You do this on the printer's own web page, from a computer or tablet on the same network as the printer.
- Open
https://followed by the printer's address, for examplehttps://192.168.1.100, and accept the certificate warning. The address is on the printer's status sheet. See Finding your printer's address. - Press Administrator Login. On recent models the password is the printer's serial number, on the label underneath the printer, unless someone changed it.
- Find Server Direct Print in the menu. Its place varies by model and firmware: on TM-i models it's under Web Service Settings → Direct Print, or Configuration → Direct Print on firmware 3.x and earlier. On other models, look for it in the menu or in your model's manual.
- If it already says Disable, leave it off and follow Epson Secure Printing instead. Otherwise, set it to Disable and save, then carry on below.
- Let the printer restart, or switch it off for ten seconds and on again.
- Back in the POS, test the printer:
- Adding a printer: press Scan again or Enter an IP address. When the card says Ready, pick it and press Print a test page.
- Printer already saved: press Test Print on its row in Settings → Printing.
Still stuck?
Press Copy setup report and paste it into your message. On the Nothing printed screen, the report lists the ports the app tried on the printer and any refusal it got back. For a saved printer, it's in the row's More actions menu in Settings → Printing.