WooCommerce REST API
Use this page when something at the till doesn't match your store. Start with what looks wrong:
- A product's price, stock count or custom field: Check a product. Needs WCPOS Pro, as do the Products, Orders, Customers and Coupons screens.
- The order in the cart: Check the order in the cart. Works without Pro.
- One line's custom fields, such as an engraving: Check one line. Works without Pro.
- A plugin's change never shows in the POS: Why some plugins don't change the POS.
How the POS talks to your store
The POS gets everything through the WooCommerce REST API, the way other apps talk to your store. The POS on your till asks your store for products and customers, your store answers in JSON (plain text that lists every field by name), and the POS sends each sale back as a WooCommerce order.
In the diagram, Your Store is your shop with its till, and Datacenter is the server your WooCommerce site runs on. Requests go from the till to your site, and the JSON answers come back.
What the POS gets from your store
- The API must be there. When you connect a store, the POS checks that your site offers the WooCommerce REST API. If it doesn't, connecting stops with AUTH321: WooCommerce missing.
- A copy on the device. The POS downloads products and variations, categories, tags and brands, customers, tax rates, coupons and orders, and keeps a copy on the device. Searching and selling read that copy, so the till stays fast and keeps working when the internet drops.
- Sales go back as orders. A sale, a new customer or a product edit made at the till goes back to your store, and WooCommerce saves it. Each sale becomes a normal WooCommerce order you can open in WooCommerce > Orders.
- Changes come in the background. The POS checks your store for changes while it runs, so an edit made in WP Admin reaches the till without a restart. How the Sync Engine Works explains how.
For developers: the routes the POS calls
The REST API gives each kind of store data its own address under /wp-json/: products, orders, customers, coupons and so on. WooCommerce's own routes sit under wc/v3.
The WCPOS plugin adds its own wcpos/v2 routes to your store. These routes pass reads and the till's changes on to WooCommerce's wc/v3 API inside your site, so the POS gets the same fields as any WooCommerce app and WooCommerce saves each order. Pro's per-store prices, and some extensions, change the values the POS receives. Payments, closing a sale, registers and sessions use the plugin's own routes: see The REST API.
See the data the POS holds
Every panel that shows one record has a JSON tab beside Form: a product, a variation, a customer, a coupon, an order, Order details in the cart, and a cart line's Edit dialog. It shows the record as this device holds it, in WooCommerce's JSON format. You don't need it to make a sale.
Checking a product needs WCPOS Pro. The cart and its lines have a JSON tab on every till.
Check a product
Open the product's JSON tab, then read a price, a stock count or a custom field and compare it with the product in WP Admin, your store's WordPress dashboard. If you can't sign in to WP Admin, note the value and ask whoever runs your store to compare it.
- Open Products from the menu and search for the product.
- Tap the open arrow (›) at the end of its row. The panel opens on the Form tab.
- Tap JSON.
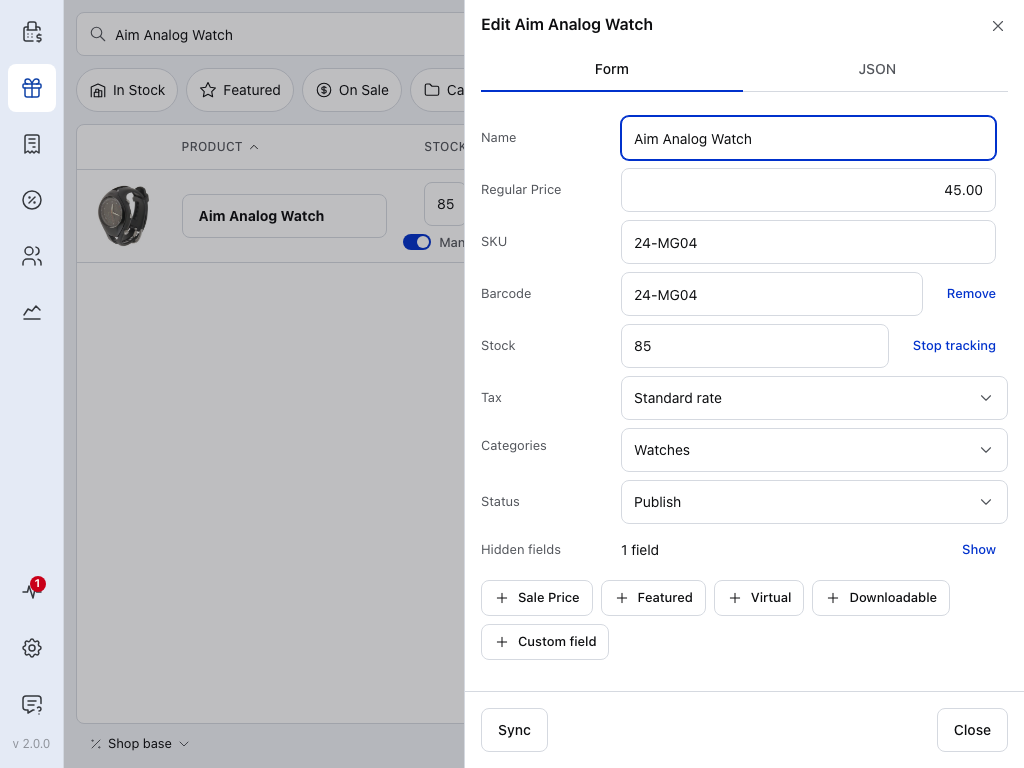
- Form — the fields you can change at the till. The panel opens here.
- JSON — the product as the POS holds it.
- Sync — fetches this product from your store again. Only on the Form tab.
- Close — puts the panel away. ✕ at the top does the same.
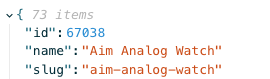
- 73 items — how many fields your store sent for this product.
- id — the product's ID in WooCommerce.
Fields that contain other fields, such as categories or meta_data, start folded: tap one to open it. Scroll to see the rest.
A price
Scroll down to price. Compare it, regular_price and sale_price with Product data > General on the product in WP Admin. If the product has its own price for this store (per-store prices), compare with that store's price on the same tab.
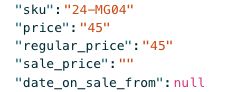
- price — the price the product sells for now: the sale price while a sale runs, otherwise the regular price.
- regular_price — the price without a sale.
- sale_price — empty when the product has no sale price.
A stock count
Scroll down to stock_quantity. It holds a number only when manage_stock is true; otherwise it is null (empty). Compare it with Product data > Inventory.

- manage_stock —
true: WooCommerce counts this product's stock. - stock_quantity — the count the POS holds:
85, as on the Form tab.
A custom field or a plugin's data
Scroll down to meta_data and tap it, then tap an entry. This close-up is from a phone, where a long value wraps onto a second line.
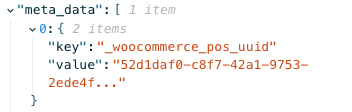
- meta_data — the product's custom fields, one entry each.
- key — the field's name.
- value — what the field holds.
If a value doesn't match WP Admin
Tap Form, then Sync, to fetch the product again.
- If you see Couldn't refresh: the device kept its old copy. Check your connection and try again.
- If no error appears but the value still differs: the POS now holds what your store's API sends. A plugin may be changing the value on your website only: see Why some plugins don't change the POS.
Check the order in the cart
- Tap ⋮ beside Checkout. Order details opens.
- Tap JSON.
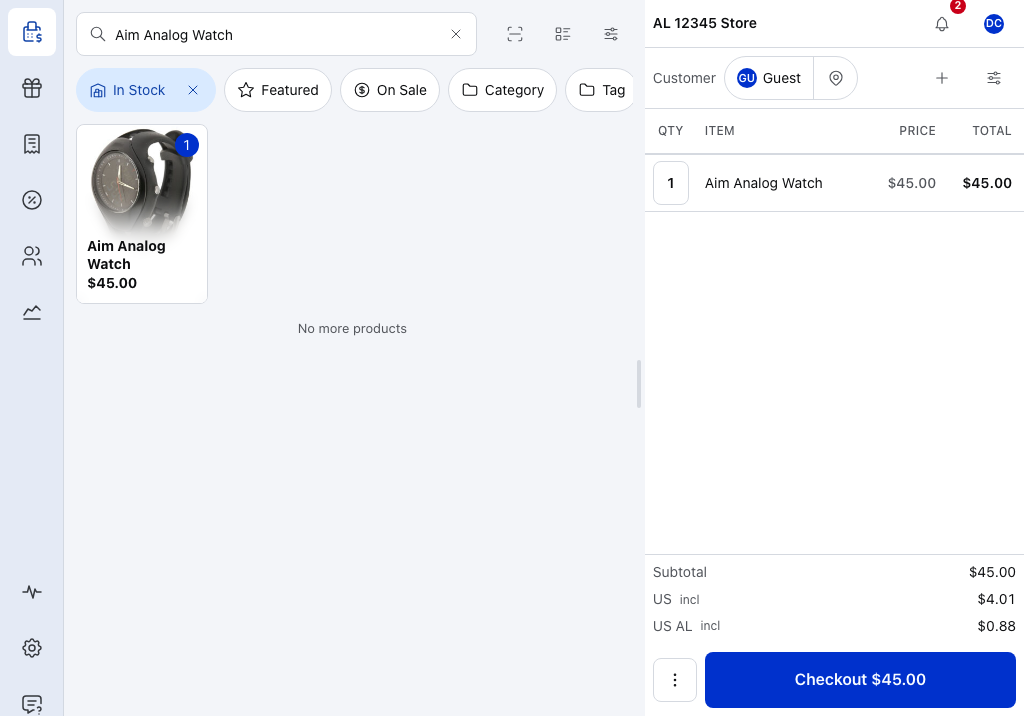
- A cart line — each line's Edit dialog has its own JSON tab. See Check one line.
- ⋮ — opens Order details for the whole order.
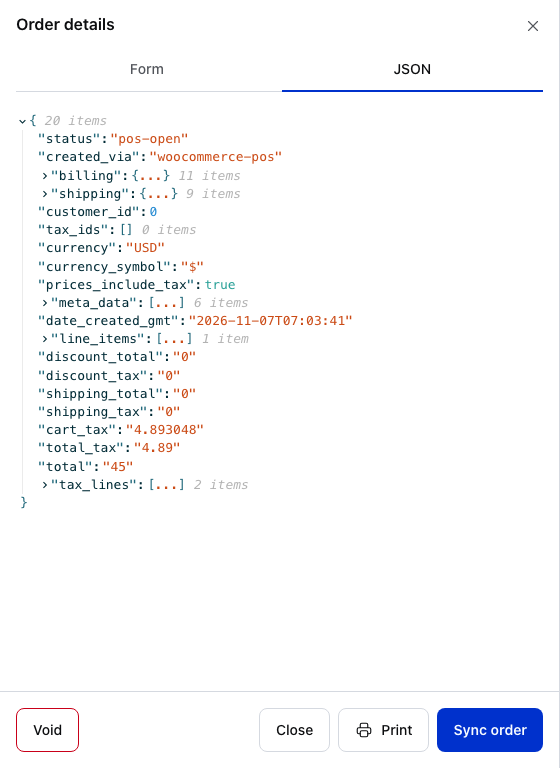
- JSON — beside Form, as on every panel.
- status —
pos-openwhile the order is open at the till. This status comes from the WCPOS plugin; WooCommerce shows it as POS - Open. - line_items — the products in the cart. Tap it to open each line.
- total — the order total, tax included.
- Sync order — sends the order to your store now. A new order has no
idin its JSON until your store has saved it. See Sync the order. - Print — prints the order.
- Void — deletes the order and empties the cart. See Void the order.
The same fields, closer up, from another cart with one watch:
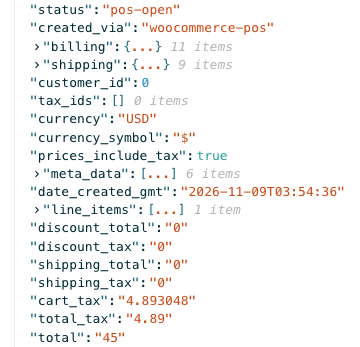
- status — reads
pos-open: the order is still open at the till. - line_items —
1 item: the one watch in the cart. - total —
45: one watch at $45.00, tax included.
Check one line
A line's JSON tab shows the line as it will be saved on the WooCommerce order, not the product record from your store. Use it to check a line's custom fields, such as an engraving.
- Tap the line's total to show Edit and Remove. See Edit or remove a line for the other ways.
- Tap Edit, then JSON.
- Tap
meta_datato open the line's custom fields, then tap an entry to see itskeyandvalue.
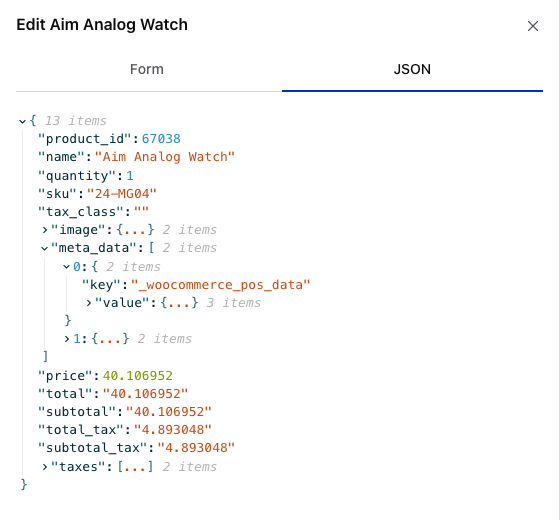
- JSON — beside Form in the line's Edit dialog.
- name — the product name as saved on this line. With
quantityandpricebelow it, it describes this sale, not the product record. - meta_data — the line's custom fields: 2 entries here.
- key — the field's name.
_woocommerce_pos_datais where WCPOS keeps the line's price, regular price and tax status. - value — what the field holds. Tap a folded value to open it.
- price — the price of one item before tax:
40.106952here. Add the line's tax,total_tax4.893048, and you get the $45.00 in the cart.
Watch the requests in the browser
In the web app you can watch the POS talk to your store with your browser's developer tools:
- Open the POS in Chrome, Edge or Firefox.
- Press F12 (on a Mac, Option + Command + I) and choose the Network tab.
- Type
wcposin the filter box. - Use the POS: search, add a product, check out. Each request your store answers appears in the list. Select one and choose Response to read the JSON.
Why some plugins don't change the POS
The POS works from its copy of your store's data. A plugin that only changes what a web page shows, or works something out while a shopper browses your website, never reaches that copy. The POS sees what the REST API sends, nothing more. Three kinds of plugin run into this most.
Dynamic pricing
Plugins that set a price per customer, per role or per quantity.
- At the till: the POS shows the product's normal price. Most of these plugins calculate the price as a shopper browses your website, so the API never sends it.
- What to do: use discounts at the till, or a coupon.
Product add-ons
Plugins that add options to a product, such as gift wrap or engraving.
- At the till: the options don't appear. Most of these plugins build them on the product page, so they aren't part of the product the API sends.
- What to do: add a fee for the extra cost, and a custom field on the line for the detail.
Plugins that change the API
Plugins that change what your store sends through the REST API.
- At the till: the POS can break. wePOS changes how your store sends variable products, so WCPOS turns itself off while wePOS is active.
- What to do: see wePOS.
A plugin that saves its data on the product, the customer or the order (as custom fields) usually does reach the POS. Open the JSON tab and look in meta_data to check.
If something goes wrong
- Connecting fails with AUTH321 — your site isn't offering the WooCommerce REST API. See AUTH321: WooCommerce missing.
- A price or field at the till doesn't match WP Admin — see If a value doesn't match WP Admin.
- A plugin's change never shows in the POS — see Why some plugins don't change the POS.
- Something stopped working after you installed a plugin — see Plugin Conflicts.
Related Documentation
For developers, WooCommerce documents every endpoint and field in the WooCommerce REST API docs.