Network Printers
Symptom: the search for a network printer ends on No printer found. Or a printer that worked for weeks stops, and every receipt fails with The selected printer cannot be reached (PRINT301).
The printer is usually fine. The till can't reach it, either because the two are on different networks or because the printer's address changed.
- Adding a printer? Check the network, read its address, then add it by its address.
- A printer that worked has stopped? Read its address, then change it on the printer you have.
Once it prints, make the address stay put so this doesn't happen again.
Check the network first
Connect the till and the printer to the same shop network, not the guest network. The printer can join it by Wi-Fi or by a network cable plugged into the router. Then go to Settings → Printing, press Add printer, and let the search run. If the printer shows up, add it and make its address stay put. If not, read its address and add it directly. Why it happens explains what keeps the two apart.
Read the printer's address
The printer prints its own address on its status sheet. Some makers call it the network self-test or configuration page.
- Epson TM printers on a network (for example the TM-m30III): with the printer on, open the roll paper cover, hold Feed for at least a second, then close the cover. If your model has a status sheet button, holding it for about three seconds prints the same sheet.
- Star printers on a network: with the printer on, hold Feed for about five seconds. The address is under Current IP Parameters.
- Other printers, or no sheet comes out: button steps differ between models. Look up "status sheet" or "network self-test" in your printer's manual.
Find the IP address line on the sheet, for example 192.168.1.100. Two printers in the shop? Check you have the sheet from the right one.
Next, add the printer, or change the address on a printer you already have.
Add the printer by its address
If the search misses the printer, enter its address directly. The till must still be able to reach the printer on the shop network.
- Go to Settings → Printing and press Add printer. The search starts by itself.
- Press Enter an IP address, while the search runs or after it ends. It stops the search.
- Type the address from the status sheet in IP Address.
- Press Check this address.
- When the card says Ready or Test needed, press Print a test page. If Paper width shows beside the card, pick 58 mm or 80 mm first.
- The app asks Did the test page print? Press Yes, and it looks right. The app saves the printer and shows … is set up.
If the ruler on the test page is off, or nothing came out, the other two answers take you on. See Add a printer.
The screens, in order:
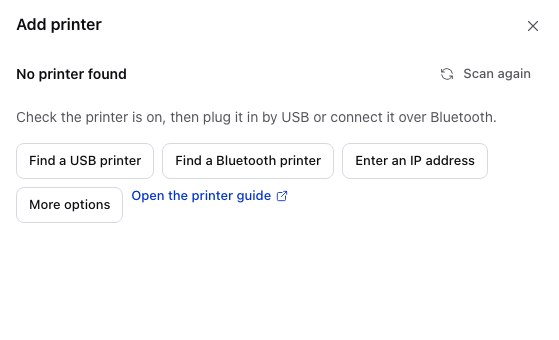
- Scan again — searches once more, after you've put the printer and the till on the same shop network.
- Find a USB printer — a printer on a cable, in Chrome or Edge. The mobile apps list USB printers in the search itself. See Add a printer.
- Find a Bluetooth printer — see Bluetooth pairing.
- Enter an IP address — type the address from the status sheet. Every app has this button.
- More options — the printer's name, maker, paper width and cash drawer. See Printer Setup Wizard.
- Open the printer guide — opens these printer pages.
Type the address and press Check this address. The app tries that one address directly. Cancel takes you back to the search results.
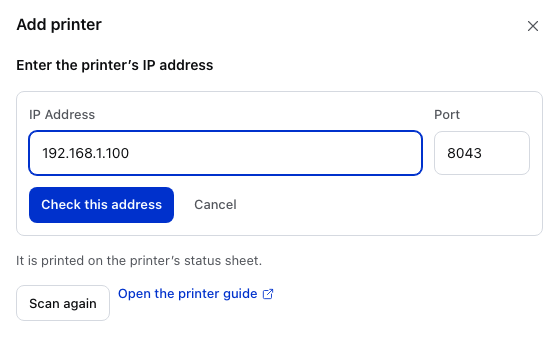
- IP Address — the address from the status sheet, for example
192.168.1.100. - Port — filled in for you, so yours may differ from this one. In a browser it also picks HTTPS or plain HTTP: see HTTPS or HTTP.
- Check this address — tries the address and shows the printer as a card.
- Scan again — closes the form and searches again.
- Open the printer guide — opens these printer pages.
After the test page prints correctly, press Yes, and it looks right to save the printer.
The card says No connection
Nothing at that address answered this device.
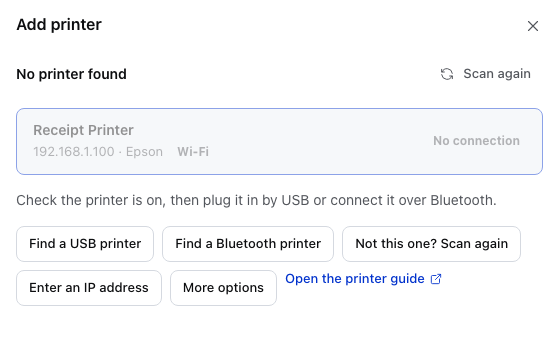
- No connection — the card for the address you typed. It can't be picked, and there's no test page to print.
- Scan again — searches the network again.
- Not this one? Scan again — searches again, the same as Scan again.
- Enter an IP address — try the address again, or a corrected one.
Check the address against the status sheet, then the network: see Why it happens.
Printer already set up? Change its address
When a printer that worked stops because its address moved, change the address on the printer you have. You don't need to add it again.
- Go to Settings → Printing.
- Press Edit on the printer's row.
- Change IP Address to the address on the status sheet. The change saves as you type. Scan Network looks for the printer instead.
- Press Test Print. If nothing prints, see If something goes wrong.
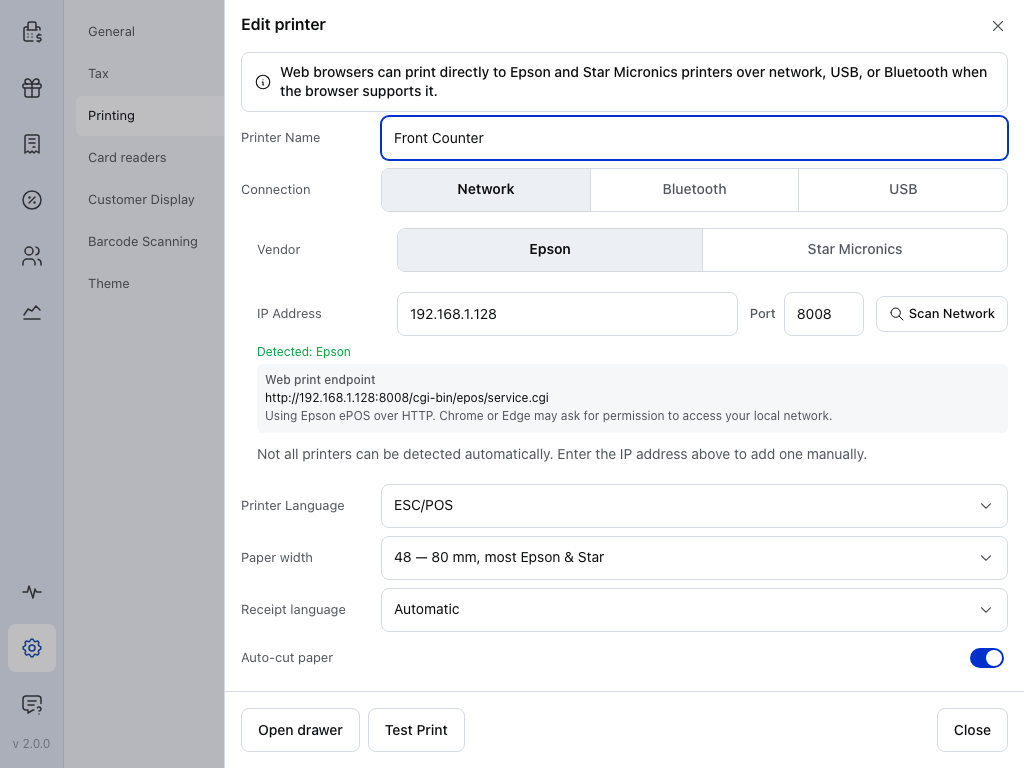
- Printer Name — the printer you're changing.
- IP Address — the address from the status sheet. The change saves as you type.
- Port — filled in for you, so yours may differ from this one. In a browser it also picks HTTPS or plain HTTP: see HTTPS or HTTP.
- Scan Network — looks for the printer instead of typing its address.
- Test Print — prints a test page at the new address.
- Close — saves and closes.
Make the address stay put
You don't need this to add or fix the printer. It stops the address moving again, so you only enter it once. Once the printer prints, ask whoever looks after the shop's router to reserve the printer's address for it: the address on its status sheet. Then the router gives the printer that address every time.
Router and printer settings
- Reserve it on the router (best). In your router's settings, open the page that lists the devices on your network (often called DHCP or LAN). Find the printer by the address on its status sheet, and reserve that address for it. Many routers ask for the printer's MAC address here. Nothing changes on the printer.
- Or set it on the printer. Open the printer's address in a web browser on the same network, for example
http://192.168.1.100, and give it a fixed (static) address in its network settings. Pick one your router doesn't hand out to other devices, or two devices can end up with the same address. The router's settings show which addresses it hands out.
Why it happens
- Different networks. The till is on one network and the printer on another: a guest network, a second router, or a separate network for staff devices. The search only looks on the till's own network.
- Guest Wi-Fi keeps devices apart. Guest and public Wi-Fi usually stop the devices on it from talking to each other. Router settings call this client isolation or AP isolation. The printer is on the same Wi-Fi and still can't be reached.
- The address moved. Your router lends each device an address for a while. After a restart, or when the loan runs out, the printer can get a new one while the app still prints to the old one. It worked yesterday and fails today.
In a web browser, the search only tries common addresses
A browser can't ask the network what is on it, so the search tries the address ranges most routers use: 192.168.0.x, 192.168.1.x, 192.168.4.x, 192.168.10.x, 10.0.0.x, 10.0.1.x and 172.16.0.x. A printer on any other range is never found by the search. Add it by its address instead. In a browser the app reaches Epson and Star printers over the network; see what each app can connect to.
If something goes wrong
- The address on the sheet starts with
169.254. The printer never got an address from the network. Check its network cable or its Wi-Fi settings, then print the status sheet again. - No connection, and the address is right. Check the till and the printer are on the same shop network, not guest Wi-Fi (see Why it happens). If they are, check the app's permissions below.
- On an iPad or iPhone, the search finds nothing. The app needs Local Network permission. See Let the app find printers on your iPad or iPhone.
- In a browser, the search finds nothing, or the desktop app prints and the browser doesn't. The browser needs permission to reach your network. See Printing from the browser.
- The address is right, and it printed once and then stopped. The printer may be holding a job. See Epson printed once and then stopped.
Still stuck?
Copy the setup report and paste it into your message. It's on the Nothing printed screen of Add printer, and in the ⋯ menu on the printer's row in Settings → Printing: press Copy setup report. On the mobile apps it opens the share sheet. It holds the address and port the app used and the app's last printer log lines. From Add printer it also holds what the printer's ports answered. Nothing leaves the device until you paste or share it.