POS Tax
POS settings: Settings → Tax in the POS. Tax rates themselves are set in WooCommerce.
The Tax page shows how the POS works out tax and how it shows it. Open it from Settings at the foot of the menu, then Tax.
Your tax rates and the four rows set in WooCommerce come from your store: the POS copies them each time it loads your store. Calculate tax based on and the display choices are the till's own, kept on this device until you press Restore Server Settings on General.
The Tax page
The page has three parts: Calculation, Display and Tax Rates.
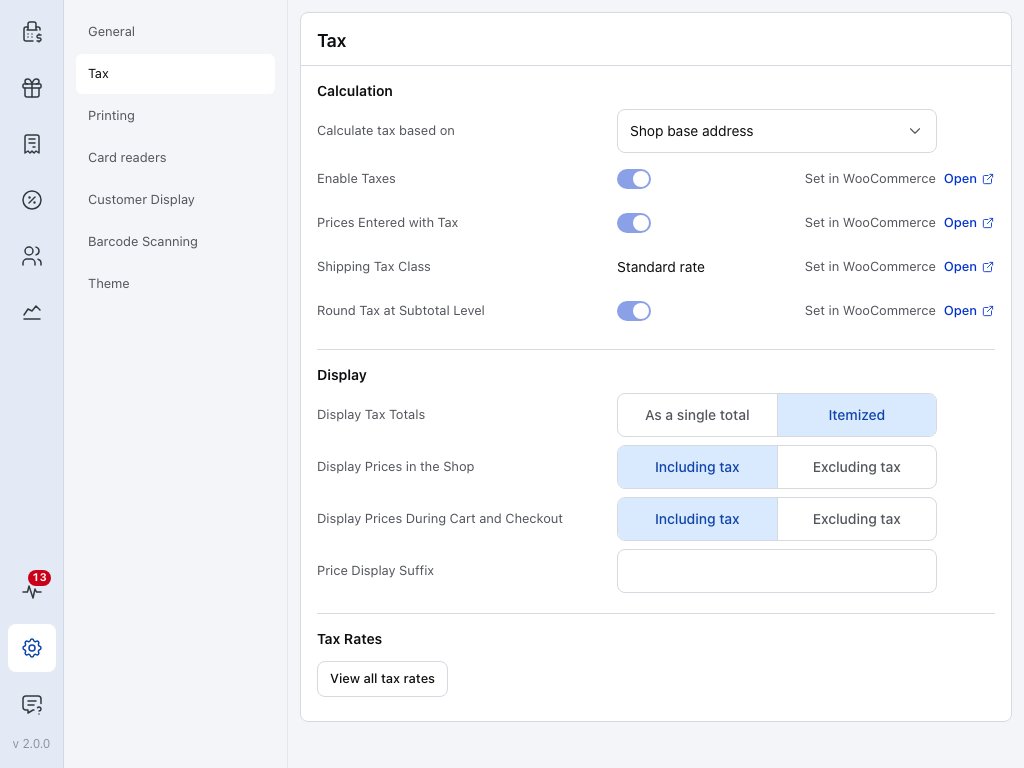
- Calculate tax based on — which address sets the tax rate. See Calculate tax based on.
- Enable Taxes — on when WooCommerce calculates tax. Off, the POS adds no tax to a sale. The switch is greyed out because the value is set in WooCommerce.
- Open — opens WooCommerce's tax settings for your store in the browser. Each greyed-out row has its own Set in WooCommerce note and Open link.
- Prices Entered with Tax — on when your product prices already include tax.
- Shipping Tax Class — the tax class used for shipping lines, here Standard rate.
- Round Tax at Subtotal Level — on when tax is rounded once for the order rather than line by line.
- Display Tax Totals — Itemized shows each tax on its own line in the cart and on receipts; As a single total adds them into one line.
- Display Prices in the Shop — whether prices on product tiles and rows show with or without tax.
- Display Prices During Cart and Checkout — the same for the cart, checkout and receipts.
- Price Display Suffix — WooCommerce's text after a price on your website. The POS doesn't show it. See How tax is shown.
- View all tax rates — every tax rate on this device, one tab per class. See Check the tax rates.
Calculate tax based on
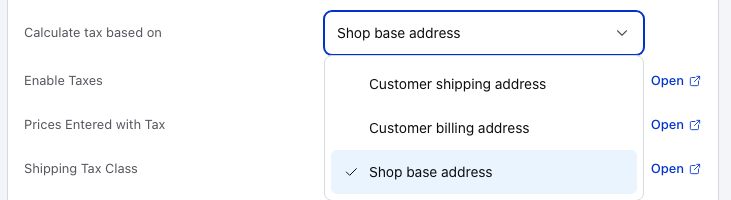
- Customer shipping address — the rate comes from where the order is shipped to.
- Customer billing address — the rate comes from the customer's billing address.
- Shop base address — the rate comes from your store's own address, shown on General.
This starts as WooCommerce's Calculate tax based on. A change here stays on this device, through reloads and syncs, until you press Restore Server Settings on General.
When the order has no such address, the POS falls back the way WooCommerce does. With Customer shipping address, it uses the billing address, then the shop address. With Customer billing address, it uses the shop address. A walk-in sale with no customer is taxed at the shop address.
Add or change the customer on the cart and, when their address has different rates, the POS taxes the cart again at those rates. A tax exempt order stays without tax. See Choose the customer.
The choice travels with each POS order, so your store works out that order's tax the same way. To see the address and rates a cart is using, see Which rates apply to this sale.
How tax is shown
These four only change how amounts are shown. The tax charged is the same either way. A change here shows straight away, with Saved by the row's name, and stays on this device, through reloads and syncs, until you press Restore Server Settings on General.
| Row | Choices |
|---|---|
| Display Tax Totals | Itemized: one line per tax, such as "State" and "County", in the cart and on receipts. As a single total: one tax line. |
| Display Prices in the Shop | Including tax or Excluding tax on product tiles and rows. |
| Display Prices During Cart and Checkout | Including tax or Excluding tax on cart lines, in checkout, on receipts and on the customer display. |
| Price Display Suffix | WooCommerce's text after a price on your website, such as "inc. VAT". The POS keeps it but doesn't show it on tiles, in the cart or at checkout. |
Check the tax rates
Press View all tax rates to see every rate this device has downloaded, one tab per tax class. They're the rates set in WooCommerce's tax settings. Opened from the POS, as here, the rates that apply to the cart's address are marked: see Which rates apply to this sale.
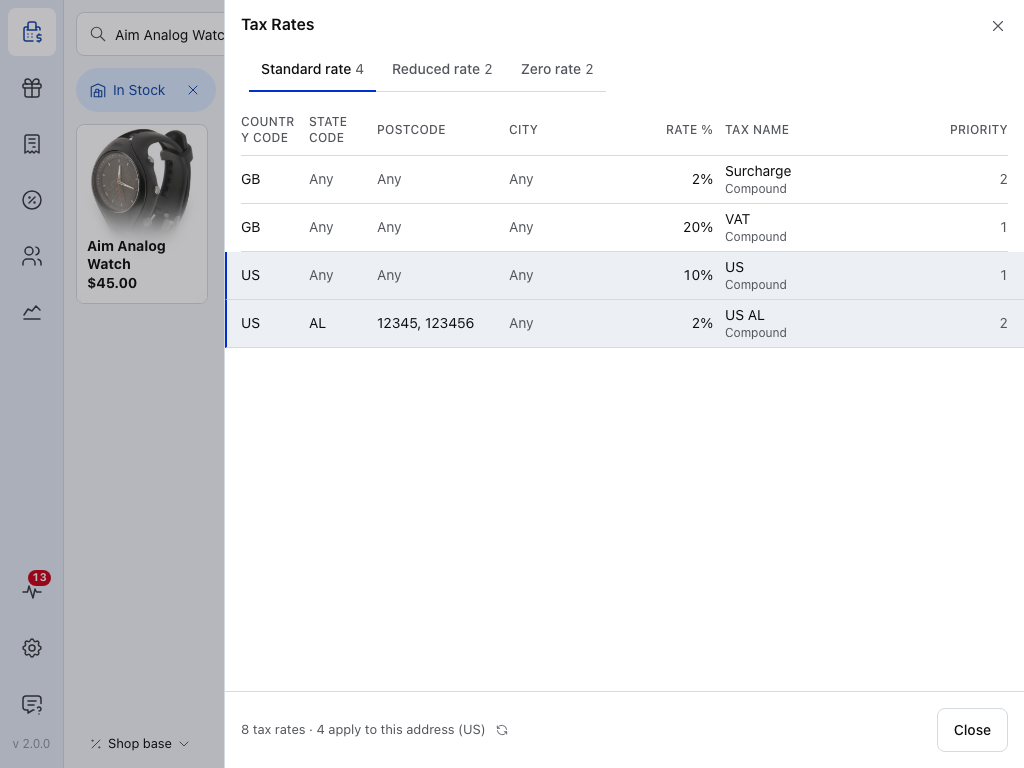
- Standard rate 4 — one tab per tax class, with how many rates it holds.
- US, 10%, priority 1 — a marked row, shaded with a blue bar on its left: this rate applies to the address the cart is using. It shows Compound too, but no rate comes before it, so it's a plain 10%.
- US, AL, 12345, 123456, 2%, priority 2 — also marked. It only applies in Alabama at those postcodes, and Compound means it's charged on the price with the 10% already added: on $100, $10 then $2.20, so 12.2% in all.
- GB, Surcharge — rows without the mark don't match this address.
- Priority — WooCommerce matches rates in priority order. Only one rate per priority applies to an address in each class.
- 8 tax rates · 4 apply to this address (US) — the total across every class, and how many rates match the cart's address. The sync button beside it fetches changes from your store.
- Close — back to where you were.
- On a phone — pick the tax class from a list instead of the tabs.
- Read the columns — they're WooCommerce's. Any means every value; Not on shipping under a name means the rate isn't charged on shipping.
- Refresh the rates — while some rates are still downloading, the foot reads … of … tax rates synced. To download every rate again, press and hold the sync button, then choose Clear and Refresh.
Which rates apply to this sale
Under the products, press the tax address button, such as Shop base, to see the address the cart is using and the rates it matched.
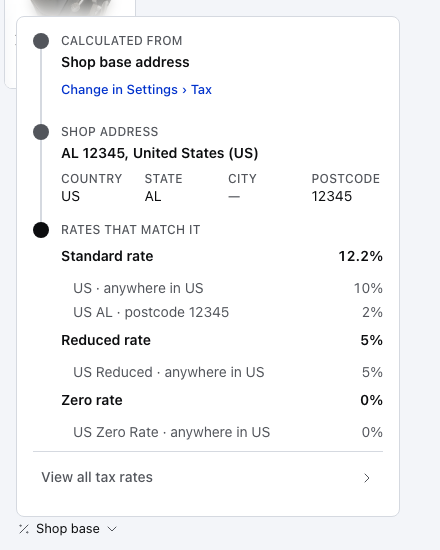
- Calculated from — the address choice this cart uses, here Shop base address.
- Change in Settings › Tax — opens this page.
- Shop address — the address the rates are matched against. With a customer's address on the order, it reads Address on the order.
- Rates that match it — each tax class with its total, and under it each rate that applies and why, such as "anywhere in US" or "postcode 12345".
- View all tax rates — opens the full list with these rates marked, and its foot says how many apply, such as "4 apply to this address (US)".
Restore server settings
Restore Server Settings is at the foot of General, not on this page. It loads your store's settings again, tax included, and puts back any value you changed on this device.
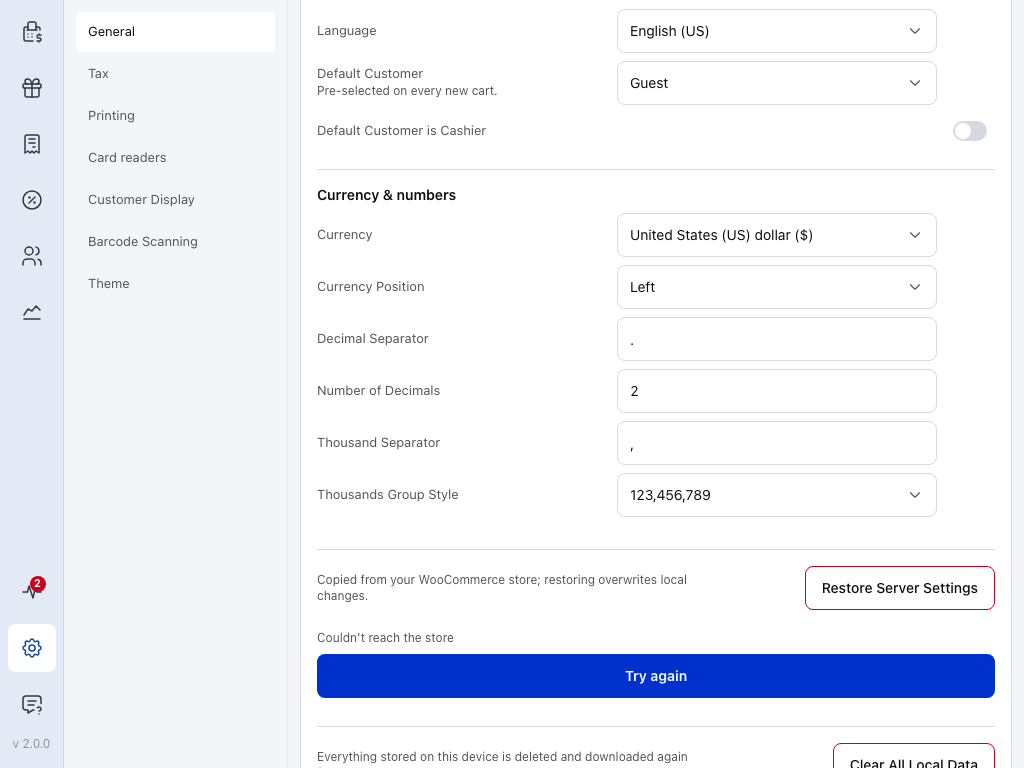
- Restore Server Settings — at the foot of General, under Copied from your WooCommerce store; restoring overwrites local changes.
- Try again — restoring needs a connection. Offline, the page says Couldn't reach the store and your settings stay as they were. Press Try again when you're back online.
Restoring puts back every store setting you changed on this device, on General as well as Tax.
- Press Restore Server Settings.
- In Restore server settings?, press Restore Server Settings again to confirm, or Cancel.
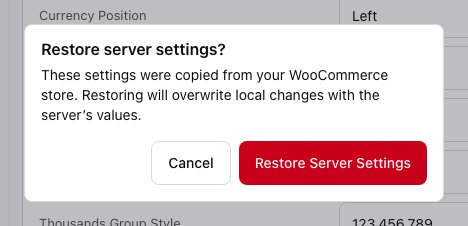
- Restore server settings? — your store's values replace what you changed on this device.
- Restore Server Settings — go ahead.
- Cancel — keep your settings as they are.
- Restored appears under the button when it's done.
Set in WooCommerce
Four rows can't be changed in the POS. Your store works these out when it saves an order, so a different value at the till would only give a different total. Change them in WooCommerce: press Open on the row, or go to WP Admin > WooCommerce > Settings > Tax. The POS picks up the new values the next time it loads your store.
Enable Taxes, Prices Entered with Tax, Shipping Tax Class and Round Tax at Subtotal Level
Enable Taxes
WooCommerce's Enable tax rates and calculations, under WP Admin > WooCommerce > Settings > General. Off, no sale has tax and the POS hides the tax address button under the products.
Prices Entered with Tax
On: the price you set already includes tax, and the POS works the tax out from inside it. Off: tax is added on top.
Shipping Tax Class
Based on cart items uses the tax class of what's in the cart. A named class, such as Standard or Reduced rate, taxes shipping at that class's rates.
Round Tax at Subtotal Level
On: tax is added up across the order, then rounded once. Off: each line's tax is rounded on its own. The two can differ by a cent or two on a large order.
How the POS works out tax
The POS uses your store's rates and works out tax the way WooCommerce does.
Rounding and compound taxes
- Rounding — each tax is worked out with extra decimal places, then rounded to your currency's decimals. With Round Tax at Subtotal Level off, that happens line by line; on, it happens once on the order's tax total.
- Compound taxes — a rate marked Compound is worked out on top of the rates before it, in priority order.
With WooCommerce Tax automated taxes, the first sale at a new location can differ once, until that location's rates reach the POS.
If something goes wrong
The POS and WooCommerce show different totals. Check the four rows under Set in WooCommerce match your store, then press Restore Server Settings on General. With WooCommerce Tax, the first sale at a new location can differ once: see WooCommerce Tax. For the notice the cart shows, see Totals disagree.
No tax on a sale. Check, in this order:
- Enable Taxes is on.
- The product's Tax status is Taxable in WooCommerce.
- Its tax class has rates: press View all tax rates and open that class's tab.
- Using WooCommerce Tax automated taxes? An empty class is normal until a location's first sale. Stop here.
- Otherwise, add rates in WooCommerce's tax settings. Then press and hold the sync button on the tax rates list and choose Clear and Refresh.
The wrong rate. Press the tax address button under the products, such as Shop base, to see which address the cart is using. Changing the customer taxes the cart again at their address. A customer with no address on file is taxed at the shop address. With WooCommerce Tax automated taxes on, don't add rates by hand: a location's rates appear after its first sale.
Prices look lower than the sticker. Prices Entered with Tax is on and a display row is set to Excluding tax. The POS is showing the price without its tax; the total charged is the same.
A cent or two out. Rounding differs between the till and the store. Check Round Tax at Subtotal Level in WooCommerce, then press Restore Server Settings on General so the POS has the same value.