Browser Permissions
If the POS in a browser tab can't reach your Epson or Star printer, though it's on and on the same network, start with Fix it in this order. The desktop app doesn't need these fixes.
What you'll see
In Settings → Printing → Add printer, the scan finds nothing (No printer found), or you enter the printer's address and its card says No connection, though the printer is on and on the same network. Or the same printer prints from the desktop app and not from the browser tab.
After a failed test page, the app may say The app was not allowed to reach the printer. Allow it in your system settings, then try again. In a browser this means the browser couldn't reach the printer. Check that the printer is on and its address is right, then work through the fixes below. Both screens are labelled further down.
Fix it in this order
In Safari or Firefox, start with what works there. In Chrome or Edge:
-
Allow local network access, then check again.
-
If it still fails, find the printer's Port: in Edit printer for a saved printer, or under Enter an IP address when you add one. The port tells you whether the POS uses HTTPS or plain HTTP:
Printer HTTPS port HTTP port Epson 8043 or 443 8008 or 80 Star 443 80 Then follow one route:
- HTTPS port: trust the printer's certificate, then check again.
- HTTP port: see When the printer uses HTTP.
-
Still No connection, or the test still fails? See Still stuck?
Check again
- Adding a printer: press Enter an IP address, then Check this address. When the card shows Ready, the browser can reach the printer: go on to Print a test page.
- A printer you've already saved: in Settings → Printing, press Test Print on its row, or in Edit printer.
Still failing after allowing local network access? Find the port (step 2). Still failing after your port's route? See Still stuck?
HTTPS or HTTP has screens that show where to read the port.
Allow local network access
Chrome and Edge ask before a website may reach a device on your local network. The prompt asks to Access other devices on your local network. Allow it.
If someone chose Never allow, or closed the prompt:
- Click the icon at the left of the address bar, then Site settings.
- Set Local network to Allow.
- Reload the POS and check again.
The printer's certificate
Over HTTPS the printer shows its own certificate. If this browser doesn't trust it, the connection fails before anything is sent. These steps let this browser connect.
-
Make sure the printer has a certificate. If its status sheet shows none, create a self-signed certificate in the printer's web configuration. On an Epson, log in the way Epson Secure Printing describes.
-
In the same browser, open the printer's address over HTTPS, using your printer's own IP address:
- Epson: try
https://192.168.1.200:8043first. If that doesn't open, tryhttps://192.168.1.200, which is port 443. - Star:
https://192.168.1.200, which is port 443.
- Epson: try
-
Accept the certificate warning. Open the steps for your browser:
Chrome
On Your connection is not private, press Advanced, then Proceed to 192.168.1.200 (unsafe).
Edge
Press Advanced, then Continue to 192.168.1.200 (unsafe).
Safari
On This Connection Is Not Private, press Show Details, then the visit this website link, then Visit Website.
Firefox
Use the warning's own option to continue to the site.
-
Go back to the POS and check again.
Do this in every browser on every computer that prints.
The desktop app accepts the printer's certificate itself. That's why the same printer can work there and not in the tab.
When the printer uses HTTP
If your store's address starts with https:// and the printer only has plain HTTP, print from Chrome or Edge 142 or newer and allow local network access.
Other browsers block it: a secure page may not send to an insecure address, which browsers call mixed content. If you can't use Chrome or Edge, switch the printer to HTTPS with a certificate, or use the desktop app.
Safari and Firefox
- Over Wi-Fi: the printer has to match the store. From an
https://store only HTTPS works, once you've accepted the certificate; plain HTTP is blocked. From anhttp://store, plain HTTP works. - USB and Bluetooth: Find a USB printer and Find a Bluetooth printer appear only in browsers that can reach those devices, Chrome and Edge.
For anything else, use Chrome or Edge, or the desktop app.
Where the POS shows it
In Edit printer, a failed Test Print shows The app was not allowed to reach the printer:
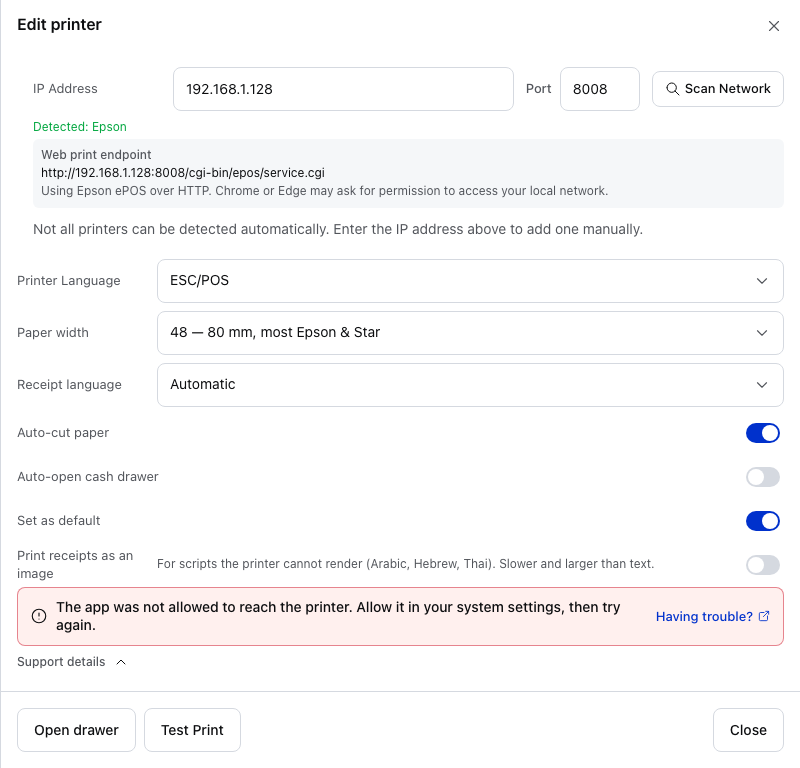
- IP Address — the printer's address, from its status sheet.
- Port — 8008 is Epson's plain HTTP port. See HTTPS or HTTP.
- The app was not allowed to reach the printer — in a browser this shows whenever the browser couldn't reach the printer: it may be off or at another address, the local network permission may be off, or its certificate isn't trusted. Check the address, then work through the fixes in order.
- Having trouble? — opens the printer guide.
- Support details — opens the details to copy for support. See Still stuck?
- Test Print — try again after each fix.
In Add printer, after Check this address, a printer the browser can't reach has a greyed-out card:
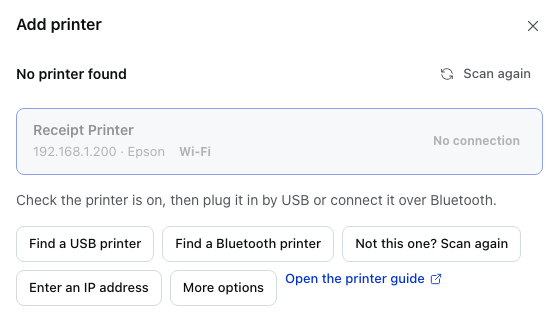
- The printer's card — No connection means the browser got no answer at that address. Work through the fixes in order.
- Enter an IP address — check the address again once you've fixed it.
- More options — choose Epson or Star Micronics.
- Open the printer guide — the printer guide.
HTTPS or HTTP
The browser reaches the printer's web server on one of the ports in the table above. The port decides between HTTPS and plain HTTP.
- HTTPS needs a certificate on the printer that this browser trusts. See the printer's certificate.
- HTTP from an HTTPS store needs Chrome or Edge 142 or newer and the local network permission. See When the printer uses HTTP.
For a saved printer, Edit printer shows which one it uses under Web print endpoint:
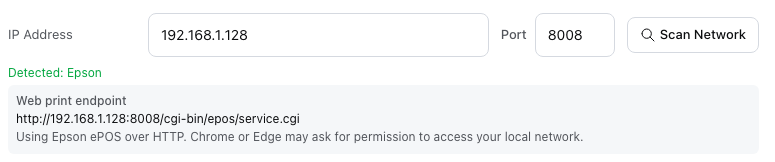
- IP Address — the printer's address.
- Port — 8008 here, Epson's plain HTTP port. On an HTTPS store a new Epson starts at 8043, which uses HTTPS.
- Web print endpoint — the address the browser sends the receipt to. It starts with
http://for plain HTTP andhttps://for HTTPS. - The line under the endpoint — the vendor and HTTPS or HTTP in words. Over HTTP it adds that Chrome or Edge may ask for the local network permission; over HTTPS, that the printer needs a certificate this browser trusts (the printer's certificate).
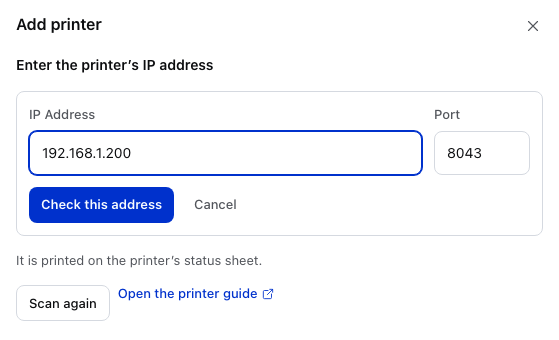
- IP Address — from the printer's status sheet.
- Port — on an HTTPS store it starts at Epson's HTTPS port, 8043.
- Check this address — tries the usual Epson and Star ports, HTTPS and HTTP, and keeps the one that answers.
The browser can print to Epson and Star only.
The card names the wrong maker
Change it under More options:
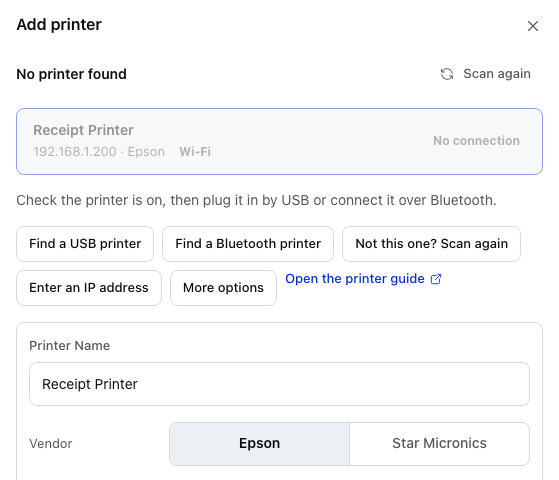
- Vendor — Epson or Star Micronics.
Still stuck?
Use Copy setup report and paste it into your message. It's on the Nothing printed screen after a failed test page, and in the menu of a saved printer. It records the address, the port and what was tried. On the Nothing printed screen, Support details also shows which browser you used.