Receipt Logo Missing
What you see: you sell in a web browser, and the receipt printer prints the whole receipt except the store logo. The Preview on the paid screen shows the logo. The same receipt printed from the desktop or mobile app has it.
Quickest: print from the desktop app. It prints the logo with nothing to set up, so use it if the till already has it installed. To keep printing from the browser, read on.
Check the printer first
Make sure the printer can print a picture at all. Go to Settings → Printing and press Test Print on your receipt printer's row, not on the built-in Print Dialog row: that row's test page has no picture. Every row has Test Print and More actions in the same place, shown here on the Print Dialog row; a printer you added yourself also has Edit between them.

- Test Print — on a receipt printer, prints the test page. Section 2 LOGO (RASTER) on it is the WCPOS mark.
- More actions — opens Copy setup report, for support.
- The WCPOS mark prints, your logo doesn't. The printer can print pictures. Next, check your logo's address.
- The rest of the test page prints, but not the mark. Start with the setup wizard's questions before changing your logo's address.
Check the logo's address
-
Right-click (or press and hold) the logo in the receipt Preview and choose Open image in new tab.
-
Compare the site name in that tab's address, the part between
https://and the next/, with the one in the POS's address bar. For example:- POS site:
shop.example.com - Logo site:
cdn.example.net
These are different.
- POS site:
-
If they differ, that is the likely cause: ask whoever manages your website to make one of the changes below.
-
After the change, reload the POS and print the receipt again. If the site names match, or the logo is still missing, go to Still missing?
Fixes for whoever manages your website
Pick one:
- Use a logo from your own site. Upload the logo to the media library under the store's address and pick that file as the receipt logo.
- Allow the header where the logo lives. If your uploads must stay on a CDN, add
Access-Control-Allow-Originfor your store's address on its image files.
Why it happens
When the POS sends a picture straight to a receipt printer from a browser, the website hosting the picture must allow it. The desktop and mobile apps fetch the logo themselves, so it prints there. Receipts printed through the Print Dialog show it too.
The detail, for whoever manages your website
In a browser, the POS turns the logo into dots before it sends the receipt to the printer. A browser only allows that for a picture from the same address as the POS page, such as your store's own media library. A picture from another address needs that server's permission, a header called Access-Control-Allow-Origin. Without it, the browser hands the POS nothing, and the receipt prints without the logo rather than not at all.
The logo comes from another address when:
- an image CDN or a media offload plugin serves your uploads from its own domain
- the logo's address and the POS's differ only by
www.
Still missing?
Right after a receipt prints without the logo, go to Settings → Printing, open More actions on the printer's row and press Copy setup report.
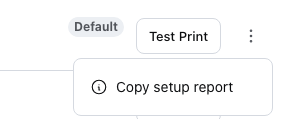
- More actions
- Copy setup report
The report holds the app's recent printer events from this session only, so copy it before you reload the POS. Paste it into your message with the logo's address.