What's New
WCPOS 2.0 is the biggest release since the plugin was first published. Every sale used to finish on WooCommerce's own payment page, which capped what the till could do: one payment method per order, no cash sale without waiting for a reply from your store, and no card reader talking directly to the POS. 2.0 replaces that with a checkout that belongs to the POS, and rebuilds the register around it.
- 2.0 needs WooCommerce 9.0 or later.
- Update the app and the plugin together: both must be on 2.0.
Read Upgrading to 2.0 first.
A new register
The whole POS has one visual language now, on phones, tablets, desktops and in the browser. Forms and pickers slide in from the side as panels instead of popping up over the cart. A scale setting (compact, regular, spacious) sizes the POS for your device, and Auto follows the window size. The bar at the top names the store you're in (and the register, when the store has more than one) and shows an Offline badge when the store can't be reached.
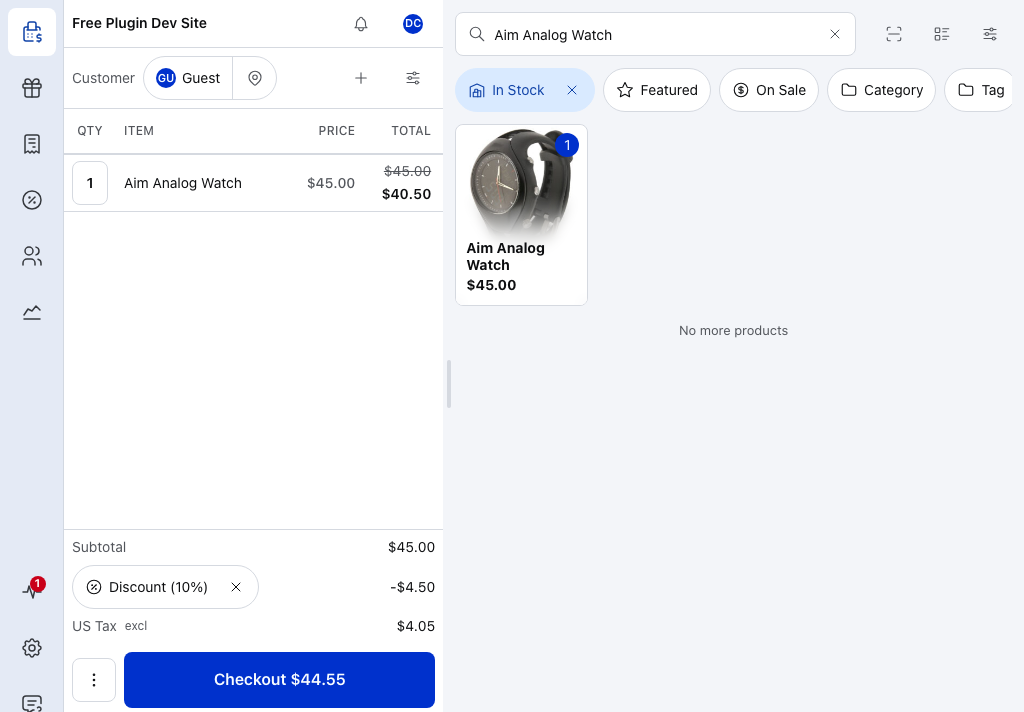
- Cart Settings — where you choose which side the cart sits on, where open orders go, how lines are sorted, your quick discount keys and the cart's columns. See Cart on the left or right.
- Search products — type part of a name, a SKU or a barcode. The filter bar below it can hold your own buttons.
- Add to cart (+) — adds something that isn't a product tile: a new customer, a miscellaneous product, a fee, a discount or shipping.
- Discount (10%) — a quick discount on the whole order. The cross takes it off.
- Checkout — opens the tender pane, with the amount to pay on the button. See Checkout.
Two parts of the layout are yours to set: which side the cart sits on, and a row of quick filter buttons above the products.
Cart on the left or right
In the cart, press Cart Settings and choose Cart left or Cart right under Panel position. The cart starts on the right; the change takes effect at once, and the products move to the other side.
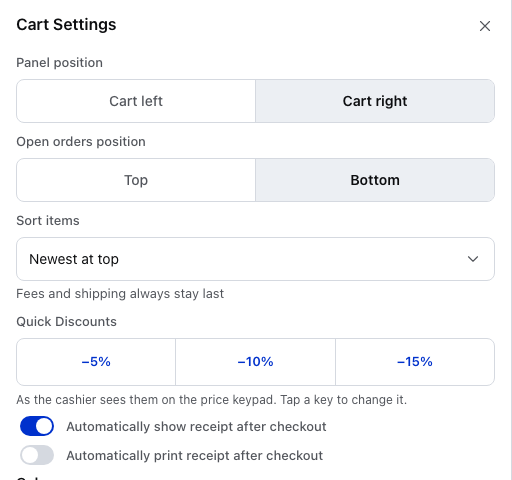
- Panel position — Cart left or Cart right.
- Open orders position — whether the strip of orders still open sits at the Top or the Bottom of the cart.
- Sort items — the order lines appear in, such as Newest at top. Fees and shipping always stay last.
Below these, Quick Discounts sets the three percentage keys (–5%, –10% and –15% to start with) that the cashier sees on the price keypad; tap a key to change it.
Your own quick filter buttons
A quick filter is a button on the filter bar that applies several filters, and an order, with one tap. In the products' Settings, press Customise filter bar, then Add quick filter. Start from one of the suggestions, or from scratch.
Set up a quick filter, step by step
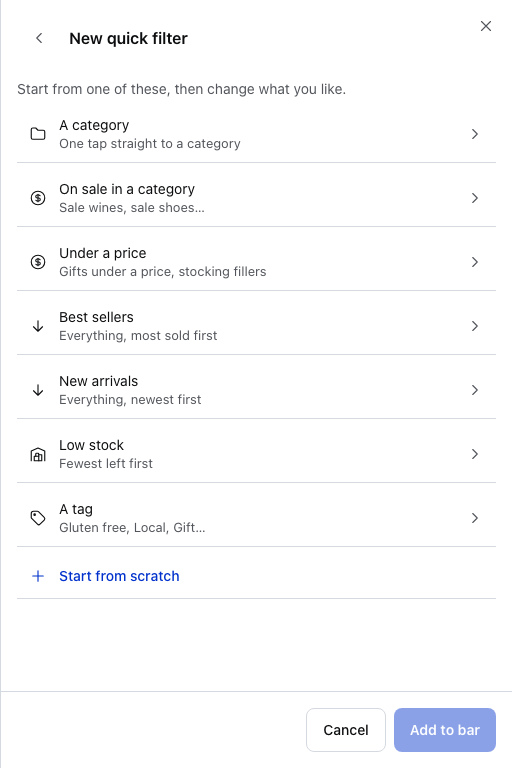
- A category — one tap straight to a category. On sale in a category, Under a price and the others below it fill in the conditions for a common button.
- Best sellers — everything, most sold first. New arrivals and Low stock sort the same way, by newest or by fewest left.
- Start from scratch — an empty button you build yourself.
A starter opens the editor with its conditions filled in. Change whatever you like.
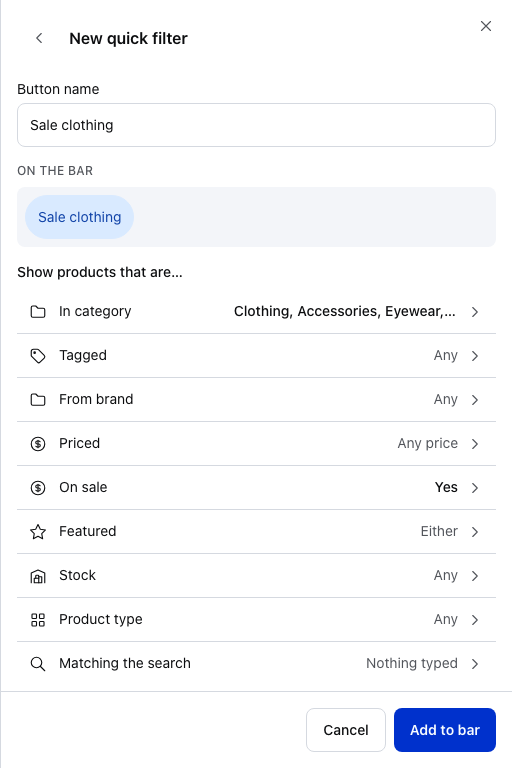
- Button name — what the button says on the bar.
- On the bar — how the button will look.
- In category — one of the conditions under Show products that are…. The others are Tagged, From brand, Priced, On sale, Featured, Stock, Product type and Matching the search. A product has to meet all of them.
- On sale — here set to Yes.
- Add to bar — saves the button. Cancel leaves without saving.
Further down, choose the order the products come in, and check what the button will show.
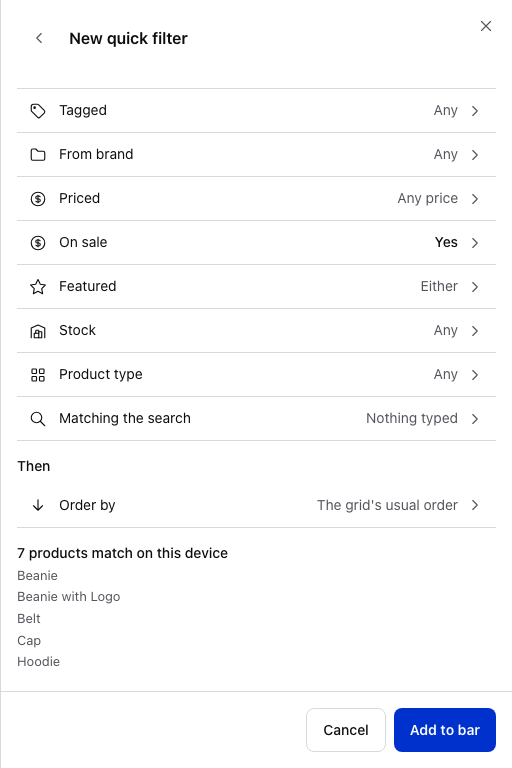
- Order by — The grid's usual order, or a sort of your own for this button.
- … products match on this device — a count and the first few names, from the products already on this device. If nothing matches yet, you can still save the button.
- Add to bar — saves it. The button appears on the filter bar, where one tap applies it.
To change or remove a button later, open Customise filter bar again. See Display Settings and the Product Panel.
Checkout that belongs to the POS
Pressing Checkout opens the tender pane: a keypad for what the customer hands over, the change shown as you type, and the payment methods your store offers.
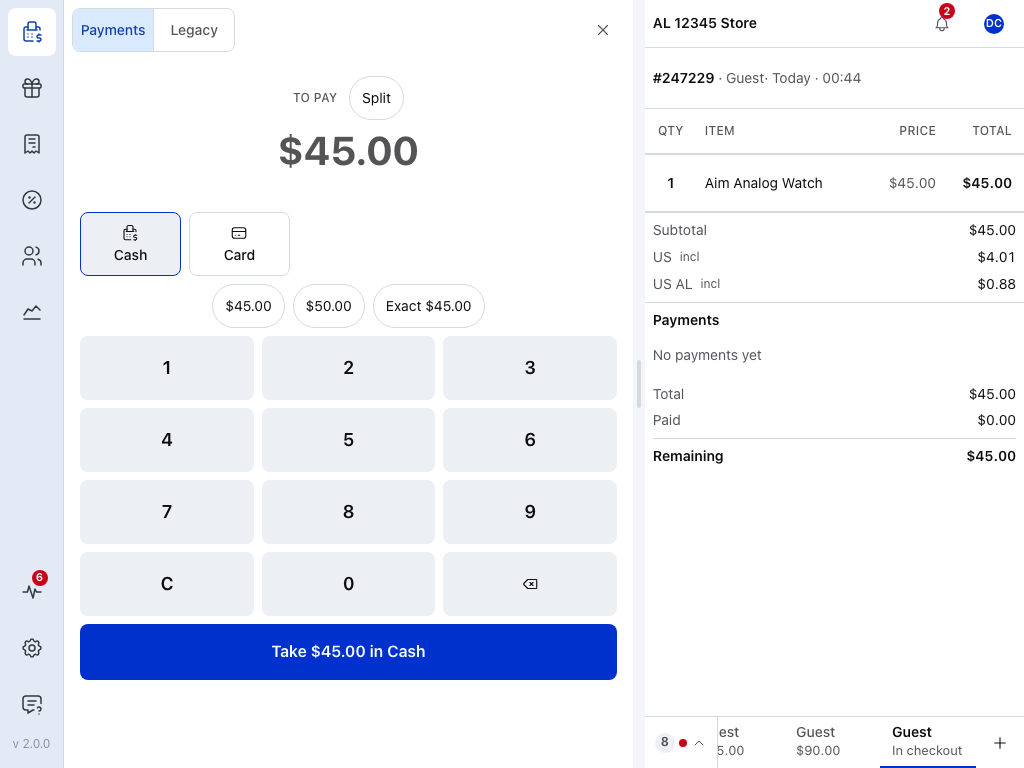
- Payments tab — the payment method tiles and what's been taken so far. See The Tender Pane.
- Legacy tab — gateways that run on their own payment page. See The Legacy Tab.
- To pay — the balance still due.
- Split — divides the order into several payments. See Split Payments.
- Payment method tiles — the ways your store takes payment at the till. See Payment Methods.
- Quick amounts — the exact amount, or rounded-up notes.
- Keypad — enter what the customer hands over.
- Take — names the amount and the method. Press it to record the payment. See Taking a Payment.
- Split payments. Split by Even, Amount, Percent or Item: part in cash and the rest on a card, evenly between several cards, or by what each person bought. What is still owed stays on screen as Remaining until the order is paid.
- Recorded payments complete offline. A sale paid with cash or another payment recorded at the till finishes even when the store can't be reached, and syncs when the connection returns.
- A slow connection holds the sale instead of failing it. If the store is slow to answer, the till waits and tells you.
- Quick discount. Add Discount takes an amount or a percentage off the order and records it as a proper discount. See Quick discount.
- Tips. A tip the customer adds on a card reader is recorded on the order as a fee line named Tip.
- Legacy tab. Supported gateways that use their own payment page remain available through the Legacy tab. See The Legacy Tab.
Which payments wait for a connection, and when the Legacy tab can't be used
- Recorded at the till means cash, a card on an external terminal, cash on delivery, bank transfer or cheque. Payments through an integrated reader or an online gateway still wait for a connection.
- A legacy gateway charges the whole order, so it can't be used once a payment has been taken on the order, unless you cancel the payments taken so far.
See Checkout.
Quick discount
In the cart, press + (Add to cart), then Add Discount. On the Quick discount tab, enter the amount, choose $ for money or % for a percentage, and press Add Discount.
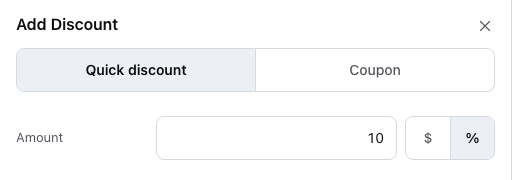
- Quick discount — an amount or a percentage off the whole order.
- Coupon — applies one of your store's WooCommerce coupon codes instead.
- Amount — tap it to enter the number on the keypad. A percentage has to be above 0 and no more than 100.
- $ / % — money or a percentage.
The buttons sit at the foot of the same panel:

- Add Discount — adds it to the order. Cancel closes the panel without adding anything.
The discount is saved on the order as a discount, not as a fee, so WooCommerce and your reports count it as one. It shows in the cart as Discount (10%), with the amount taken off, and the cross beside it removes it. It replaces the old habit of adding a negative fee, which is no longer possible. See Cart Discounts.
Card readers at the register
Card terminals are driven from the tender pane, with the reader's progress shown on screen and cancel one tap away. Available with WCPOS Pro:
- Stripe Terminal: the smart readers you may already use, plus Bluetooth readers. Tap to Pay on a phone or tablet follows in an app update.
- SumUp: the SumUp Solo over the network, and the Solo, Solo Lite and Air over Bluetooth.
- Mollie Terminal.
The till remembers which reader it uses for each gateway. A reader on the network is set up on the gateway's own WooCommerce settings page; Bluetooth readers and Tap to Pay are set up in the app, in Settings → Card readers. See Payment Gateways.
Registers and the cash drawer, in the free plugin
A cashier opens the register with a float, records cash paid in or out during the day, and closes it with a count. The count is filed as a numbered closure, and its closing report (the Z-report) is printed from the completion sheet with Print closure, so the end of every day is a document you can find again, not a screen you saw once. Closures can be exported as CSV from Reports → Closures in the POS, or from WP Admin → POS → Settings → Export closures.
See Open the Register for opening the drawer, moving cash and closing with a count.
Register sessions are off until you turn them on.
Turn on registers and choose who can handle cash
In WP Admin → POS → Settings → General, under Register, turn on Open and close the register. Beside it are Opening float, Ask a manager when the count is out and Remind the cashier to close. Which roles may handle cash is set on the Access tab, and approving a closure that's out is for administrators and shop managers. See Register settings and Access.
The free plugin has one register, shared by every device on the counter. Naming registers, more registers and more stores come with Pro. See Stores, Registers and Devices.
The Reports screen has a Closures view (the open session and its X-report, closures by business day) and a Sales view with margin by category and brand, when your products have a cost. The free plugin shows today on its register; Pro opens earlier days, every register and every store. See End-of-Day Reconciliation and Reports.
Customer-facing display
A second screen that shows the customer their cart as it's rung up: each line, fees, shipping, coupons and discounts, the totals, and the payments taken with what is left to pay. It's a web page served by your store, so any tablet, phone or monitor with a browser can be the display. Available with Pro.
Set up a customer display
To pair one, open Settings → Customer Display on the till and press Generate pairing code. On the display, open the Display page URL shown there and enter the 6-digit code before it expires, 10 minutes later.
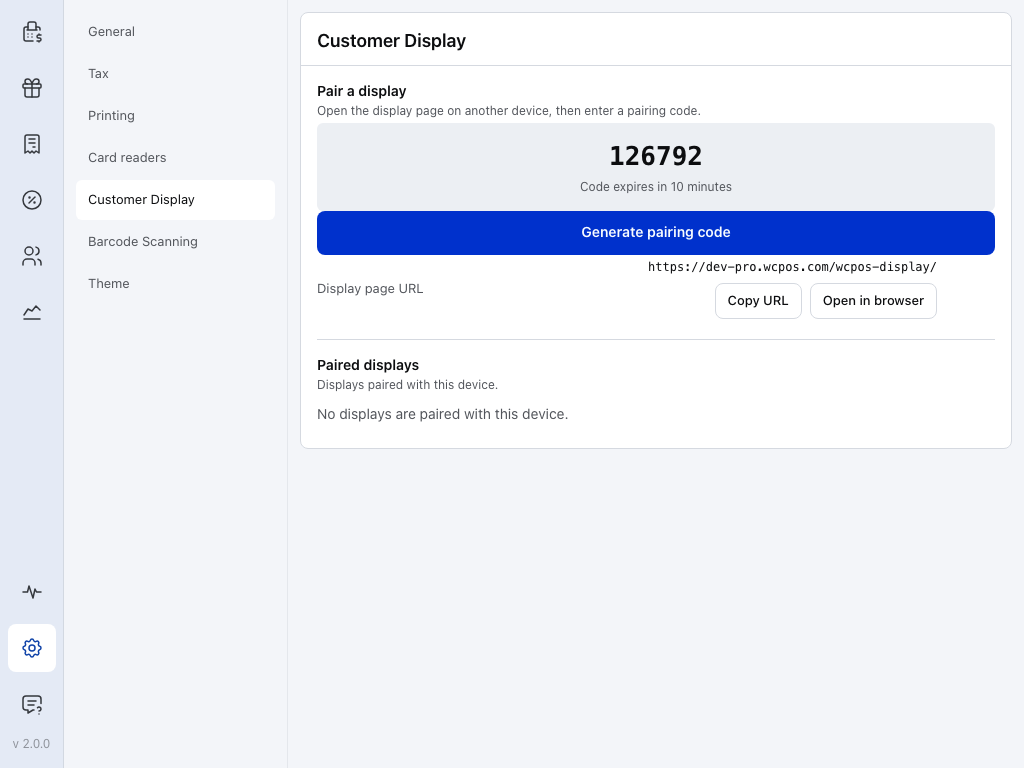
- Pairing code — type it on the display. Press Generate pairing code again for a new one.
- Display page URL — the page to open on the display. Copy URL and Open in browser sit beside it.
- Paired displays — each display paired with this till, shown as Connected or Disconnected with when it was last seen. Forget unpairs it.
From then on the display follows the till's cart by itself. Choose its look from the gallery in WP Admin → POS → Templates → Display.
Receipts and refunds built for fiscal rules
Receipts now carry the register name and the software version, and have a place for a fiscal QR code, left empty until a country's rules need one. Offline sales keep the time they were really made and the register they were made on. A refund or a void is recorded as a separate record that can't be changed. A refund also prints its own receipt, as a credit note that names the sale it corrects.
This is the groundwork that country-specific fiscal rules (such as France's and Spain's) will build on. Certification for a particular country is not part of 2.0.
Coupons in the free plugin
Applying a WooCommerce coupon code at the till no longer needs Pro: it's the Coupon tab of Add Discount. The Coupons screen in the POS, for browsing the catalogue, stays a Pro feature; coupons are still created in WP Admin → Marketing → Coupons.
Requirements and removals
- WooCommerce 9.0 or later is required. On an older store the plugin doesn't start, and WP Admin shows a notice saying so.
- The app and the plugin move together. A 1.11 app that meets the 2.0 plugin stops at an update notice until it's updated: the app and the plugin must both be on 2.0. See Upgrading to 2.0.
- Magnetic-stripe card readers, an experimental Pro feature, are no longer supported.
- Negative fees can no longer be added; use Add Discount.
- WooCommerce Analytics counts a POS order when it's paid, so open or partly paid orders no longer appear in sales totals until they're completed.
Not in 2.0
- Surcharges. Rules for extra card-payment charges vary by country, and supported payment services do not yet provide what this needs; they will be their own effort.
- Country-specific fiscal certification (the information France requires, Spain's VeriFactu submission). The groundwork is in 2.0 so nothing has to be redone when those land.
- Changing the register layout from an extension. Extensions cannot change the register layout in 2.0; the layout settings are for WCPOS's own panels for now.