Receipt Templates
WP admin: templates are chosen in WP Admin → POS → Templates.
Every receipt WCPOS prints is a template filled in with the sale. You choose the templates in WP Admin → POS → Templates, and the till prints the first active one unless the cashier picks another. The same screen holds invoices, gift receipts, packing slips and kitchen tickets.
Jump to what you need:
- At the till: print a receipt, email it, or reprint one later.
- Store owner: choose your store's receipt and send it to a printer.
At the till
When a sale is paid, the paid screen shows its receipt. To print it:
- Check the receipt in the preview (5).
- Check Printer (4). Auto picks one that suits the template.
- Tap Print receipt (6). After the first print it reads Print again.
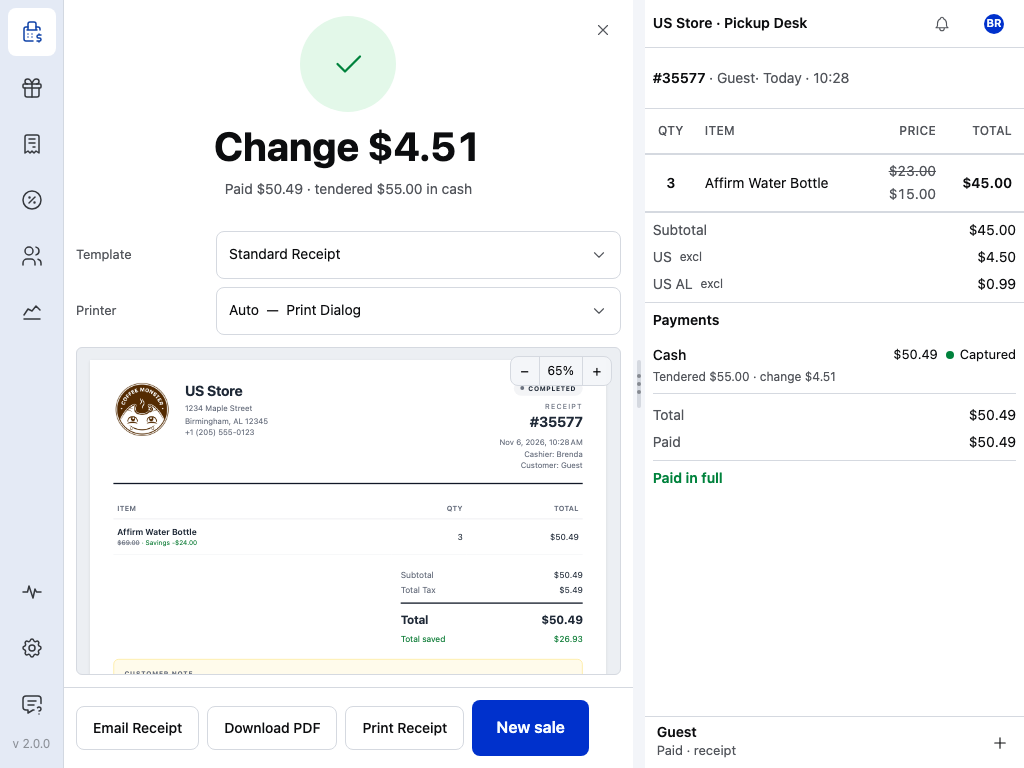
- Change: what to give back.
- Paid: the amount and how it was paid.
- Template: which receipt this sale gets. See A different receipt for one sale.
- Printer: where it prints. See Send each template to a printer.
- Preview: the receipt as it will print.
- Print receipt: prints the receipt shown, on that printer.
- Email Receipt: emails the customer. See Email a receipt.
- New sale: an empty cart for the next customer.
Download PDF, between the two, saves the receipt as a file. It needs a connection.
Email a receipt
- Tap Email Receipt.
- Check Email Address. It starts as the order's billing email. To keep a new address on the order, turn on Save email to Billing Address.
- Tap Send.
The customer gets WooCommerce's invoice email for the order, not the template shown in the preview. Offline, the button reads Send when online, and the email goes when the device reaches your store again.
Reprint a receipt
With WCPOS Pro, you can print it again later:
- Open Orders from the side menu.
- Find the order, and tap its receipt button.
- Print it from the receipt that opens.
Without Pro, print or email the receipt from the paid screen before you tap New sale.
More on this in Reprinting Receipts.
A different receipt for one sale
The cashier can pick another active template from Template on the paid screen. The pick lasts for that sale only. With one active template, Template shows its name and there is nothing to choose.
Choose your receipt
Start at Customise Your Receipt. It walks through the three easiest ways: picking a different bundled template, asking AI to tweak one, or editing by hand.
The store owner sets this up once, in WP Admin:
- In WP Admin, go to POS → Templates. The Receipts tab lists Your Templates at the top, with the Template Gallery below.
- In the gallery, narrow the cards with Search templates..., Category, Format and Direction. Preview shows a template filled in with Sample Data or with one of your orders.
- Click Use Template. Your own copy joins Your Templates, already active, at the bottom of the list.
- Drag it to the top of Your Templates. The till uses the first active template as its default, and the built-in Legacy PHP Template stays ahead of yours until you move yours above it or turn its Active switch off.
To change what a template says or how it looks, open your copy in the template editor, which shows a live preview as you edit. See Customise Your Receipt.
Send each template to a printer
In the app, Settings → Printing lists the templates the till can print under Receipt Templates, with Report templates and Closure templates below. Each row shows:
- The template, such as the built-in Legacy PHP Template.
- Its type: HTML for the print dialog; a thermal template shows its paper, such as Thermal 80mm.
- The printer: Auto picks a printer that suits the template's type and paper width, and opens the Print Dialog when none does. Choose a printer to always send this template there.
Adding a printer is covered in Printers.
What prints on a receipt
This is the Standard Receipt as the gallery previews it, with sample data. Below it, each part and where it comes from.
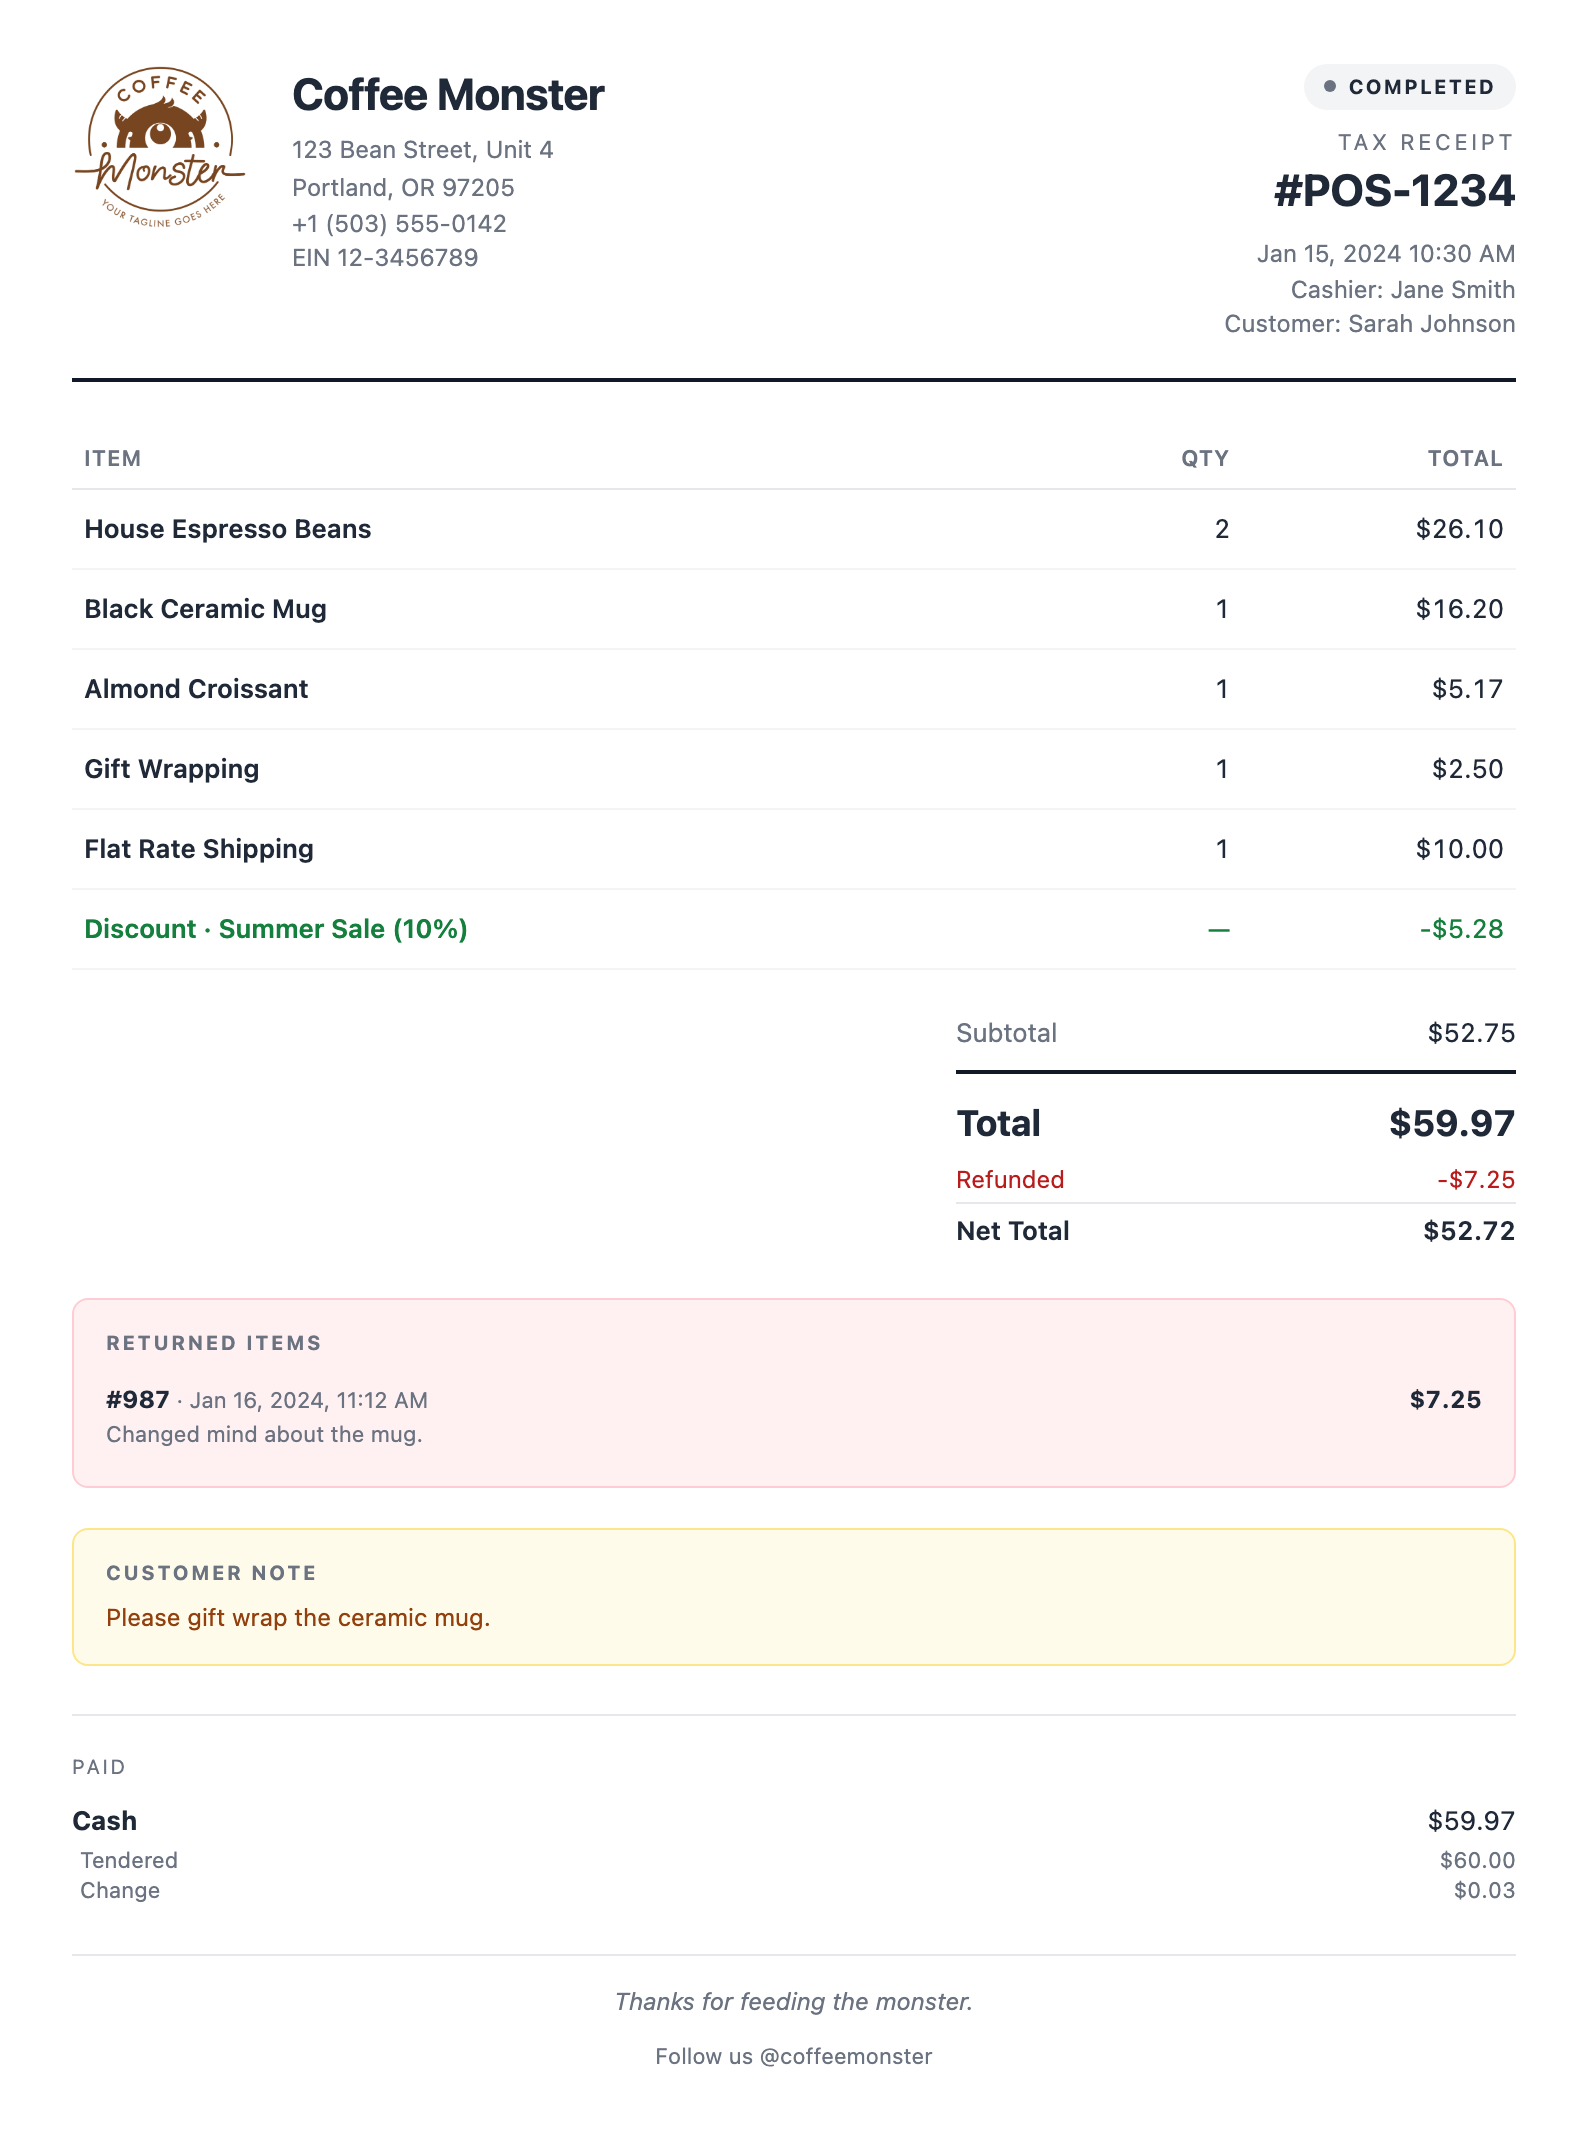
- Top left (logo, name, address, phone and tax ID): your store details. Without Pro, they come from POS → Settings (Store details and Store tax IDs), and the logo is your WordPress site logo. With Pro, each store has its own on its Details and Tax pages.
- Top right (order number, date, cashier and customer): the order.
- The middle (items, discount and totals): the order, priced the way your tax setting says. See Adaptive tax display.
- The two boxes (Returned items and Customer note): the order's refunds and note, when it has them.
- Paid (near the bottom): each payment, with the cash tendered and the change.
- The bottom (the thank-you line): with Pro, each store's Receipt messages. Otherwise the receipt prints a standard thank-you.
Tax IDs are covered in Store Tax IDs, and each store's details (Pro) in Fill in the store's pages. Every field a template can print is listed in Receipt Data.
The bundled templates that show prices print the regular price and the saving when a product is on sale or its price was changed at the till (Cart Discounts); to add them to your own template, see Displaying regular price and savings.
Pro: a receipt for each store
With WCPOS Pro, each store can print its own receipt. In POS → Stores, open a store:
- Receipts: the store's Receipt Templates list says Same as site until you click Customise. Then tick what cashiers can print there; the first ticked template is the store's default, and you drag to change the order. Use site template goes back. The same page has the store's Receipt messages.
- Details: Logo and address, with Use site logo or Upload logo, and the store's Contact details.
See Fill in the store's pages and Per-store templates.
Receipts outside the till
- Email: Email Receipt at the till sends WooCommerce's own customer invoice email, not a WCPOS template. Change how it looks in WooCommerce → Settings → Emails.
- Download PDF: the server builds the PDF, so it needs a connection.
- Online customers: turn on Let customers download receipts to add a Receipt button to their orders in My Account. It is off until you turn it on, and Receipt template for customers chooses which template they get. See Storefront receipts.
For template editors: the receipt data
Every template prints from the same receipt data: store details, items, totals, tax, payments, refunds and more. Each amount also has a ready-formatted _display version, such as $29.99 instead of 29.99.
If something goes wrong
Your new template isn't the one that prints. The till uses the first active template in Your Templates. Drag yours to the top, or turn off the ones above it. For a single sale, the cashier can choose it from Template on the paid screen.
Template shows a name but no list on the paid screen. Only one receipt template is active. Turn on another in Your Templates to give cashiers a choice.
A template can't be picked while offline. Legacy PHP Template and the WP Overnight templates are built on the server. Make an HTML or thermal template the default if the till often loses its connection.
The logo is missing. Without Pro, the receipt uses your WordPress site logo, so set one in your theme. With Pro, open the store's Details and choose Use site logo or Upload logo. If the logo is missing only when printing from a browser tab, see Logo Missing in the Browser.
Nothing prints, or it prints to the wrong printer. Check the template's printer in Settings → Printing, then see When nothing prints.
Template gallery
The gallery ships with ready-made templates you can use as they are or customise. Filter by Category (Receipt, Invoice, Gift Receipt, Credit Note, Purchase Order, Kitchen Ticket, Bar Ticket), Format (HTML (browser print) or ESC/POS (thermal printer)) and Direction (Left-to-right or Right-to-left). Each card has Preview and Use Template; Use Template makes an editable copy in Your Templates and leaves the gallery's original as it was.
When the gallery's version of a template you copied is newer, the card says Update available. Install new version adds the new version as a separate copy, so your edits stay.
HTML templates
For the print dialog. They render on the device, so printing works offline. Download PDF is built on the server and needs a connection.
The 9 HTML templates
Standard Receipt
HTML · Default receipt: logo, store identity, items, totals, payment.
Standard Receipt (RTL)
HTML · RTL · Right-to-left counterpart for Arabic, Hebrew, Persian, Urdu.
Minimal / Modern
HTML · Same essentials as Standard, packed into less vertical space.
Detailed Receipt
HTML · Full tax invoice: SKU column, unit price, per-rate tax breakdown, addresses.
Gift Receipt
HTML · Items only, prices hidden. Includes gift message and return policy.
Invoice
HTML · Full-page A4/Letter invoice with optional "How to pay" panel for unpaid orders.
Packing Slip
HTML · Warehouse companion: items and quantities, ship-to, no prices.
Quote / Estimate
HTML · Pre-sale document with pricing and terms, no payment section.
Narrow Receipt
HTML · Monospace receipt for narrow paper or HTML-capable thermal printers.
Thermal templates
For Epson, Star, and other thermal receipt printers.
The 6 thermal templates
Simple Thermal Receipt (58mm)
Thermal · 58mm · Clean 58mm thermal layout.
Simple Thermal Receipt (80mm)
Thermal · 80mm · Clean 80mm thermal layout, the most common.
Simple Thermal Receipt 80mm (RTL)
Thermal · 80mm · RTL · RTL counterpart for 80mm. Needs a printer with an Arabic codepage (CP864 / Windows-1256).
Detailed Thermal Receipt (58mm)
Thermal · 58mm · Everything on 58mm: addresses, tax breakdown, refunds, payments, terms, barcode.
Detailed Thermal Receipt (80mm)
Thermal · 80mm · Everything on 80mm: addresses, tax breakdown, refunds, payments, terms, barcode.
Kitchen Ticket
Thermal · 80mm · Items only, large font, no pricing, for prep stations.
Reports, closures and customer displays
The other tabs in POS → Templates, Reports, Closures and Display, work the same way.
What each tab holds
- Reports: the layouts for a printed report (Report, Report (Letterhead), and Thermal Report in 80mm and 58mm).
- Closures: the end-of-shift slips (Closure, Closure (Detailed), Thermal Closure in 80mm, 58mm and 80mm RTL, and Count Slip (80mm)).
- Display: the customer display templates, which need Pro.
Reports and closures can't use the Legacy PHP engine.
Third-party document templates
With WP Overnight's PDF Invoices & Packing Slips for WooCommerce active, its invoice and packing slip join your receipt templates. They need a connection to print.
How the WP Overnight templates work
WCPOS adds Invoice (WP Overnight) and Packing Slip (WP Overnight) to the receipt templates, turned on. They hand the order to WP Overnight's document API, so they keep the invoice and packing-slip numbering, layout, branding, legal and tax fields, and template changes set up in that plugin.
They are there only while the WP Overnight plugin is active, and the server renders them. Use a bundled HTML or thermal template when you need to print offline. See WP Overnight templates.
Adaptive tax display
Most bundled templates print prices with or without tax to match your WooCommerce tax display setting.
Which templates follow the setting, and how
Standard, Standard RTL, Minimal/Modern, Narrow, Invoice, Quote and the Simple Thermal templates follow your WooCommerce tax display setting:
- Stores that show prices with tax (EU/UK/AU) print gross prices with a "Tax included" line.
- Stores that show prices without tax (US/CA) print net prices with tax added as a separate line, labelled Total Tax.
- The grand total always shows the gross amount actually charged.
The Detailed templates are formal tax invoices: their item lines are always without tax, followed by a breakdown of each tax rate. Only the tax heading follows your setting.
Template engines
Each template uses one of three engines: HTML (Offline), XML (Receipt Printer) or PHP (Legacy). HTML and XML print offline; PHP needs the server.
The three engines
You choose the engine when you create a template, or the gallery card decides it when you click Use Template. It can't be changed once the template is saved: start a new template to switch.
HTML (Offline), recommended
Logicless HTML with {{variable}} placeholders. Renders on the device, so printing works offline. For the print dialog.
XML (Receipt Printer)
XML that gives both a screen preview and ESC/POS commands for thermal receipt printers. Same template, two outputs. For Epson, Star, and other thermal printers.
PHP (Legacy)
Server-side PHP using WooCommerce functions. Kept for existing yourtheme/woocommerce-pos/receipt.php overrides and the built-in Legacy PHP Template. Needs a connection to the server to render, and receipts only.