Change Cart Items
Every product, fee and shipping charge in the cart is a line. You change most of a line right where it sits: tap the quantity, the price or the name. Everything else is in the line's Edit dialog.
A line in the cart
A product line shows its quantity, its name and its unit price, with the line total on the right. Fees and shipping are lines too, below the products. The columns you show decide what else is there.
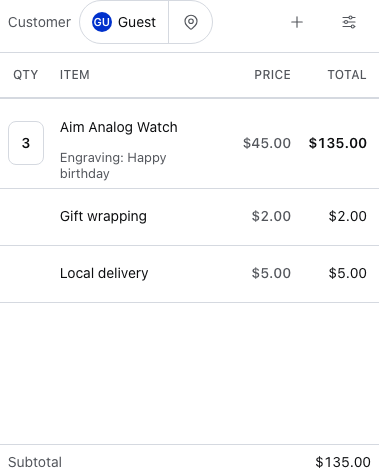
- Qty — the quantity. Tap it to change it; see Change the quantity.
- Item — the product's name. Tap it to rename the line for this sale: the name turns into a text box, and Enter or tapping anywhere else keeps the new name. Underneath are the options a variation was sold with and the line's custom fields, as
Key: value. Turn on the column's SKU option to show the SKU too. - Price — the price of one. Tap it to change it; see Change the price. When the price is lower than the regular price, the regular price shows struck through above it.
- Total — quantity times price. Tap it to show Edit and Remove; see Edit or remove a line.
- A fee — tap its name to rename it, the same way, and its amount to change it. See Fees.
- A shipping line — the same: tap its title or its amount. See Shipping.
- + — adds a fee, shipping, a discount or a miscellaneous product to the cart.
- Cart Settings — which side the cart sits on, how it sorts its lines and which columns it shows; see Cart Settings for lines.
Change the quantity
Tap the quantity box. In the iOS and Android apps you type the number straight into the box, and a quantity of 0 removes the line. Everywhere else a keypad opens: type the new quantity, then tap the tick (or press Enter) to keep it. On a phone the keypad opens as a sheet from the bottom of the screen; on a tablet or computer it grows from the box, with the quantity at the top:
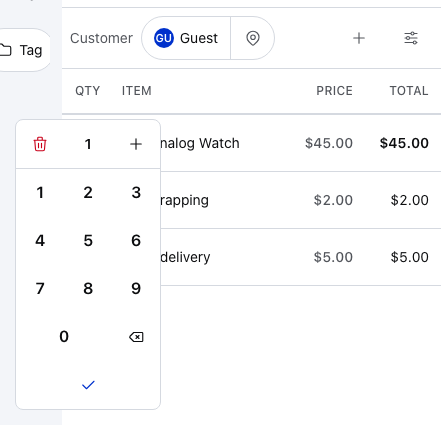
- The quantity — what you've typed so far.
- − — one fewer. At 1 it turns into a bin, as here: pressing it removes the line.
- + — one more.
- Number keys — type the new quantity.
- Delete — takes off the last digit.
- Done (the tick) — keeps the new quantity. Enter does the same. Escape closes the keypad and keeps the quantity you had.
When your store has Enable Decimal Quantities on, the keypad also has a decimal key, marked with your store's decimal separator. It takes a part quantity such as 2.5 or 0.25 (up to six decimal places), for things sold by weight or length.
When your store prevents overselling, a quantity above what you have in stock turns amber; see When checkout is blocked.
Split a line
Split turns one line of several into separate lines of one each, so you can give one of them a different price, discount or note. A part quantity keeps its fraction on a line of its own: a line of 2.5 splits into 1, 1 and 0.5.
The Split link sits under the quantity of any line with more than one. It's off until you switch it on in Cart Settings.
Where the Split link is, and how to switch it on
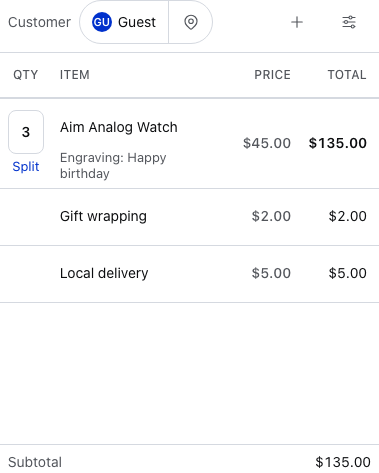
- Qty — the line's quantity, 3 here.
- Split — tap it to make three lines of one.
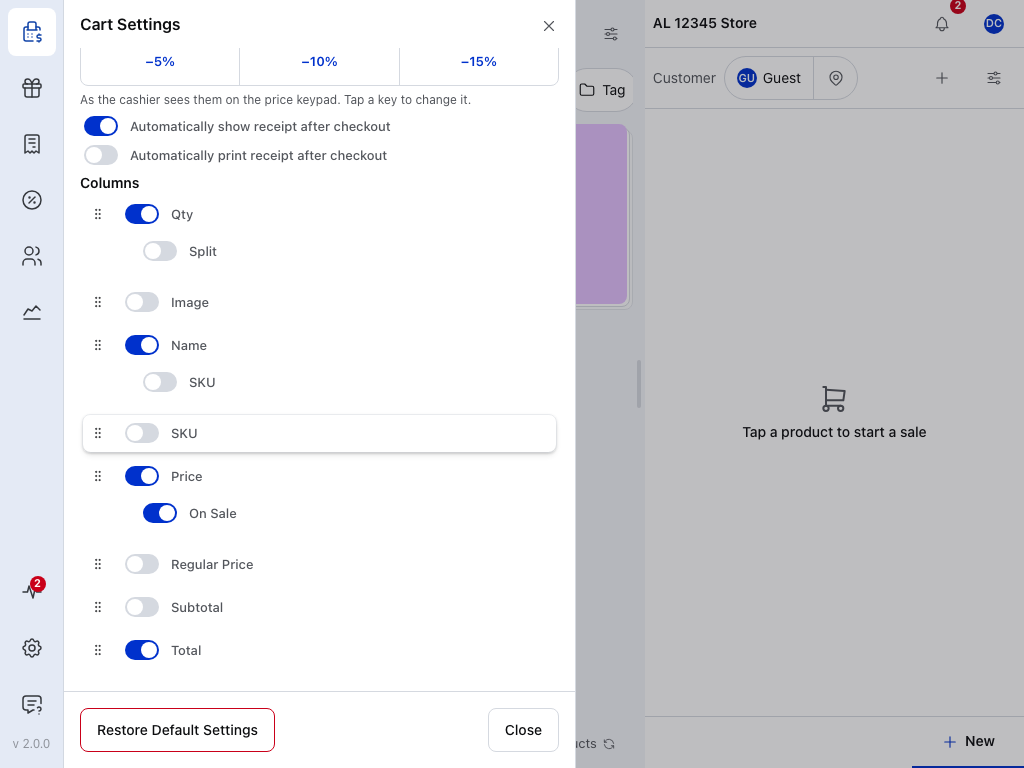
To switch it on, open Cart Settings (the sliders icon above the cart), find the Qty column and turn on its Split option.
Change the price
Tap the price, type the new price for one (or press a quick discount key), then tap the tick (or press Enter) to keep it. The price grows into a keypad:
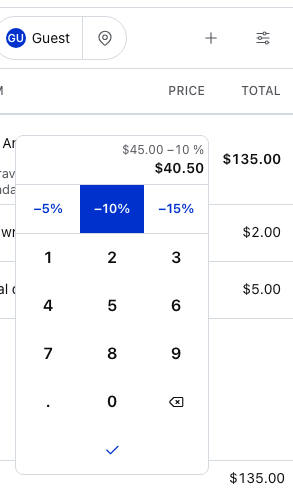
- The price — the new price for one. After a quick discount the sum shows above it: here $45.00 −10 %, making $40.50.
- −5% — a quick discount key: it takes 5% off the line's price.
- −10% — lit, because it's been pressed. Press a lit key again to undo it.
- −15% — takes 15% off. These three are where you start; you can change them.
- Number keys — type the new price for one. The first digit replaces the old price.
- Delete — takes off the last digit.
- Done (the tick) — keeps the new price. Enter does the same. Escape closes the keypad and leaves the price as it was.
With a keyboard, type the digits, use Backspace to delete, Enter to keep and Escape to cancel. On the quantity keypad the up and down arrows add or take one (down stops at 1).
On a phone in the browser the same keypad opens as a sheet. In the iOS and Android apps, tapping the price turns it into a box: type the new price for one, and it's kept when you leave the box. The quick discount keys are on the keypad only.
A lowered price is recorded as the item's sale price. Receipts can show the saving, but the order's Discount total is reserved for coupons, and reports count the sale at the price paid. See Cart Discounts for why WooCommerce treats the two differently.
A new price stays on this sale
A price you change in the cart is for this sale only. The product keeps its own price: its tile still shows it, on this device and on others. To change the price for every sale, change the product's price on the Products screen or in WP Admin.
To sell something that isn't in your catalogue, at a price you type, press + and add a miscellaneous product.
Edit or remove a line
Each line has Edit and Remove buttons hidden under it. To show them:
- Tap the line's total. Tap it again to hide them.
- Hover over the total with a mouse and the line slides aside to give you a peek.
- Swipe the line to the left on a touch screen, or drag it left with the mouse.
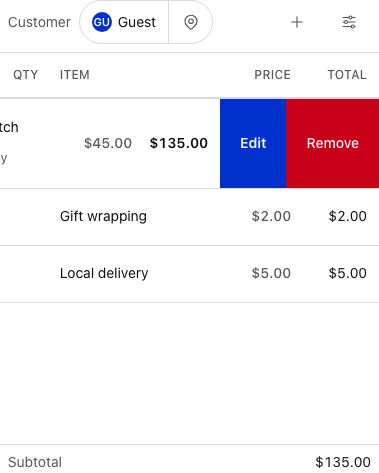
- Edit — opens the Edit dialog.
- Remove — takes the line out of the cart.
Swipe further and Remove fills the whole row in red: let go and the line is removed in one move.
The message that appears after a removal has Undo, which brings the line back as it was.
The Edit dialog
Edit opens the line's details in a dialog named after it. Changes save as you make them; press Close when you're done.
For a product line:
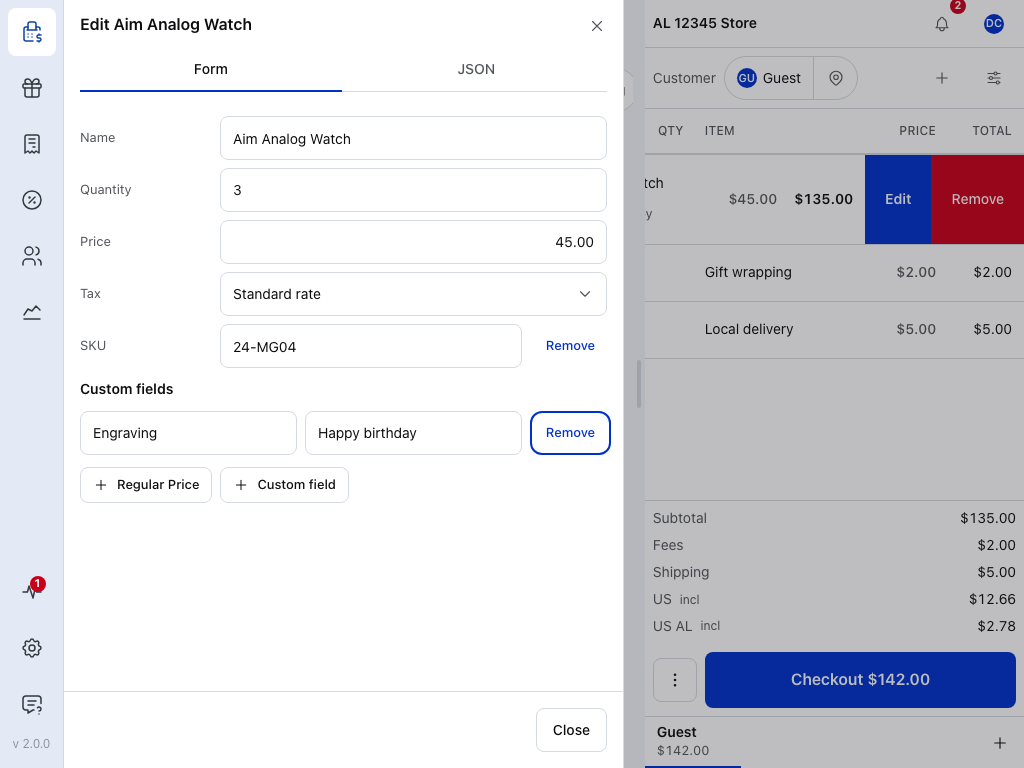
- Name — what the receipt and order call it.
- Quantity — the same as in the cart.
- Price — the same as in the cart. When the line is on sale, the regular price shows beside it with was. Its Remove drops the regular price: the line is no longer on sale, and the price stays as it is.
- Tax — whether the line is taxable, and its tax class.
- SKU — shown when the product has one. A line without a SKU has a SKU button to add one.
- Regular Price — adds a regular price to a line that isn't on sale.
- Custom field — adds a key and a value, like the Engraving row above it; see Custom fields.
- Close — closes the dialog. Everything you changed is already saved.
Each added row has its own Remove. A miscellaneous product isn't in your catalogue, so its dialog also has Categories, Virtual and Downloadable.
A line's tax is worked out at the rates for the order's address. When your store calculates tax from the customer's address and you change the customer, or their address, to one with other rates, the lines are taxed again at the new rates straight away. A tax exempt order stays exempt.
A fee line
Edit on a fee opens the fee's own dialog, named after it. It saves as you go, like a product's.
A fee can't be negative: the dialog says A fee cannot be negative. Use Add Discount instead. See Discounts.
Edit a fee: the dialog and its fields
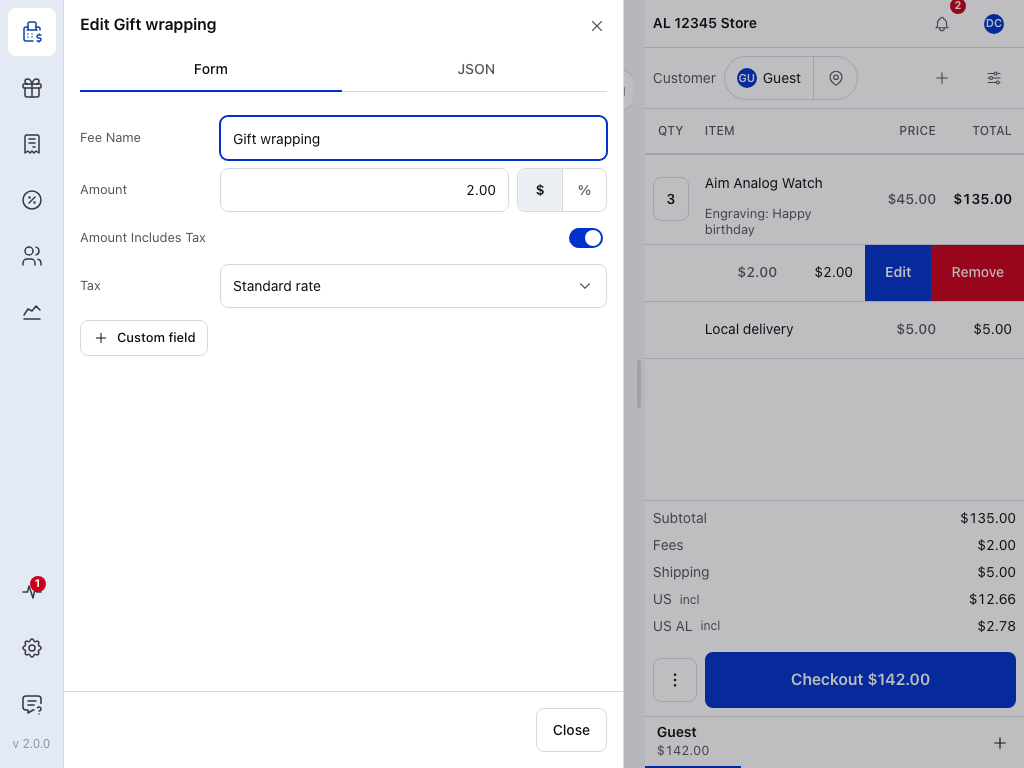
- Fee Name — what the receipt calls the fee.
- Amount — a fixed sum, or a percentage when % is chosen.
- $ / % — switches the amount between a sum and a percentage of the cart total.
- Amount Includes Tax — on when the amount already has tax in it.
- Tax — Not taxable, or the tax class charged on the fee.
- Custom field — see Custom fields.
- Close — closes the dialog.
A shipping line
Edit on a shipping line opens its own dialog, which also saves as you go.
Edit a shipping charge: the dialog and its fields
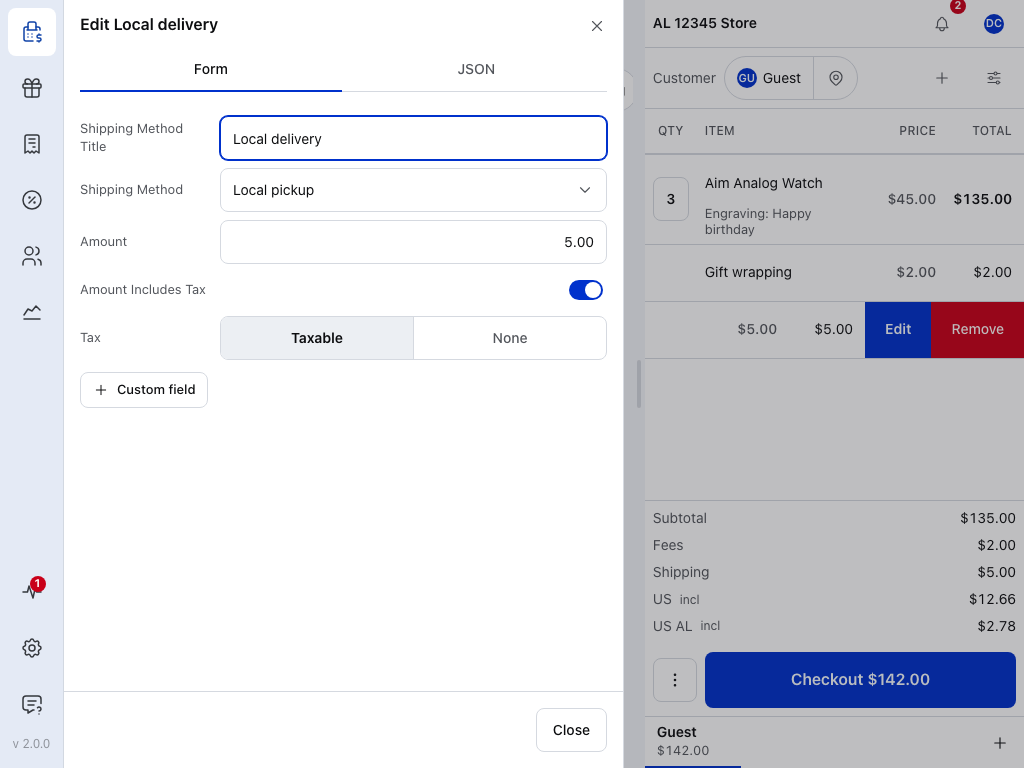
- Shipping Method Title — what the receipt shows.
- Shipping Method — one of your store's shipping methods, recorded with the order.
- Amount — the shipping charge. You type it: the POS doesn't work out shipping rates.
- Amount Includes Tax — on when the charge already has tax in it.
- Tax — Taxable or None.
- Custom field — see Custom fields.
- Close — closes the dialog.
Technical details: the JSON tab, line kinds and WCPOS's own fields
The JSON tab
The JSON tab beside Form shows the line exactly as it goes to WooCommerce. You won't need it for a sale. It helps when you're checking what a plugin will see, or why a field isn't saving.
The three kinds of line
WooCommerce stores products, fees and shipping as separate kinds of line:
| Kind | In WooCommerce | Examples |
|---|---|---|
| Product | line_item | T-shirt, Coffee mug |
| Fee | fee_line | Gift wrapping, Service charge |
| Shipping | shipping_line | Standard shipping, Express delivery |
WCPOS's own fields
WooCommerce calls custom fields meta data. Keys that start with an underscore are WCPOS's own records (such as _woocommerce_pos_data and _reduced_stock). They stay out of the form and the cart, and you can see them on the JSON tab.
Custom fields
A custom field is a note kept with one line, such as an engraving or a serial number. To add an engraving, open the line's Edit dialog, tap Custom field, type Engraving in Key and the customer's message in Value. The field shows under the line's name in the cart, and on the order in WP Admin. Each one has its own Remove.
Some fields come with the product: any Meta Data Keys you've chosen are copied onto the line when you add it.
If the form says This key is managed by WCPOS. Choose another key., you've typed one of WCPOS's own keys. Pick a different key.
Cart Settings for lines
Cart Settings, the sliders icon above the cart, sets which side the cart sits on and the order of its product lines. Fees and shipping always stay last, in the order you added them.
Change the cart position and item order
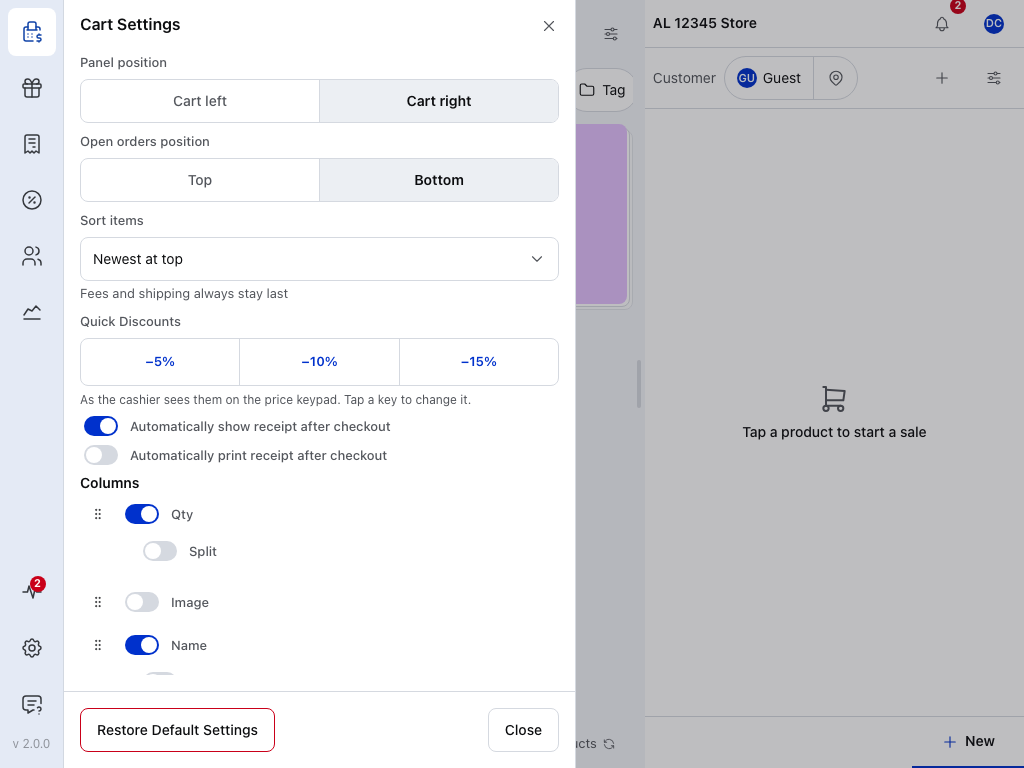
- Cart left / Cart right — which side of the screen the cart sits on. It starts on the right.
- Sort items — the order of the product lines. See below.
The rest of the dialog, from open orders to the columns, is covered in Display Settings.
Sort items has four orders:
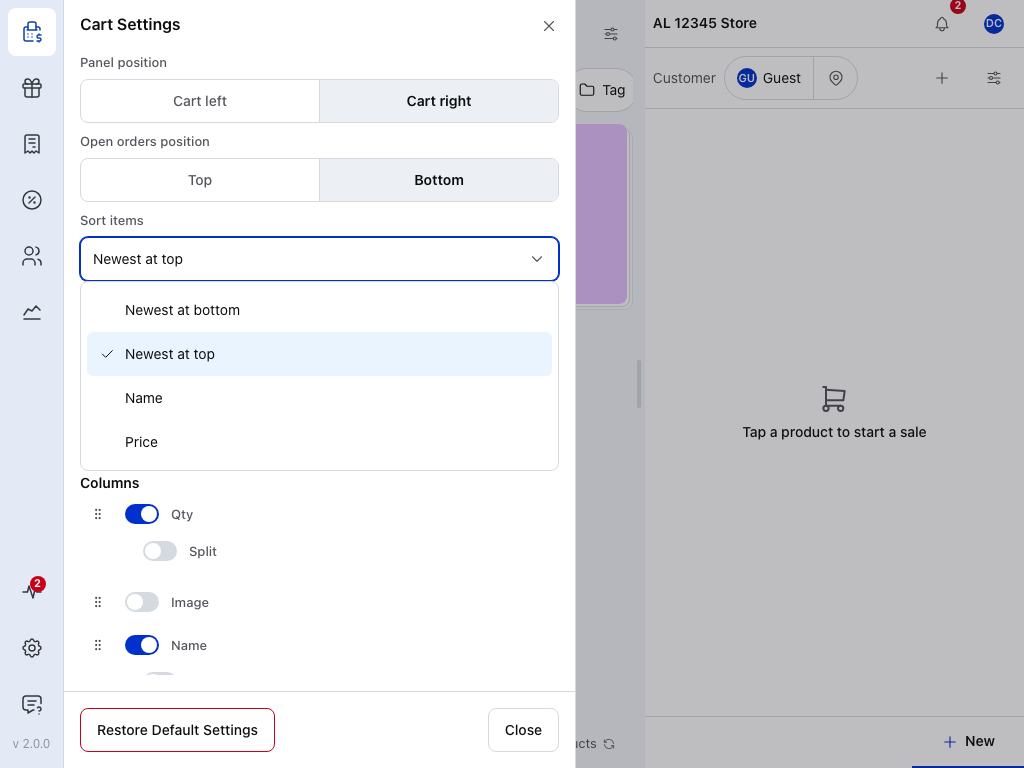
- Sort items — Newest at top (the default) puts the last product you added first. Newest at bottom keeps the order you added them. Name sorts A to Z. Price goes from the lowest price of one to the highest.
When checkout is blocked
When your store prevents overselling, the cart checks every product line against your stock:
- A notice above the lines lists each one that's short: Only 2 available for Hoodie, with Reduce, which opens that line's quantity, or Hoodie out of stock, with Remove.
- The short lines are marked in amber with what's available.
- Checkout dims. Pressing it takes you to the first line to fix.
Fix every line and Checkout comes back. A product on backorder doesn't block the sale.
If something goes wrong
"Couldn't update that item — it's no longer in the cart." The line was removed while you were changing it. Check the cart and make the change again.
"That item is no longer in the cart." You pressed Remove on a line that had already gone. Nothing else is needed.
There's no Split link. Turn on Split under the Qty column in Cart Settings. The link only shows on lines with a quantity above 1.
Checkout is dimmed. A line is short of stock. See When checkout is blocked.
A custom field won't save. Its key starts with an underscore and belongs to WCPOS. Choose another key.