Take Payment
Press Checkout in the cart. The tender pane opens beside the order, with the amount due as the big figure and the first payment method picked. You pick how the customer pays, enter what they hand over, and press the button that names the amount. Take cash, a card on your own terminal, or a card on a connected reader. Checkout walks through a whole sale; this page is the payment itself.
With Open and close the register switched on, the till won't record a payment while the register is closed, and a card you've already taken would have to be refunded. Open the register before you charge the customer. See Open the register.
Discounts and coupons go on in the cart, before you press Checkout. See Cart Discounts.
Take cash
- Tap Cash if it isn't already picked.
- Tap a quick amount, or type what the customer hands you on the keypad. There is no decimal key: the digits fill in from the right, so 2, 0, 0, 0 is $20.00.
- When they hand over more than is due, the change becomes the big figure in green, with Tendered and the amount under it.
- Press Take $45.00 in Cash and give the change. The button names the balance, not the note: only what's due goes on the order.
That pays it off: see Finish the sale. If you took less than the balance, see Take part of the balance.
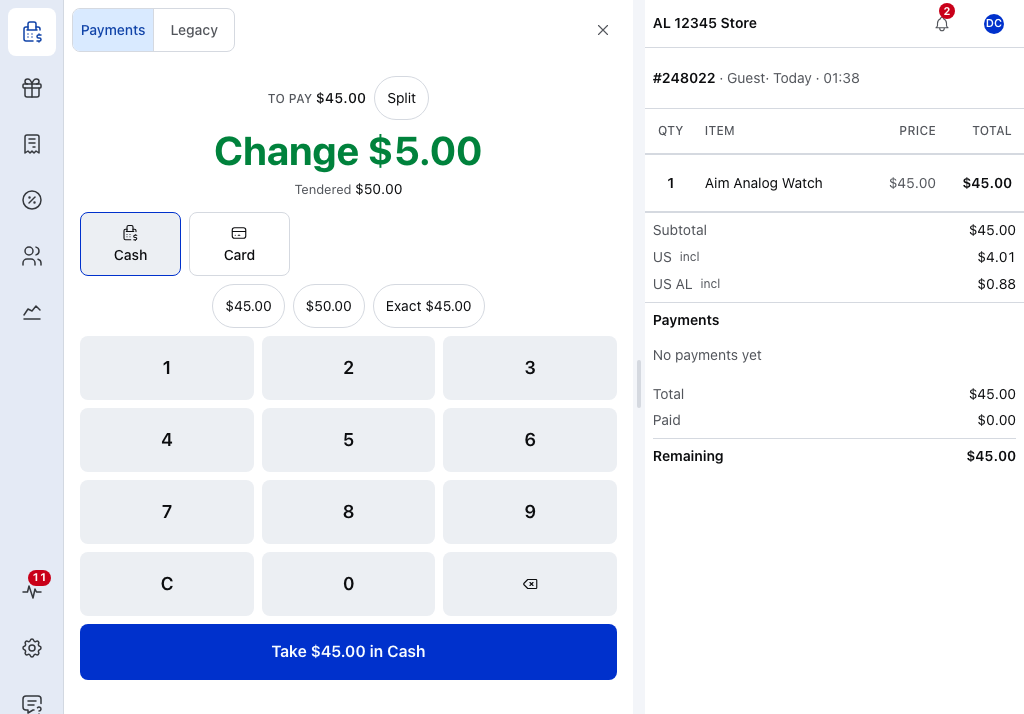
- To pay — the balance still due.
- Change — what to give back. It takes the big figure once the customer hands over more than is due.
- Tendered — what the customer handed you.
- Cash — the payment method this payment goes on.
- Card — for a card terminal that isn't connected to the POS. See Record a card.
- Quick amounts — the next round notes up from the balance.
- Exact — the balance to the cent.
- Keypad — C clears the amount; the arrow deletes the last digit.
- Take — names the amount and the method. Press it to record the payment.
- Order totals — the total, what's paid and what remains.
When a cash payment settles the sale and your store rounds cash, the screen shows Rounded from and the unrounded amount, and the difference goes on the order as a Rounding line. Change is always shown in the order's own currency.
Record a card from your own terminal
Card is for a card terminal that isn't connected to the POS.
- Take the payment on your terminal and wait until it shows the payment approved.
- Tap Card. The amount starts at the balance, or at what you typed on the last tile; Full balance puts the balance back.
- Press Take $45.00 in Card. If that pays it off, see Finish the sale.
The other methods your store records at the till, such as cheque or bank transfer with WCPOS Pro, work the same way. See Payment Methods.
If the amount is more than what's due
A card can't take more than is due. Type more and the line under the amount says Only $45.00 is due — Card can't give change, and the button is greyed out until you lower the amount.
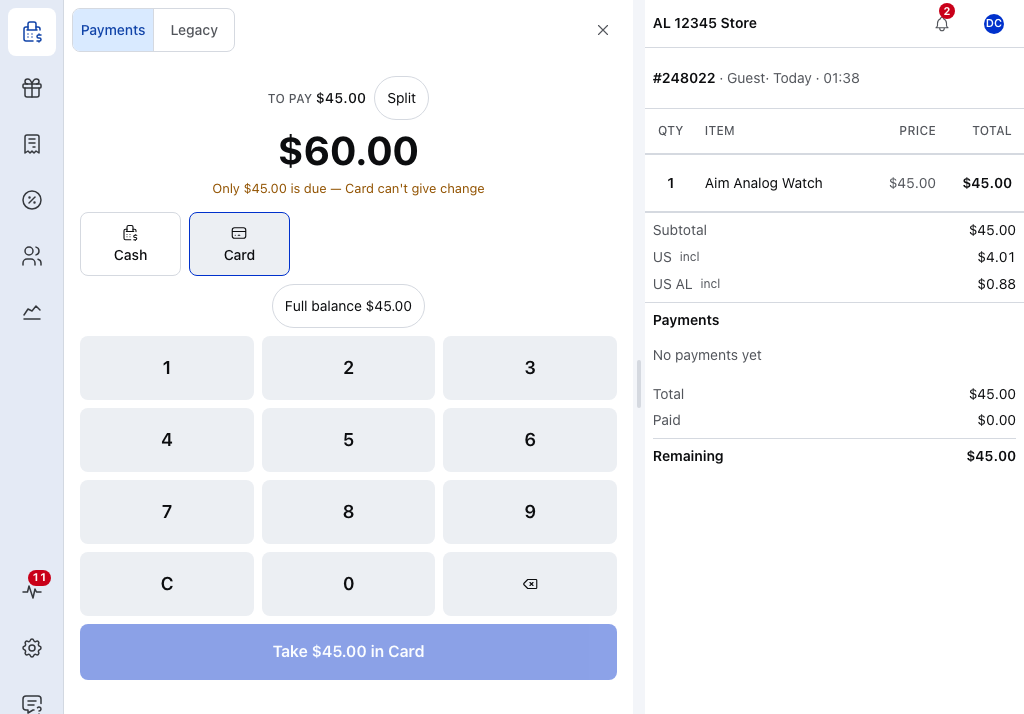
- Card — the picked payment method.
- Amount — more than the balance.
- Only $45.00 is due — why the payment can't be taken.
- Full balance — puts the amount back to the balance.
- Take — greyed out until the amount is the balance or less.
On a Card Reader
Card readers at the till require WCPOS Pro.
A card reader connected to the POS has its own tile, and the till sends it the amount.
- Tap the reader's tile. With one reader set up, online and free, the till picks it for you. With more than one, pick a terminal, or press Change beside Terminal to pick another.
- Press Send $45.00 to …. The button names the payment method.
- The customer presents their card on the reader. Under On the terminal, the till shows Sent, On terminal, Approved, then Captured.
- When it's captured, the payment joins the order like any other.
To stop, press Cancel on terminal. When the till says Cancel on the reader, cancel on the reader itself. If a payment fails, Try again sends it once more and Choose another way goes back to the tiles.
The till remembers which reader you used for each payment method, on this device. Which readers work depends on how you run WCPOS; see Card reader compatibility. Pairing a reader is covered on its gateway's page, under Payment Gateways.
You don't have to watch the terminal
Once you've sent the amount, the terminal tells the till when the customer has paid. While it waits, the till reads Waiting for the customer on the terminal, and the cart's tab reads Waiting for terminal and the amount.
When the payment is approved, the till takes it without you pressing anything. If that pays the whole order, the sale completes as in Finish the sale. If money is still owed, the till goes back to the tiles.
If the customer doesn't pay in time, the till cancels the payment itself and says Timed out — payment cancelled.
This works for every reader with its own tile. PayPal Reader is paid on the Legacy tab instead: press Start reader payment on its page, and the sale completes on its own when the reader reports the payment complete. See PayPal Reader.
Take part of the balance
Card on your own terminal? Take that part on the terminal and wait for approval first.
- Tap the tile and type less than the balance. The line under the amount says Part payment and what will be left after this.
- Press the button that names it: Take $20.00 in Cash · $25.00 left.
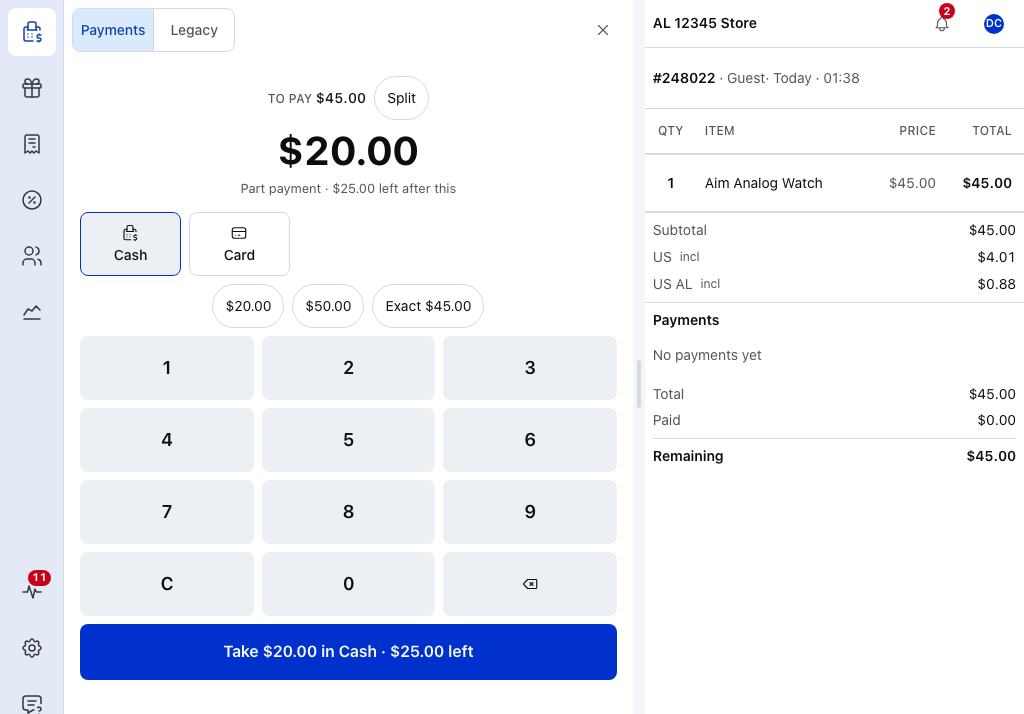
- Amount — less than the balance.
- Part payment — what's left after this payment.
- Take — names the amount and what will be left.
The payment joins the order. The tender pane stays open on the same method with the rest filled in.
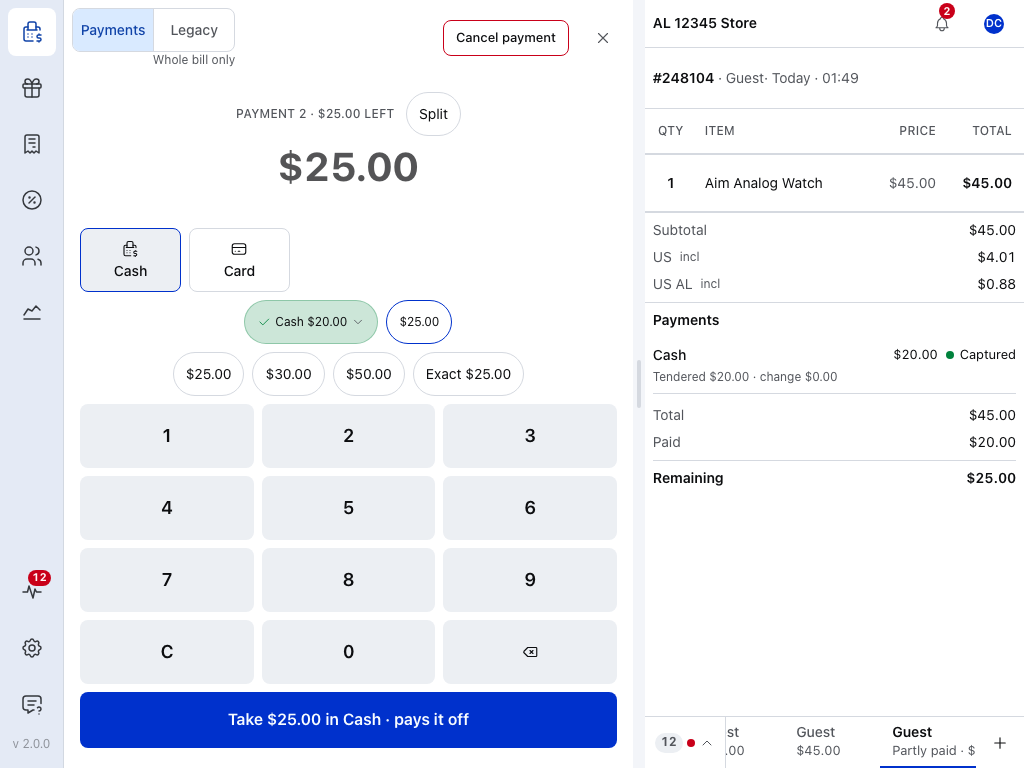
- Cancel payment — lists what has to go back before it voids anything: Return $20.00 cash to the customer for cash, Void $20.00 on Card for a card from your own terminal, so void it on the terminal too. Cancel and void voids them, and the sale goes back to the cart. See Cancelling a Payment.
- Payment 2 · $25.00 left — replaces To pay once a payment is in.
- Amount — the rest, ready to take.
- Cash — still picked. Tap another tile to take the rest another way.
- Cash $20.00 — the payment taken. Tap it to list the payments, each with its own Cancel payment. With two or more it reads, for example, 2 paid · $40.00.
- Take — pays it off when this payment clears the balance.
- The payment — its method, amount and status: Captured means it's taken. A cash payment also shows what was tendered and the change.
- Paid and Remaining — the running balance.
To take the rest, leave the method picked or tap another tile, and press Take again. If the customer pays in more parts, type the next amount first. Once a payment is in, Whole bill only shows under the Legacy tab. See The Legacy Tab.
To share the bill out before you start, evenly, by percent or by item, press Split beside To pay. See Split Payments.
Finish the sale
When the balance reaches zero, the sale completes. There is nothing more to press. The paid screen leads with the change to give, or with Paid and the amount when there is no change. In this picture, a $50.49 sale was paid with $55.00 in cash.
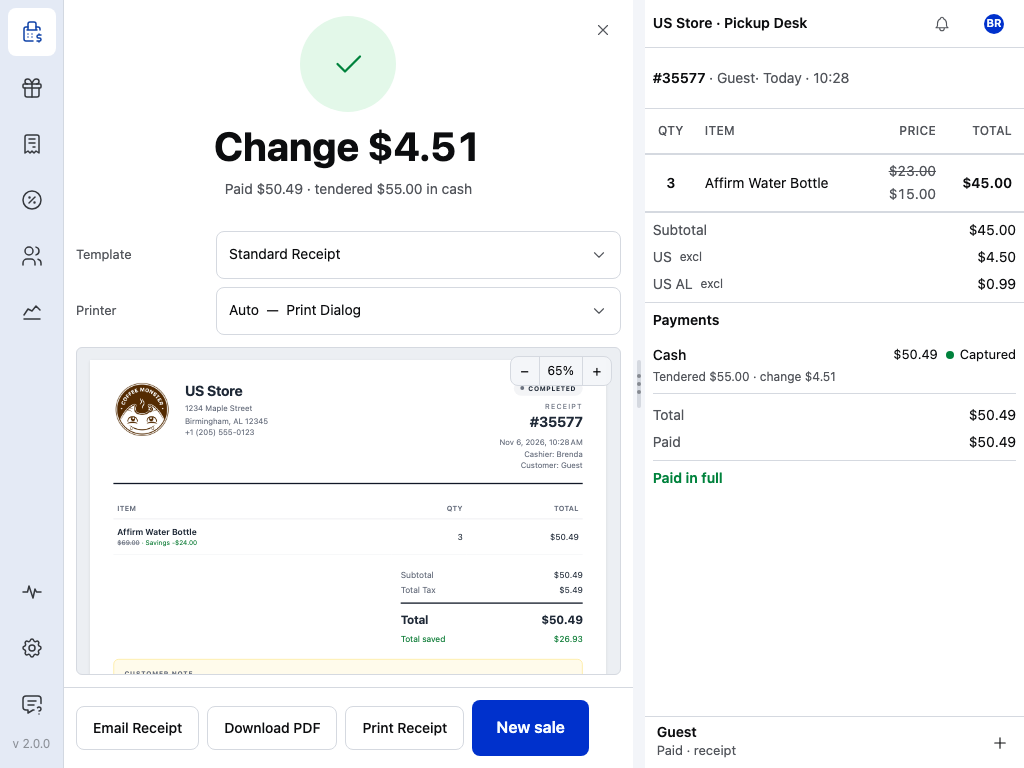
- Change — what to give back.
- Paid — what was paid and, for cash, what the customer handed over. A sale paid more than one way names each method and how many payments, for example Cash · 2 payments.
- Template — which receipt this sale gets.
- Printer — where it prints.
- Preview — the receipt as it will print.
- Print Receipt — prints it.
- Email Receipt — sends it to the customer.
- New sale — an empty cart for the next customer, back on your default customer.
Download PDF saves the receipt as a file. It needs a connection.
With Automatically show receipt after checkout off in the cart's settings, a message says Payment completed for order with its number instead, and the cart is ready for the next sale. If Automatically print receipt after checkout is on, the receipt still prints after each sale. See Receipts at Checkout.
If something goes wrong
The card was charged, but the order didn't finish. On a card reader, the charge went through but the sale didn't complete. Don't charge the card again, and don't close the tender pane with ✕: with a payment on the order, that opens Cancel payment. Reload the app: as it starts, the till tries again to finish the order. If the order is still open, see Finish an order after the card was charged.
No connection. Cash, and a card from your own terminal, still work offline on a sale your store already knows. This message shows when nothing can take the payment now, such as a sale started while offline. The sale is saved in your open orders: press Back to the register, serve the next customer, and take the payment once the connection returns. See Take a payment offline.
Open the register before completing the sale. The register is closed. Open it, then press Take or Send again. See Open the register.
Choose a register before completing the sale. Your store has more than one register and this device hasn't picked one yet. Pick the register you're on. See Stores, Registers and Devices.
Take is greyed out. Read the line under the amount. On a card, the amount is more than is due: tap Full balance.
A payment method can't be picked. Its tile is folded under not available right now, with the reason beside it. See When a tile can't be used.
Only Done shows. The order is already paid in full, for example a paid sale you opened again. Press Done to complete it.
You took the wrong amount or method. Press Cancel payment at the top of the tender pane. See Cancelling a Payment.
Payment failed: Card declined. The reader didn't take the payment. Press Try again, or Choose another way to take it on another tile.
The store hasn't answered the last payment. Don't take the card on your terminal again. Press Try again on the message to confirm the same payment; it won't be taken twice.
Why the till asks you to try again
The till sent the payment but got no reply, so it can't tell whether the store recorded it. Try again sends the same payment, not a new one, and the store records it once. Until then the tender pane shows only this message, even after a restart.