Customer Display
A customer display is a second screen that faces the customer, such as a tablet or a monitor with a web browser. It shows the cart as you ring it up, line by line, with the total.
Customer displays need WCPOS Pro. Without it, Settings → Customer Display says so: see Free vs Pro.
Each display is paired with one till, and that till sends it the cart directly. Keep the till and the display on the same Wi-Fi network: guest networks often block the link between them.
Pair a display
You need the till and the display device side by side. A pairing code works once and expires after 10 minutes.
- On the till, tap Settings at the bottom of the side menu, then Customer Display.
- Tap Generate pairing code. A six-digit code appears, with when it expires.
- On the till, note the address. Display page URL, under the button, is your site's address followed by
wcpos-display/. On a till that runs in a web browser, Copy URL copies it, to send to the display device. - On the display device, open that address. The page reads Pair this display.
- Enter the code. Type the code in Pairing code, change Display name if you like (it starts as Customer display), and tap Pair display.
- Check the till. The display appears under Paired displays and reads Connected. Add a product to the cart: it shows on the display. If the display shows a message instead, see If something goes wrong.
On a till that runs in a web browser, Open in browser, beside Copy URL, opens the display page in a new tab on the till itself, not on the display device.
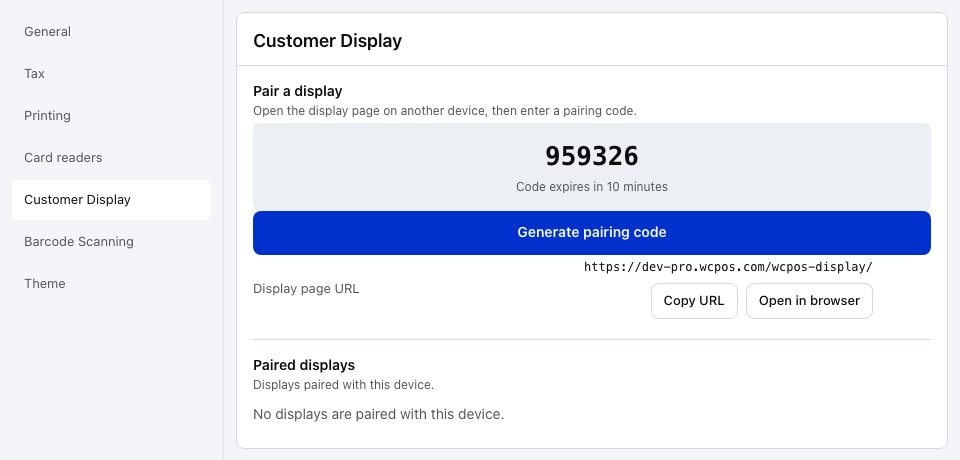
- Customer Display — in Settings, after Card readers.
- The pairing code — type it on the display. One code pairs one display.
- Generate pairing code — makes a new code. Tap it again if the code expires before you use it.
- Display page URL — the address to open on the display, with Copy URL and Open in browser on a till in a web browser.
- Paired displays — reads No displays are paired with this device. until a display enters a code.
To fill the screen, use the browser's full-screen mode on the display device. The browser remembers the pairing: reopen the same address in the same browser and the display reconnects, with no new code.
Paired displays
Paired displays lists the displays paired with this till. Each row shows the display's name, when the till last saw it, and Connected or Disconnected.
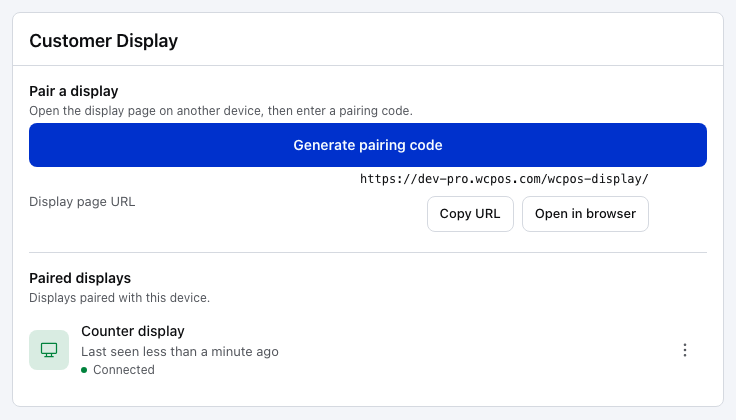
- Connected — the display named Counter display is linked to this till right now. Disconnected means the display page is closed or can't reach the till.
- ⋮ — the row's menu, with Forget.
A display shows one till's sales. To give each counter its own screen, pair a display on each till.
What the customer sees
What the display shows comes from its template. Ledger, the default display template, lists the items with a totals panel beside them on a wide screen, and docks the total at the bottom of a narrow one. With Ledger:
- Between sales: the store's logo, or its name if it has no logo, and a welcome line.
- During a sale: each line with its quantity, name and line total under Your items, and a panel with Subtotal, any fees, shipping, discounts and tax, then Total. When the customer saves money on the sale, it adds You saved. When a customer is attached to the order, it greets them by first name.
The display follows the sale through payment.
The logo is the store's own: the one on the store's Details page, which also prints on receipts. A store that uses the site logo shows your WordPress site logo. See Store setup.
Choose the template
Every display shows the site's Live display template, unless its store picks its own. A display picks up a change within about a minute, with no new pairing.
Change the template for all stores
- In WP Admin, go to POS → Templates and open the Display tab, next to the receipt templates.
- Turn on Enabled for the template you want.
- Select it in the Live column.
The gallery itself is covered in Reports, closures and customer displays.
Change the template for one store
- In WP Admin, go to POS → Stores, click the store, then Customer display in its menu.
- Under Display template, which reads Same as site, click Customise.
- Pick a template. The list holds the templates enabled on the Display tab. The page saves as you go.
Use site template puts the store back on the site's Live template.
Forget a display
To unpair a display, open ⋮ on its row under Paired displays and choose Forget, then Forget again to confirm. The display page then reads This display was removed. Pair it again. To use that screen again, pair it with a new code.
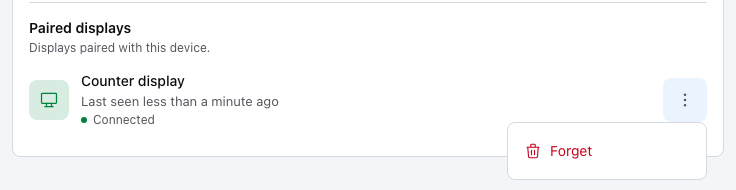
- Forget — removes the display from this till. It needs a new pairing code before it shows this till again.
If something goes wrong
Pairing
That pairing code is invalid or expired.
Codes last 10 minutes and work once. Tap Generate pairing code on the till and type the new one. After several wrong codes the page reads Too many attempts. Try again shortly.: wait a moment before trying again.
The Generate pairing code button is greyed out.
The page reads The customer display service is not running on this device. Reload the POS, and if it stays greyed out, check Logs for the reason.
Customer displays need a newer version of WCPOS Pro.
The Pro plugin on your site is older than customer displays. Update WCPOS Pro in WordPress, then reload the POS.
This display was removed. Pair it again.
Someone chose Forget for this display on the till. Pair it with a new code.
Connection
When a display can't connect for 30 seconds, it says why on its screen and keeps trying.
This display can't reach the POS on this network.
The display reached your store but not the till. Put both devices on the same Wi-Fi network. Guest networks often keep devices apart, so use your shop's main network.
This display can't reach your store.
The display device has no internet connection, or can't reach your site. Check its Wi-Fi, then reload the display page.
Waiting for the POS.
The till this display is paired with isn't running. Open the POS on that till.
The POS answered but didn't finish setting up this display.
Restart the POS on the till and try again.
What the display shows
No customer display template is configured.
No display template is enabled. Enable one on the Display tab in POS → Templates.
The display shows the welcome screen during a sale.
The picture of the cart couldn't be built, logged as DISPLAY101. Carry on with the sale: the display catches up the next time the cart changes.