Receipt Width
A receipt printer fits a set number of characters on each line: 32 on 58 mm paper, and 42, 48 or 64 on 80 mm paper. The app lays out every receipt to the number you pick. Pick too many and the long lines wrap onto a second line; pick too few and the prices stop short of the right edge. The test page has a ruler that tells you which way you're off.
Already added your printer? See Change the width later.
Print a test page
In Add printer, after you pick your printer:
- Set the paper, if asked. If Paper width appears, pick the roll in your printer: 58 mm or 80 mm.
- Press Print a test page.
- Check the ruler in section 1 COLUMN RULER of the printout. Last digit at the right edge of the printing: right. Wraps onto a second line: too many. Stops well short: too few. Pictures in Read the ruler below.
- Answer Did the test page print?
- Yes, and it looks right — saves the printer at the width it just printed.
- Printed, but the ruler is off — the app asks Which paper is loaded in the printer? and lists the four widths.
- Choose a width, using Which width to pick. The app prints the test page again at that width.
- Check the new ruler.
- Still off? Choose again. When the ruler ends at the right edge of the printing, answer Yes, and it looks right.
- Nothing came out — this isn't a width problem. See When nothing prints.
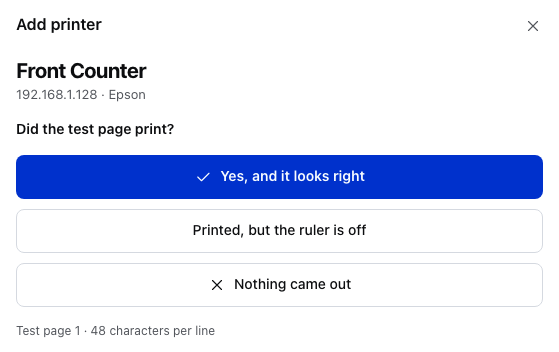
- Yes, and it looks right — saves the printer.
- Printed, but the ruler is off — opens the list of widths below.
- Nothing came out — see When nothing prints.
- Test page 1 · 48 characters per line — how many test pages you've printed, and the width of the last one.
After Printed, but the ruler is off:
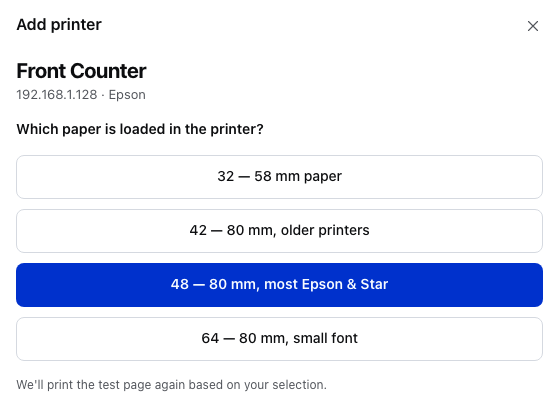
- 32 — 58 mm paper — the narrow roll.
- 42 — 80 mm, older printers — when 48 wrapped.
- 48 — 80 mm, most Epson & Star — filled in: the width the last test page printed at.
- 64 — 80 mm, small font — a Star printer on its small font.
Each answer is a number of characters per line; the mm says which roll it suits.
For a printer you've already saved, press Test Print on its row in Settings → Printing.
When Paper width appears, and the size it starts on
The mobile apps, and the desktop app for a USB printer, first ask the printer for its paper size and show Checking paper width…. Paper width appears only when the app still can't tell. It starts on 80 mm for Epson and Star printers. For any other printer, make sure it shows your roll before you print.
Read the ruler
Section 1 COLUMN RULER is a row of digits as long as the width the app is using, then Must end flush right. The line Width at the top of the page says the same number, for example 48 columns.
Here is the ruler at 48 on three printers. The dashed lines are the edges of the printing area. The paper is a little wider (80 mm paper prints about 72 mm of it), so a blank margin either side is normal.
Right. The last digit reaches the right edge of the printing, with only the normal blank margin after it.
Too many. The row wraps onto a second line. Pick a smaller number.
Too few. The row stops well short of the right edge. Pick a bigger number.
The last digit tells you the width you printed: a row of 48 ends in 8, 42 and 32 end in 2, and 64 ends in 4.
Which width to pick
| Option in the list | Pick it when |
|---|---|
| 32 — 58 mm paper | The narrow roll: most small, portable and Bluetooth printers |
| 42 — 80 mm, older printers | 48 wrapped onto a second line |
| 48 — 80 mm, most Epson & Star | Your first try on 80 mm paper |
| 64 — 80 mm, small font | Star printers on the small font, when 48 stops short. See Font A and Font B. |
Not sure which roll you have? Measure across it: 58 mm paper is just under 6 cm wide, 80 mm paper is 8 cm.
Set the width before printing
You can also set the width before any test page, in Add printer → More options:
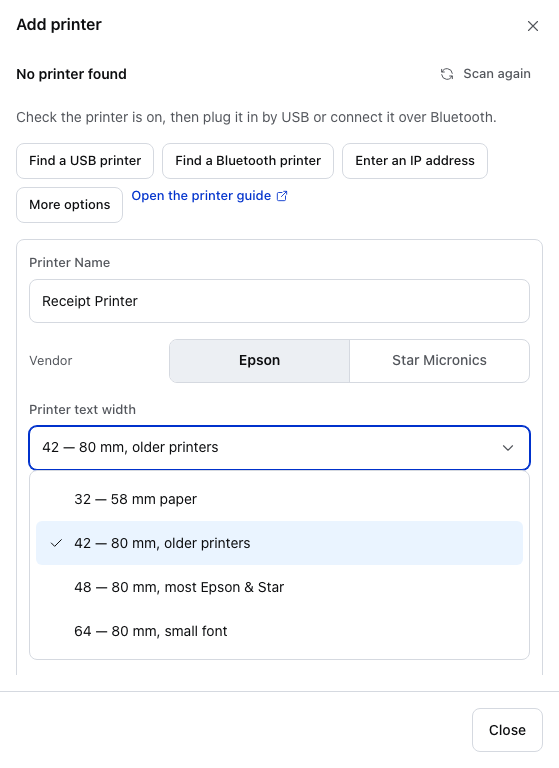
- More options — the printer's settings, before you print anything: name, vendor, width, receipt language and the toggles.
- Vendor — in the web app, Epson or Star Micronics, the two makes a browser can reach over Wi-Fi. It also sets the printer language: ESC/POS for Epson, Star Line Mode for Star. See What each app can connect to.
- Printer text width — the characters per line every receipt is laid out to. The tick in the list marks the current one.
- 32 — 58 mm paper — the narrow roll.
- 42 — 80 mm, older printers — when 48 wraps.
- 48 — 80 mm, most Epson & Star — start here on 80 mm paper.
- 64 — 80 mm, small font — a Star printer set to its small font. See Font A and Font B.
Change the width later
- Open the printer. Go to Settings → Printing and press Edit on the printer's row.
Edit printer opens over Settings, with Paper width under Printer Language:
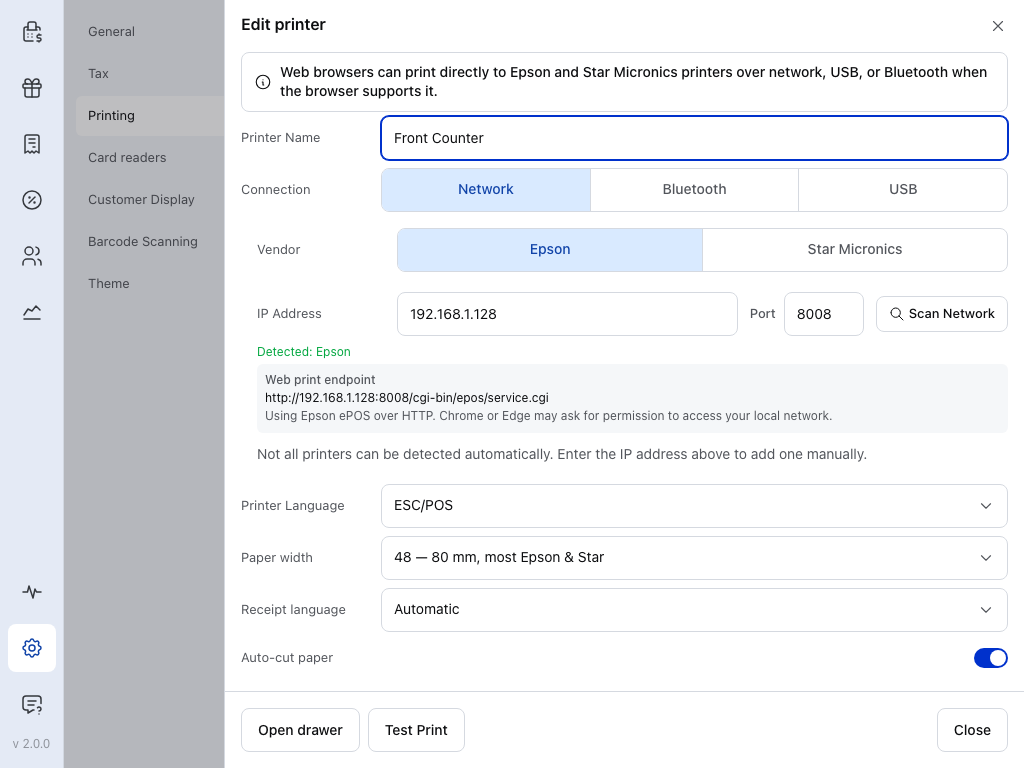
- Printer Language — ESC/POS here. It decides how the printer's font affects the width: see Font A and Font B.
- Paper width — the characters per line, here 48 — 80 mm, most Epson & Star. Open it to pick 32, 42, 48 or 64.
- Receipt language — the character table for the text, not the width. See Non-Latin receipts.
- Test Print — prints the test page at the width now set.
- Choose the number under Paper width: 32, 42, 48 or 64. Here Paper width means characters per line, not the 58 mm / 80 mm roll that setup can ask for. The change saves as you make it.
- Press Test Print, at the bottom of the same dialog or on the printer's row, and read the ruler again.
The rest of the printer's settings
Scroll down in Edit printer for the switches and Print receipts as an image:
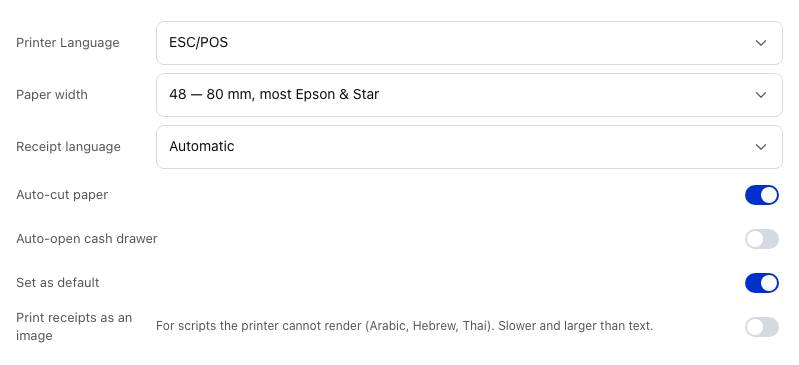
- Printer Language — as above.
- Paper width — as above.
- Receipt language — as above.
- Print receipts as an image — prints the receipt as a picture, for scripts the printer can't print as text.
If something goes wrong
Lines of the receipt wrap onto a second line. The width is too big for the paper. Go one step down: 48 to 42 on 80 mm paper, or anything to 32 on 58 mm paper.
The prices stop short of the right edge. The width is too small. Go one step up: 42 to 48. On a Star printer where 48 already stops short, see Font A and Font B.
The logo is cut off on 58 mm paper. Set the width to 32, and print with a receipt template made for 58 mm paper, such as Simple Thermal Receipt (58mm), or one that sets no paper size. A template made for 80 mm paper sizes the logo for 80 mm whatever the width. The test page's logo always follows the width, so it can print whole while receipts are still cut off.
£, € or accented letters print as other characters. That's the printer's character table, not the width: look at section 8 CHARACTERS on the test page. See Non-Latin receipts.
Font A and Font B
Receipt printers have two built-in fonts. Font A is the standard one. Font B is smaller and fits more characters on a line, which is what 64 is for. On 80 mm paper, use 48 or 42 for an ESC/POS printer. Use 64 only when a Star printer is already set to its smaller font.
How your printer's font affects the width
- ESC/POS printers (Printer Language set to ESC/POS, as on most Epson printers): the app asks for Font A at the start of every test page and every receipt. A printer left on Font B in its own setup still prints Font A from the app, so stay with 48 or 42.
- Star printers (StarPRNT or Star Line Mode): the app prints in whatever font the printer is set to. If 48 stops well short on 80 mm paper, the printer is on its small font. Pick 64, or set the printer back to Font A in Star's own setup tool and keep 48.
Still stuck?
Press Copy setup report and paste it into your message. In Add printer it's on the Nothing printed screen and on the screen that says your printer is set up:
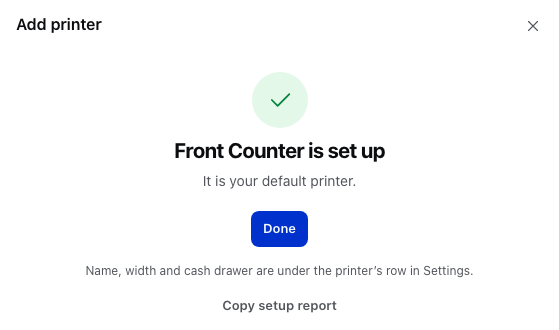
- Done — closes Add printer. The printer is already saved, at the width of your last test page.
- Copy setup report — copies the report for your message.
It's also in the More actions menu on the printer's row in Settings → Printing. The report records the printer, the width the app is using and the app's recent printer log, which shows how the printer answered. From Add printer it also records how many test pages printed and the last error. In the mobile apps it opens the share sheet instead of copying.