Supported Printers
Find your printer, your app and your connection below. Verified means we have printed on that model over the connections listed; other models are under Expected to work. The Vendor setting tells the app which make it is talking to.
Verified
Printed on real hardware here, on the connections listed.
| Printer and paper | Printed from |
|---|---|
| Epson TM-m30III 80 mm | Wi-Fi from the web, desktop and mobile apps. Bluetooth from the Android app. |
| Netum NT-1809 58 mm | USB and Bluetooth from the desktop app. |
A new Epson that the app finds but that prints nothing usually has Secure Printing switched on. See Epson Secure Printing.
Expected to work
Not tested by us model by model, but they use the same connections as the verified printers. If yours doesn't print, follow the Setup Wizard, then report it.
The web app is WCPOS in a browser. The mobile apps are the WCPOS apps for Android, iPhone and iPad. The desktop app is the WCPOS app for Windows, macOS and Linux.
iPhone and iPad can't connect by USB, and they reach Bluetooth Classic printers from Epson and Star only.
- Epson TM-series printers with ePOS, and Star mC-Print and TSP printers
- Wi-Fi: every app.
- USB: the desktop app, Chrome, Edge and the Android app.
- Bluetooth: the desktop and mobile apps.
- ESC/POS printers from other makers
- Wi-Fi: the desktop and mobile apps.
- USB: the desktop app, Chrome and Edge.
- Bluetooth Low Energy (BLE), if the printer's manual lists it: Chrome, Edge, the desktop app and the mobile apps.
- Bluetooth Classic: the desktop app and the Android app, once paired in the computer's or phone's Bluetooth settings.
Not supported yet
- Wi-Fi printers other than Epson and Star in the web app. A browser can only reach the web server built into Epson and Star printers. Use the desktop or mobile app, a USB or Bluetooth connection, or a cloud printer.
- USB printers from other makers in the mobile apps. On Android, USB works with Epson and Star printers only. Use Wi-Fi or Bluetooth, or a desktop till.
- Bluetooth Classic printers from other makers on iPhone and iPad. Use Bluetooth Low Energy or Wi-Fi, or an Android or desktop till.
- The built-in printer in Sunmi and iMin all-in-one terminals. The app has no support for them. Connect an external printer to them as on any Android device.
Tell the app which make it is
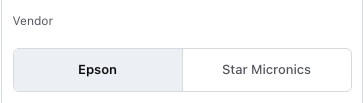
The Vendor setting says whose printer this is. The app fills it in when it finds the printer, or when you check an IP address. In Edit printer it shows Detected: Epson, Detected: Star or Detected: Generic under the IP address. You change it yourself only when the app guessed wrong or could not reach the printer.
You'll find it in two places: in Settings → Printing → Add printer under More options, and in Edit printer for a printer you have already added.
Changing Vendor also resets Printer Language and, in the web app, the Port. While Edit printer stays open, the app stops checking the printer's make at that address.
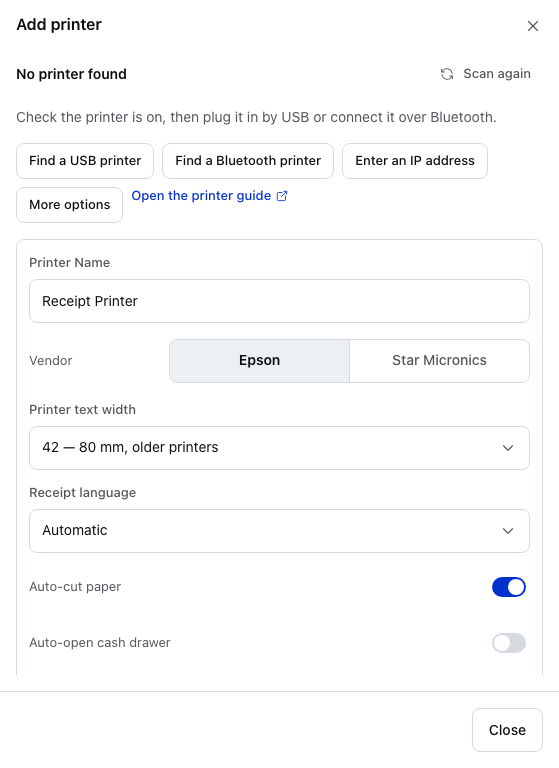
- More options — opens the card below when the scan found nothing or found the wrong printer.
- Printer Name — the name in your printer list and on the receipt screen.
- Epson — the default in the web app.
- Star Micronics — switches the card to Star's settings: Receipt language goes, because it picks the character set for ESC/POS printers. It is not Printer Language, the command language, which you set in Edit printer.
- Auto-open cash drawer — the command that opens the drawer depends on the vendor and the printer language. See Connecting a cash drawer.
- Find a USB printer — Chrome and Edge. The app reads the make from the printer when it can.
- Find a Bluetooth printer — opens the browser's or computer's own Bluetooth chooser.
- Enter an IP address — check one address. Its Port follows the vendor you chose.
In Edit printer, Vendor sits under Connection, and the make the app detected shows under the IP address:
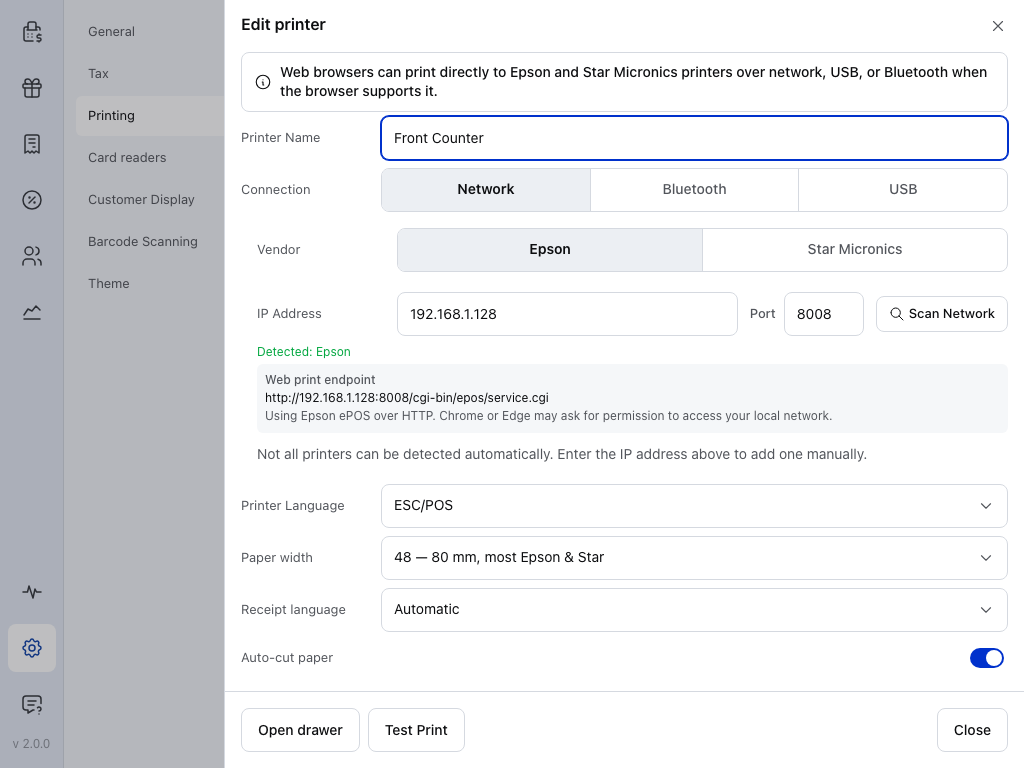
- Connection — the web app offers Vendor for Network, a printer on Wi-Fi or a network cable.
- Vendor — Epson or Star Micronics in the web app. Change it only when the app guessed wrong.
- IP Address — Detected: Epson under it is the make the app found at this address.
- Port — changes with Vendor in the web app. Here it is 8008, Epson's plain-HTTP port; on an HTTPS store it starts at 8043.
- Web print endpoint — how the web app sends the receipt, here Epson ePOS. See What changing it does.
- Printer Language — goes back to the vendor's default when you change Vendor: ESC/POS for Epson.
In the web app you choose between Epson and Star Micronics, and only for a Wi-Fi printer. In the desktop app the list also has Generic. The mobile apps offer Generic for Wi-Fi printers, Bluetooth Low Energy printers and printers paired in Android's Bluetooth settings.
What changing it does
Printer Language, Port and how each vendor prints
Receipt printers speak ESC/POS, which most makers use, or one of Star's own languages, StarPRNT or Star Line Mode.
- Printer Language goes back to that vendor's default: ESC/POS for Epson and Generic, Star Line Mode for Star. A saved printer keeps the language you set until you change the vendor.
- Port changes in the web app to the port that make listens on. After Star Micronics the address form reads 443 on a secure store:
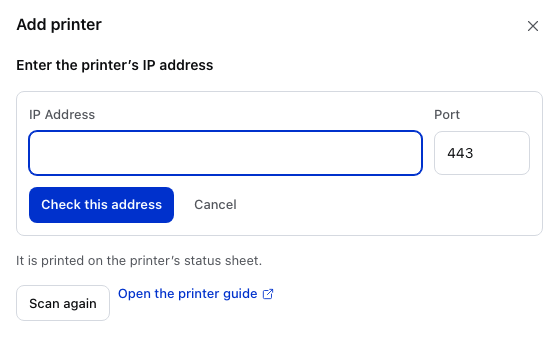
- IP Address — it is printed on the printer's status sheet.
- Port — 443 for Star on a secure store (80 otherwise). Epson uses 8043 (8008 otherwise).
- Check this address — the app asks the address which make answers and shows the printer as a card. Press Print a test page below the card to print.
- How the app sends the receipt changes too. Choosing a vendor by hand stops the app re-detecting it until you close Edit printer. The next time you open it, the app checks the address again and can change the vendor back.
How each vendor prints, app by app
| Epson | Star Micronics | Generic | |
|---|---|---|---|
| Web app, Wi-Fi | Epson ePOS, port 8043 (8008 on a store without HTTPS) | Star WebPRNT, port 443 (80 without HTTPS) | Not offered |
| Desktop app, Wi-Fi | Epson ePOS | Plain network printing, port 9100 | Plain network printing, port 9100 |
| Mobile apps, Wi-Fi | Plain network printing, port 9100 | Plain network printing, port 9100 | Plain network printing, port 9100 |
| Mobile apps, USB and Bluetooth | Epson's own software | Star's own software | Bluetooth Low Energy, or Bluetooth Classic once paired on Android |
| Open drawer button, ESC/POS | Epson's own drawer command | The standard ESC/POS drawer command | The standard ESC/POS drawer command |
Only the Open drawer button sends Epson's own command. A receipt with Auto-open cash drawer on uses the standard command, whatever the vendor.
In the web app, a USB or Bluetooth printer is sent its Printer Language directly: ESC/POS, or Star Line Mode for a printer that answers as a Star. Epson ePOS and Star WebPRNT are used over Wi-Fi only.
If something goes wrong
"Cash drawer kicks depend on printer language/emulation." The vendor and the Printer Language don't match: a Star printer set to ESC/POS, or another make set to a Star language. That is fine if the printer really is in that emulation mode. If the drawer doesn't open, set Printer Language to the mode the printer is in.
The Open drawer button does nothing on a printer that isn't an Epson. With Vendor set to Epson, that button sends Epson's own drawer command, which many other printers ignore. In the desktop or mobile app, set Vendor to Generic. The web app saves a USB or Bluetooth printer as Epson unless it answers as a Star, and has no Vendor choice for it, so turn on Auto-open cash drawer: the drawer then opens with each receipt.
Your Epson or Star shows Detected: Generic. Choose its make under Vendor. The printer answered on its basic print port only, so the app could not tell the make.
Your make isn't in the web app's list. The browser can only print over Wi-Fi to Epson and Star. Connect the printer by USB or Bluetooth in Chrome or Edge, or use the desktop app.
Report yours
Whether it worked or not, tell us the model. Tap Copy setup report: it is on the Nothing printed screen of Add printer, on the screen that says the printer is set up, and in each printer's More actions menu in Settings → Printing. It records the printer, its vendor, how it answered and the app's recent printer log. Paste it into your message.