Customers
The Customers screen lists everyone who can be the customer on a sale: your store's WordPress users. With WCPOS Pro you add, edit and delete them here, without going to WP Admin. Without Pro you can still choose an existing customer for a sale: see Customers on a sale.
Customers without Pro
Without WCPOS Pro, the list sits blurred behind an upgrade card, and Add new customer and each row's › are greyed. Display options still works.
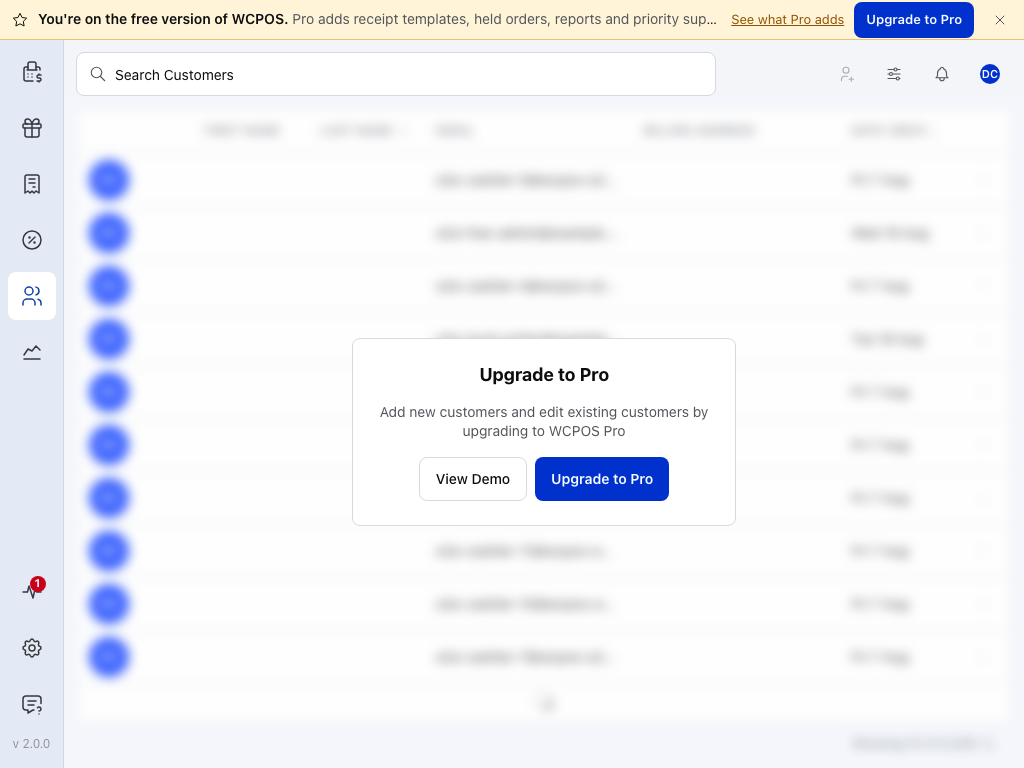
- Customers — opens this screen from the menu.
- Search Customers — type part of a name, email, phone number or tax ID.
- Add new customer — greyed without WCPOS Pro.
- Upgrade to Pro — the card over the list.
- View Demo — opens the Customers screen on the WCPOS demo store.
- Upgrade to Pro — opens wcpos.com/pro.
Customers on a sale
Each sale starts with your store's default customer: whoever Default POS Customer names, or the cashier when Use Cashier Account is on. Tap the customer's name in the cart to choose someone else. See Choose the customer.
If your store calculates tax from the customer's address, choosing or adding a different customer, or changing their address in the cart, can change the tax on what's already in the cart. Prices before tax stay the same. Tax isn't recalculated on a tax exempt order.
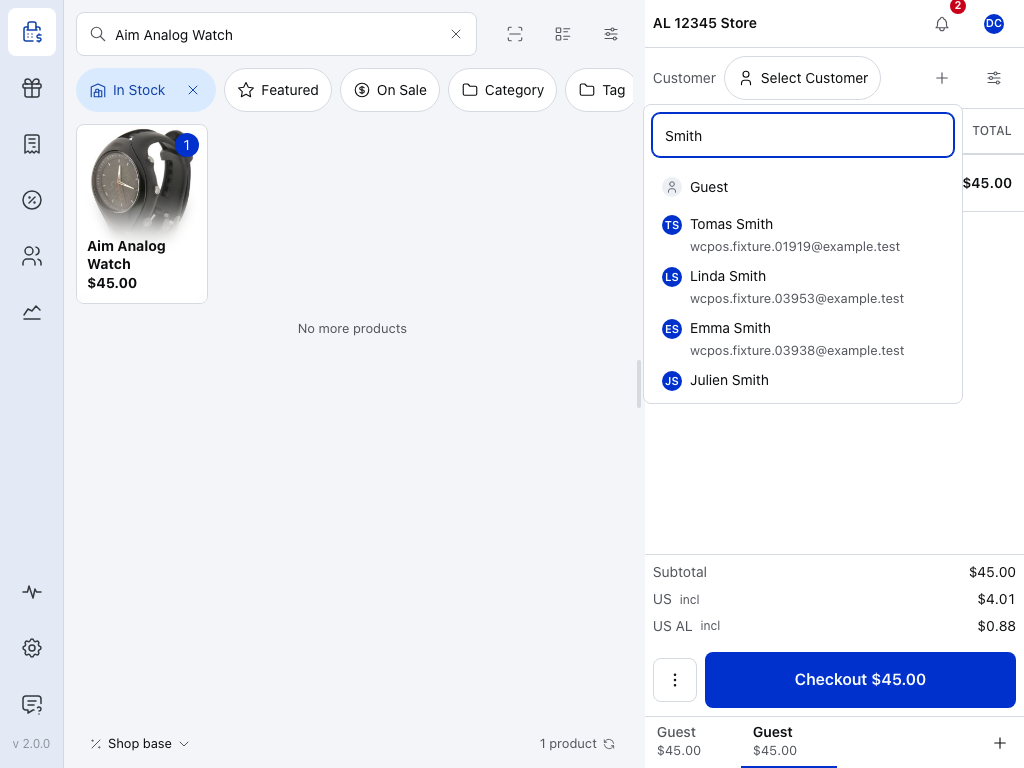
- Select Customer — type part of a name, email or phone number.
- Guest — a sale with no customer account.
- A customer — tap to put them on the order, with their billing and shipping addresses.
Find a customer
Open Customers from the menu. Type a name, email address or phone number in Search Customers.
What you can search for
Every word you type must match, in any order, across the name, email, username, company, phone and tax ID fields, so jane acme finds Jane whose company is Acme. See What Search Matches.
The list starts sorted by last name, A to Z. Tap a heading such as First Name, Email or Date Created to sort by it, and tap it again to reverse. The footer counts the customers listed against your total.
Add a customer
- Press Add new customer beside the search. The Add Customer form opens empty.
- Type the customer's Email. It's the only field you must fill.
- Add the Name, Phone and anything else you have: open Addresses and other optional details below.
- Press Add Customer. A message names the customer, and the form closes.
To add a customer in the middle of a sale, use Add new customer in the cart's add menu instead. It's the same form, and the customer goes straight onto the order. See Add a new customer.
Addresses and other optional details
The form starts with Name, Email, Phone and Username:
- Username — can only be set now, when you add the customer. Leave it empty and your store makes one from the email while Automatically Generate Username from Customer Email is on, as it is by default.
Everything else starts as a button below them; press one to add that row:
- Company, Billing Address and Shipping Address. Shipping Address is Same as billing until you press Use a different address.
- Password — leave it out and your store makes one.
- Tax ID — a type, the ID and a country. A new row starts with a type for the billing country, or for your store's country when there's no billing address. "Format does not match the selected type." is a warning only: the ID still saves.
- Custom field — a key and a value, saved on the customer's account.
A customer's role is set in WP Admin, not here.
Edit a customer
- Open the customer. On a touch screen, tap the customer. With a mouse, click the › at the end of their row, or the row itself if the Actions column is hidden. The Edit dialog opens with the customer's name in its title.
- Change a field. There's no Save button: the change saves a moment after you stop typing.
- Check for the green Saved mark beside the field.
- Press Close when you're done.
Account access and refreshing customer details
- Password saves when you leave its field, not as you type.
- A value the form can't accept, such as an email with no
@, shows an error under the field and isn't saved. - Username is locked: it's set at creation.
- Role is locked: it's set in WordPress.
- Sync saves anything still waiting, then fetches the customer again from your store. Use it when the customer looks out of date.
- JSON shows the customer's record as it is stored on this device, for when support asks what the POS holds.
Delete a customer
Deleting a customer deletes their WordPress user on your store. There is no Trash for WordPress users, so it can't be undone.
In the Edit dialog, press Delete. Tick Confirm and press Delete again.
Delete shows only to a cashier whose role may delete users. Only an administrator can edit or delete a staff account, such as a shop manager or another cashier. See Access.
A customer deleted in WP Admin leaves the POS list too, at the next sync.
Display Settings
Press Display options (the sliders, beside Add new customer) to open Customer Settings. Switch a column on or off, or drag it by its grip (⠿) to move it. These settings are kept on this device only.
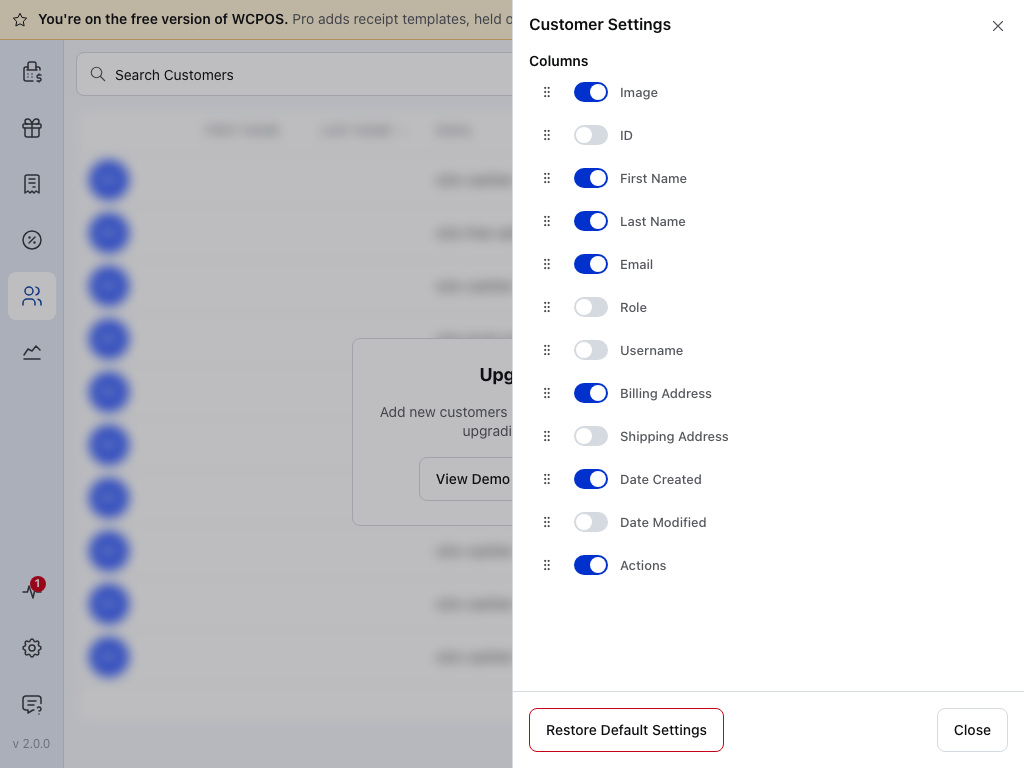
- Restore Default Settings — puts the columns back as they came, listed under Default columns below.
- Close — closes the panel. Each change applies as you make it.
Default columns
| Column | Shown at first |
|---|---|
| Image | Yes |
| ID | No |
| First Name | Yes |
| Last Name | Yes |
| Yes | |
| Role | No |
| Username | No |
| Billing Address | Yes |
| Shipping Address | No |
| Date Created | Yes |
| Date Modified | No |
| Actions | Yes |
If something goes wrong
Buttons are greyed out
- Add new customer is greyed — the store needs WCPOS Pro, or your role may not add customers. An administrator can allow it in Access. With a mouse, rest the pointer on the button to see which.
- The › is greyed and the customer won't open — your role may not edit customers. An administrator can allow it in Access.
Changes aren't saving
- "Failed to save customer" — the form stays open with what you typed. Press Add Customer again.
- "Not saved" beside a field — that change wasn't written. Type it again.
- The customer was saved, but not added to this order — from the cart's Add new customer. Search for them in the cart and add them again.
Customers are missing or the list looks wrong
- "Couldn't refresh. The copy on this device is unchanged" — Sync couldn't reach your store. Check your connection and press Sync again.
- A customer you expect isn't found — offline, search only finds customers already on this device. See On the device and in your store.
- The list looks wrong — press and hold the sync button in the footer and choose Clear and Refresh. It clears this device's copy of the customer list and downloads it again; nothing changes on your store.