Printer Setup Wizard
The app has its own setup wizard: Add printer looks for your printer, prints a test page, and asks whether it came out right. This page walks through it. If the test page doesn't print, answer a few questions. The printer's settings, and how to change them later, are at the end.
Add a printer
Switch the printer on and load paper first: the search starts the moment the panel opens. Then go to Settings → Printing and press Add printer. Under Printers you'll already see Print Dialog, the built-in printer every till has.

- Add printer — opens the setup panel and starts looking for printers straight away.
- Having trouble? — opens the printer guide.
While it looks, the panel shows where it is searching:
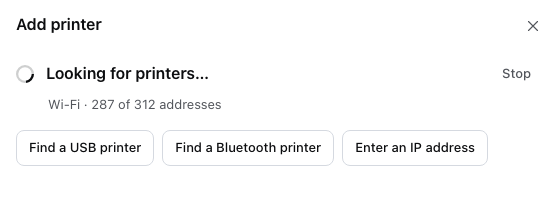
- Stop — ends the search.
- Find a USB printer — opens the browser's chooser for a printer on a cable, in Chrome or Edge. The desktop and mobile apps look for USB printers in the search itself. See what each app can connect to.
- Find a Bluetooth printer — opens the chooser for a Bluetooth printer. Not in the list? See Bluetooth pairing. The mobile apps have no such button: their search already looks for Bluetooth printers.
- Enter an IP address — type the address of a Wi-Fi or network printer yourself. See below.
Where each app searches
Under Looking for printers… the panel says where it is looking:
- Wi-Fi in the web app, with a count of addresses tried.
- USB, Bluetooth and Wi-Fi in the desktop app.
- Wi-Fi, Bluetooth and USB (Epson and Star) in the mobile apps.
What the search finds
Each printer it finds is a card. The heading says how it went: Found your printer, Which printer is yours? when there are several, That is an office printer, not a receipt printer, or No printer found.
If your printer's card shows Ready or Test needed, go on to Print a test page.
A card carries one of four badges:
- Ready — the app can print to it. Press Print a test page.
- Test needed — the app thinks it can print, but only a test page will tell.
- Office printer — an office or inkjet printer, not a receipt printer. Its card can't be picked or tested. Receipts print on it through the built-in Print Dialog instead.
- No connection — nothing at that address answered as a printer the app can reach.
If the search finds nothing, see No printer found.
Print a test page
Pick your printer's card and press Print a test page (or Print a test page on and its name, when there are several). While the app checks the paper, the panel says Checking paper width…. If it can't tell, Paper width lets you pick 58 mm or 80 mm first.
Then the panel asks Did the test page print? Under the question, Test page n · n characters per line shows the width in use. Before you answer, look at the COLUMN RULER on the test page: a line of digits that must end flush right. If it wraps onto a second line or stops short of the edge, the width is off. Then pick the answer that matches.
Yes, and it looks right
The printer is saved. The panel says name is set up, then It is your default printer. or Receipts will print here. Press Done.
Printed, but the ruler is off
Under Which paper is in the printer?, pick the width and the test page prints again:
- 32 — 58 mm paper
- 42 — 80 mm, older printers
- 48 — 80 mm, most Epson & Star
- 64 — 80 mm, small font
See receipt width.
Nothing came out
The panel shows Nothing printed and one line on the likely cause, such as paper or Secure Printing. Fix it, then:
- Try again — prints the test page again.
- Save without testing — saves the printer anyway. Use it when the printer is off or out of paper right now and you know its settings are right. Test it later from its row with Test Print.
- Start over, Copy setup report (for support) and Open the printer guide.
Still nothing? Answer a few questions.
No printer found
If the search finds nothing, the panel looks like this. Not sure what to try? Answer a few questions.
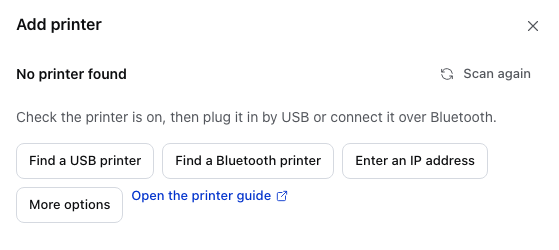
- Scan again — looks again, after you've switched the printer on or plugged it in.
- Find a USB printer — for a printer on a cable.
- Find a Bluetooth printer — for a Bluetooth printer.
- Enter an IP address — for a network printer the search missed. See below.
- More options — name, paper width and drawer, before the test page. See More options.
- Open the printer guide — the printer guide.
Enter the address yourself
If the search missed a Wi-Fi or network printer, press Enter an IP address. The address is on the printer's status sheet. On most Epson printers, open the paper cover, hold Feed for a second, then close the cover to print it.
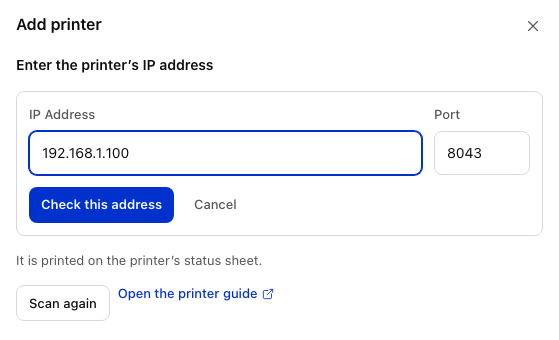
- IP Address — the address from the status sheet, such as
192.168.1.100. Give the printer a fixed address so it doesn't change. - Port — filled in for you.
- Check this address — asks the printer what it is and shows it as a card. A Ready or Test needed card goes on to the test page.
- Scan again — back to the search.
Which port each app uses
- In a browser, the printer's own web port: on an HTTPS store 8043 for Epson and 443 for Star (8008 and 80 on plain HTTP).
- The desktop app prints to an Epson through ePOS-Print (443 first, then 8043, 80, 8008) and to other printers on 9100. The mobile apps print to 9100.
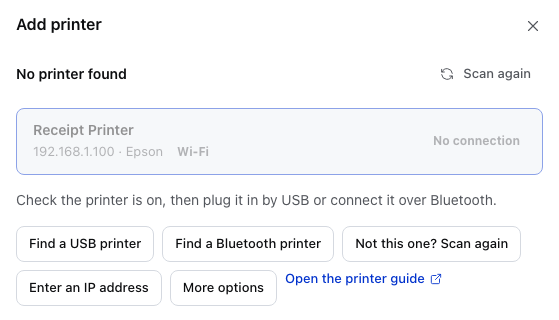
- The printer's card — its address, maker and connection. No connection here means nothing answered at that address. Check the address and that the printer is on the same network as this till. In a browser, also see permissions and certificates.
- Enter an IP address — try the address again.
Still not printing? Answer a few questions
Pick what matches your till. Each answer leads to the next step or to the fix.
Where is the printer?
Name, width and drawer
More options opens the printer's settings before you print the test page. You can change them all again later.
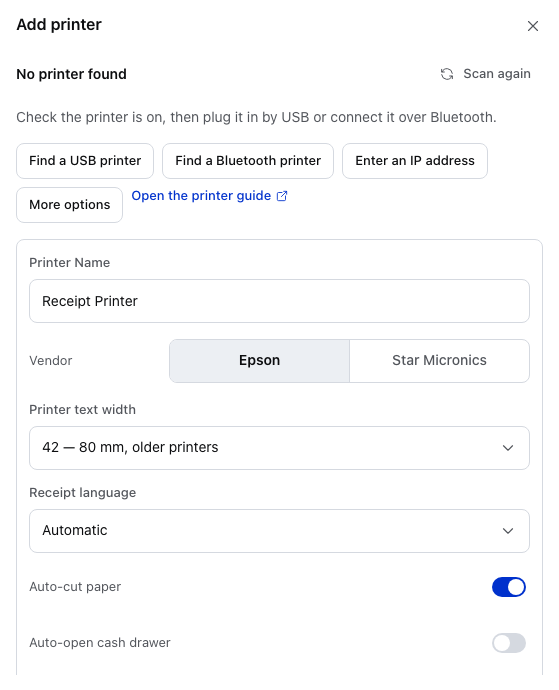
- Printer Name — the name you see in your Printers list and when you choose which printer each receipt goes to.
- Vendor — Epson or Star Micronics in a browser; a list in the apps.
- Printer text width — characters per line: 32, 42, 48 or 64. See receipt width.
- Receipt language — controls which letters and symbols print correctly. Automatic suits most. See non-Latin receipts.
- Auto-cut paper — cut after each receipt.
- Auto-open cash drawer — open a drawer wired to the printer. See cash drawers.
Further down, Set as default uses this printer for every receipt not routed elsewhere.
Change a printer later
Each printer you add gets a row in Settings → Printing with Test Print and Edit. Edit opens Edit printer, where the connection and every setting can change. The row's More actions menu has Copy setup report, Set Default and Delete.
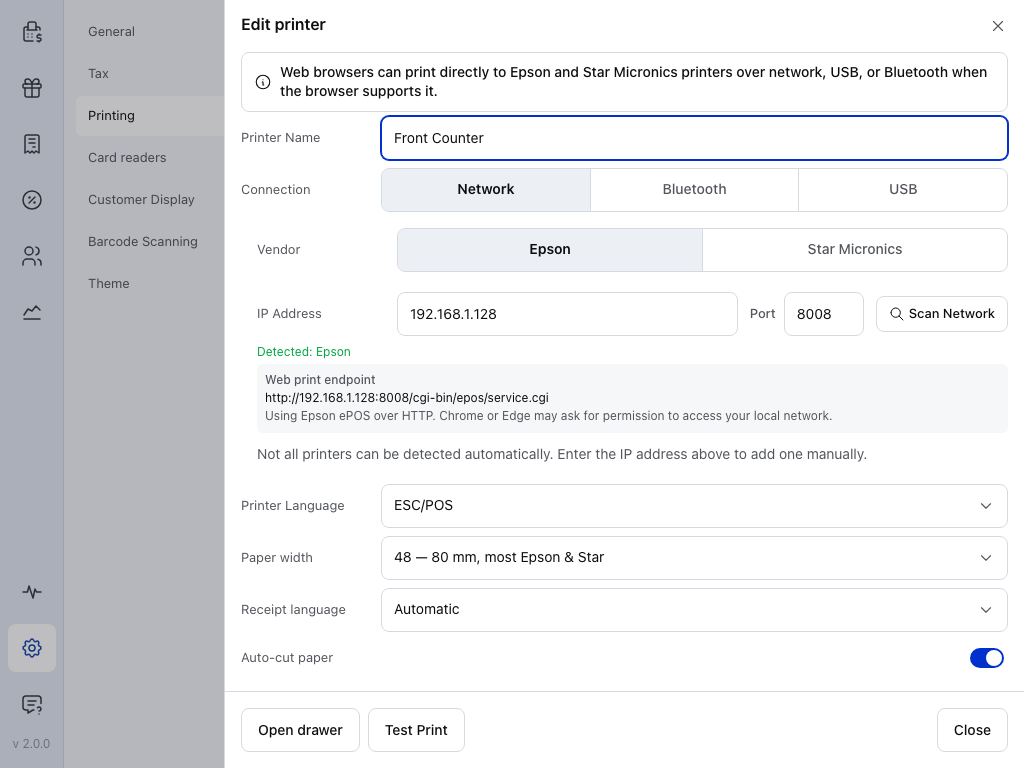
- Printer Name — the name you see in your Printers list and when you choose which printer each receipt goes to.
- Connection — Network, Bluetooth or USB.
- Vendor — Epson or Star Micronics in a browser.
- IP Address — with Port beside it. Detected: Epson under it means the app reached the printer.
- Scan Network — looks for printers on the network again.
- Web print endpoint — the address a browser prints to, and whether it uses HTTPS or HTTP. See Printing from the browser.
- Printer Language — ESC/POS for Epson and most other makes, StarPRNT or Star Line Mode for Star.
- Test Print — prints a test page with the settings as they are.
Connection and advanced settings
- IP Address and Port — the network address. While it checks, the panel says Detecting printer..., then Detected: and the maker.
- Scan Network — looks for printers on the network. Each one found shows Discovered: and its address, with Use this printer to fill in the fields. In a browser, the panel shows the Web print endpoint it will use; a browser can't print to port 9100.
- Printer Language — the commands the printer understands: ESC/POS for Epson and most other makes, StarPRNT or Star Line Mode for Star. The wrong one prints random characters.
- Paper width, Receipt language, Auto-cut paper, Auto-open cash drawer and its Cash drawer connector, and Set as default.
- Print receipts as an image — for scripts the printer can't draw, such as Arabic, Hebrew or Thai. Slower, and the job is larger than text.
The settings under the address, in Edit printer:
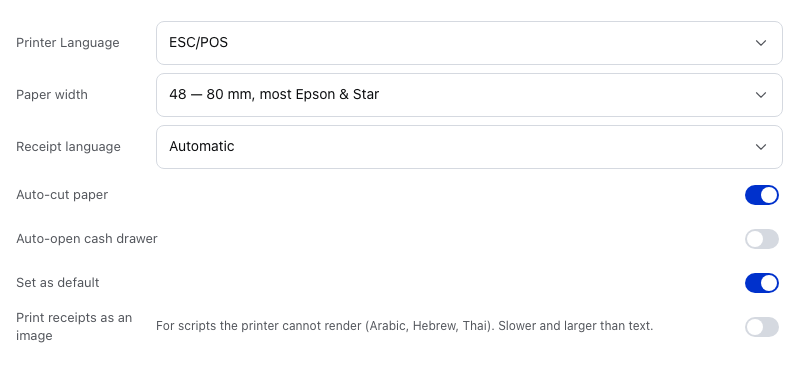
- Printer Language — the commands the printer understands. The wrong one prints random characters.
- Paper width — characters per line. See receipt width.
- Receipt language — Automatic suits most. See non-Latin receipts.
- Auto-cut paper — cut after each receipt.
- Auto-open cash drawer — open a drawer wired to the printer. Once on, Cash drawer connector shows under it. See cash drawers.
- Set as default — use this printer for every receipt not routed elsewhere.
- Print receipts as an image — for scripts the printer can't draw, such as Arabic, Hebrew or Thai.