Closure Reports
This page is for whoever balances the day; the count itself is walked screen by screen in Close the register.
- Check the closures in Reports, and read one.
- Recount a closure when the count was wrong.
- Export closures as a CSV file.
- Set the close rules once, then run the day at the till and count and close.
- Find a variance when the drawer is short or over.
Turn on Open and close the register in Registers. With it off the POS sells without a register session, so there's nothing to count or close.
Opening, counting and closing the register, and Export closures in WP Admin, are free. The Closures view in Reports, with earlier days, recounts and Export CSV, needs WCPOS Pro.
Check the closures
- Open Reports. The till strip at the top shows this device's register. After the register is closed it reads Closed, then Last closure with its number and the Drawer result.
- Open the closures:
- Free plugin: tap Last closure to open that closure.
- With Pro: tap the arrow at the end of the strip to open Closures, every register session and closure you can see.
To print the last closure again, press Print closure on the strip.
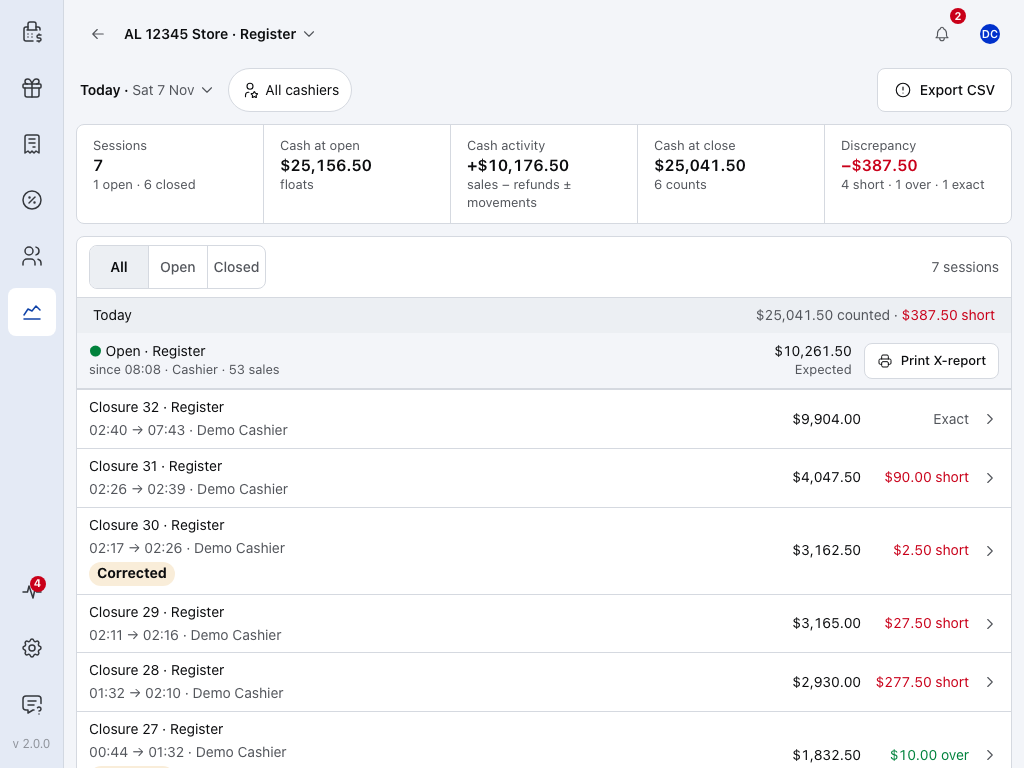
- All — every session in the period, open and closed.
- Open — the register sessions still running.
- Closed — the numbered closures only.
- Sessions — how many sessions, open and closed.
- Cash at open — the floats.
- Cash activity — cash sales less cash refunds, plus or minus paid in and paid out.
- Cash at close — what was counted, and how many counts.
- Discrepancy — the period's differences added up, with how many counts were short, over and exact.
- Open session — a register still open, since when, by whom and how many sales, with its Expected cash. Print X-report prints it as it stands.
- A closure — Closure N and its register, opened → closed and who closed it, the cash counted and Exact, short or over. Tap it to read the closure.
- Export CSV — saves the closures listed. See Export closures.
- On a phone, each closure's figures read on one line under it, Expected … · Counted … · Difference …, with its badge below.
- Each day has a heading with the cash counted that day and the day's result. The list loads 50 at a time; Load more at the end loads the next 50.
- The period, the store and register, and All cashiers at the top narrow the list, as on the Reports screen. Closures go back 92 days.
- A closure's badge says what happened to it after the count: Corrected (recounted or given a late sale or movement), Unsynced (not yet on the store) or Carried to another store.
- Closures need a connection. Offline, the view says Unavailable offline, and a closure this device has never opened can't be opened.
Read a closure
Tap a closure. On a tablet it opens beside the list, and × or Close goes back to it. The example below is a different count from the one above: Closure 30, which a late sale changed after the close.
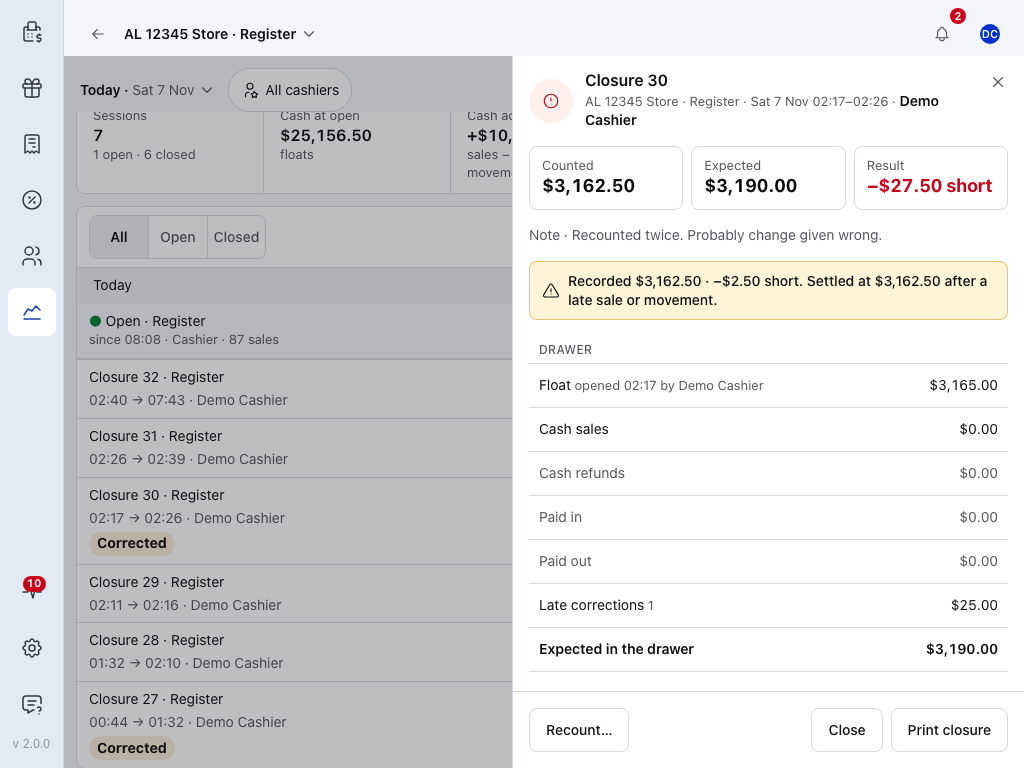
- Counted — the cash counted at the close.
- Expected — what the register expected.
- Variance — the result, counted less expected: Exact, short or over.
- Note — the cashier's note from the count.
- Drawer — every line from the Float (when and by whom the register opened) through cash sales, cash refunds, paid in and paid out, and any Late corrections, to Expected in the drawer and Counted.
- Recount…, Close and Print closure — recount the drawer, close the panel, or print the closure again.
A closure that changed after the close says so above the drawer. Here it reads Recorded $3,162.50 · −$2.50 short: a $25.00 sale reached the store after the count, so Late corrections raised Expected to $3,190.00 and the closure now reads $27.50 short. The closure is never rewritten: the correction sits beside it.
Further down the closure:
- Other tenders — the total for each other payment method, such as Card.
- Session — Cashiers, Sales, Items sold, Discounts, Average sale and Drawer openings.
- Closure paper — printed once, printed N times or not printed yet.
- Corrections — each Recount, Late sale and Late movement: who made it, Approved by and the manager's name when a manager approved it, the reason and the time. A line above says what was first recorded and where it settled, such as Settled at … after 1 recount.
Recount a closure
When the count was wrong (a bag of coins found the next morning, a note stuck in the drawer), recount the closure instead of changing the next float. Press Recount… on the closure. The example below is a different closure from Closure 30: Closure 31, counted at $4,047.50.
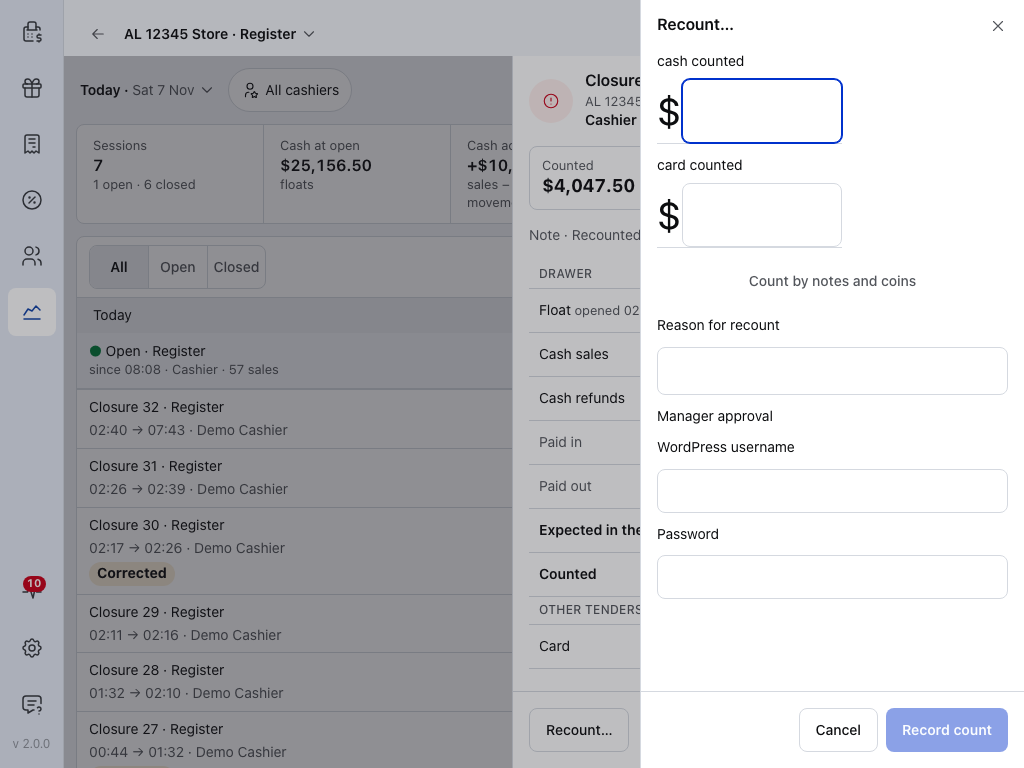
- cash counted — the cash you counted this time.
- card counted — one box like it for each other payment method on the closure.
- Count by notes and coins — the same counter as at the close.
- Reason for recount — required, up to 500 characters.
- Record count — saves the recount. It stays greyed out until every box has an amount and there's a reason, and, when Manager approval shows, the manager's username and password.
Below the reason, Manager approval asks for a manager's WordPress username and password. A user with Approving closures (Access) doesn't see it.
The original figures stay on record beside the new ones, and the closure shows Corrected. Recounting needs a connection, and the closure must already be saved in your store. Offline, Recount… is greyed out and the panel says Connect to recount. If the closure is still only on this device, it says Sync this closure to recount.
Export closures
- From the POS (Pro): in the Closures view, press Export CSV. It saves the closures listed.
- From WP Admin (free and Pro):
WP Admin > POS > Settings, under Tools, Export closures, then Download CSV. It saves every closure.
What the POS export contains
The closures listed, for the period, store, register and cashier you chose, as closures-<from>-<to>.csv. In a browser it downloads; in the app it opens the share sheet. Each row has the business day, closure number, register, store, opened, closed and who closed it, then expected, counted and variance for each payment method, and Unsynced or Corrected. It's off while the Open tab is selected: open sessions aren't closures yet.
What the WP Admin export contains
Every closure for the stores you can reach, with no date range, exactly as recorded at the close: number, register, business day, float, counted and expected totals, variance, each payment method and tax rate, and running totals. It needs a user who can manage the POS and view reports.
Before your first close
Set these once in WP Admin > POS > Settings > General, under Register (Registers). With Pro these are site defaults: a store changes the rules under Cash drawer rules on its Registers page, where each register also has its own float (A store's Registers page).
The three close settings
- Opening float fills in the amount when a cashier opens the register. A typical till starts with $100–$200 in small notes and coins. The opening card also offers the last count, what was counted at the last close.
- Ask a manager when the count is out by more than …: a bigger difference needs a manager's approval before the register closes. Off, any difference closes without one.
- Remind the cashier to close at …: past this time the register shows Overdue, and the panel's button reads Close register · it's past the time.
Who counts and who approves
A cashier with the view reports capability sees the expected cash while counting. Without it they count blind: no expected figure, no difference and no closure details. An approval needs a manager account that is neither the cashier closing nor the one who opened the register. See Access.
One drawer, one register
Every device on one counter shares the register and its session, so the drawer is counted once. A second cash drawer is a second register (Pro). See Stores, Registers and Devices.
Open the register
Put the float in the drawer. The cart shows Open register with Cash in the drawer filled in. Count the float, correct the amount if it differs, and press Open register. While it's closed the POS is price check only; the card's Last closure row opens the register panel with the last closure. Step by step: Open the register.
A register already open on another device doesn't ask for a float: this device joins that session (REGISTER221).
During the shift
Tap your avatar in the bar, then In the drawer, to open the register panel. It's the only way in: the bar has no register button. The panel shows the cash in the drawer, Session sales, Paid in, Paid out and No sale, then Expected in the drawer, which you tap to unfold the sum from the float. When there are any, it also lists Other tenders (card and every non-cash method) and the Last closure, before Print X-report and Close register. See Move cash in and out for the labelled panel.
Cash that moves without a sale
Paid in for cash going into the drawer, Paid out for cash leaving it (a drop to the safe, a supplier paid from the till). Each needs an amount and a reason. A movement entered by mistake: Void on its row while the register is open.
Open the drawer for change
Press No sale. The sheet asks Why open the drawer?: pick Change, Mistake or Drawer check, or Other… and type a reason, then press Open the drawer. No money moves, but the opening is counted: the closure lists No sales and Drawer openings.
Check the drawer mid-shift
Print X-report prints the session as it stands, without closing anything. The till strip at the top of Reports shows the same sum: Opening float + Cash sales − Cash refunds = Expected in drawer, with Paid in and Paid out when the session has any (The till strip).
Park orders rather than abandon them
Hand over without closing
Tap your avatar, then pick the next cashier under Hand the till to, or Another account… to sign one in. Each name shows how many open carts they have. The drawer stays open and the POS reloads as them. See Your cashier sheet.
Count and close
- Finish the last sale, then press Close register in the register panel. While you count, the products read Counting the drawer. Items can be added after the count.
- Count all the cash in the drawer, float included, and enter it in Cash counted, float included, or tap it in with Count by notes and coins.
- Enter the card terminal's batch total under Other tenders, and the total for any other payment method.
- If Expected shows the drawer short or over, count again and work through Variance handling. Say what you found in Note.
- Press Close & print. If the button reads Approve & close, a manager approves on this device; approval needs a connection.
Who can approve?
The button reads Approve & close when the count is over the limit. A manager enters their WordPress username and password on this device. The store refuses the cashier who is closing and the cashier who opened the register. A blind count isn't exempt: the cashier never sees the difference, but the store checks it and asks. If you change the count after a manager has approved it, the manager approves again. See REGISTER301 if it's refused.
The ‹ at the top goes back to selling if a customer walks up; count again before you close. Screen by screen: Close the register.
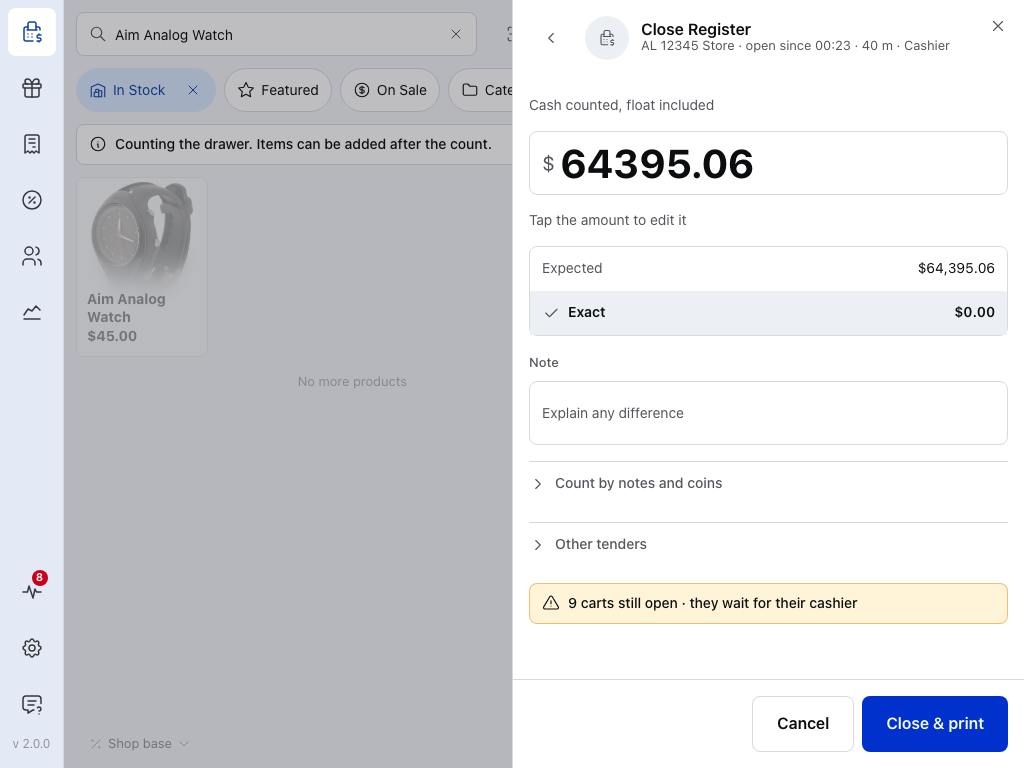
- ‹ Back to selling — leave the count and sell again.
- Cash counted, float included — what's in the drawer.
- Tap the amount to edit it — the keypad comes back.
- Expected — what the register expects. A cashier who counts blind doesn't see it or the difference.
- Exact — the difference: Exact with a tick, or the amount short or over.
- Note — Explain any difference. The note is kept on the closure.
- Count by notes and coins — tap a note or coin once for each one you count. The amount becomes their total; Clear starts again.
- Other tenders — a box for each other payment method the session took, such as Card counted, for the total from the terminal or the slips.
- Close & print — writes the closure. It reads Approve & close when the difference is over your limit.
Expected cash is worked out for you:
Expected cash = Opening float + Cash sales − Cash refunds + Paid in − Paid out
After you close:
- The closure. The sheet says Closure N written with what you counted against what was expected. Press Print closure for the closing report (the Z-report); once printed, the sheet says Printed on and the time. Press Done. See File the closure.
- Settle the card batch. The Card line under Other tenders on the closure should match the terminal's batch total you entered. Settle the batch now if your terminal doesn't do it for you. For a hosted checkout such as Square, see Web Checkout.
- Drop the cash. Put tomorrow's float back in the drawer and bag the rest with the printed closure for the safe.
Variance handling
If counted cash doesn't match expected, work through these in order before closing:
- Recount the drawer. Recount, especially the coins, and enter the new figure. After the close, a manager can still recount the closure in Reports; the original figures stay on record beside the corrected ones.
- Check that every device has synced. A sale that hasn't reached the store yet isn't in the expected figure. The count warns N sales not yet on the server — the closure will record them: you can still close, and they're added beside the closure as Late corrections when they arrive. On a device that joined the session, Figures arrive with the next sync keeps Close register off until the figures are in. Bring every device online before you count.
- Check for parked orders. Filter Orders to POS - Open: a sale rung up but not paid shows here. Check whether money was taken for an order still marked POS - Open, and complete it if so.
- Paid in and paid out. Confirm every cash drop and payout is in the register panel. A movement the store refused is listed at the top of the panel with Retry (see REGISTER101).
- Refunds. A cash refund given in WP Admin instead of the POS isn't in the drawer sum. See Refunds.
- Wrong change given. Check whether the wrong change was given. If you can't explain the difference, say so in Note.
The variance is recorded on the closure whether you find the cause or not. A trail of small documented variances is better than untracked ones.
Several cashiers or stores
Several cashiers worked the same till today
The register has one session however many cashiers sell on it, so the drawer is counted and closed once. The session records who opened it and the closure records who closed it. Each cashier sees their own figure under Your sales today on their cashier sheet, and the closure's Session band lists the Cashiers.
To pass the till on, use Hand the till to on the cashier sheet: the drawer stays open, and open carts wait for their cashier. For a separate count per cashier, close the register at the handover and let the next cashier open it again with a float. Each close is its own numbered closure.
One cashier worked at multiple stores today
Each store has its own register, so each one is opened and closed on its own. Use Switch beside Store on the cashier sheet to move between stores, and close the register in each store at the end of the day.
With Pro, the store and register menu at the top of Reports switches between registers and stores, so you can review each store's closures from one device.
Each store has a different person closing
That's the normal pattern. Each closer counts and closes their own store's register. With Pro, a manager can review every register's closures the next morning in the Closures view, for every store they can reach.
A sale went through after I closed
A sale or refund that reaches the store after the closure was written is recorded as a late correction against that closure. The closure itself is never rewritten: the correction sits beside it, and the closure shows Corrected, so the closing report and the settled figure can both be read.
Best practices
- Close every day. Skipping a day means tracking a variance across two days, which is much harder.
- Keep the printed closing report, even on quiet days. The closure is also kept in WCPOS and can be exported as CSV.
- Don't share user accounts. Each cashier on their own WordPress user means the closure names the right people.
- Cross-check weekly against WooCommerce Analytics (
WP Admin > WooCommerce > Analytics): same orders, different view. If the totals differ, a parked order was usually completed late or a refund was given in WP Admin rather than the POS. - Keep the float the same. Set an Opening float so every opening starts from the same figure.
If something goes wrong
"Unavailable offline" in Closures. The Closures view and recounts need the store. Check the connection; a closure this device has opened before can still be read.
Recount… is greyed out. Connect to recount means the device is offline. Sync this closure to recount means the closure is still only on this device: keep it connected until the closure is saved in your store.
"Report access is not permitted". Your user can't see the till's figures, so Reports and Closures are closed to them. See Access.
"Closure details are restricted while blind counting is on". A cashier who counts blind can't open closures. A manager reads them.
"This closure is outside available history". Closures in the POS go back 92 days. Older ones are in the WP Admin export.
"Export failed. Try again." Try again. In WP Admin, Your session has expired means reload the page and sign in again; Check that you have permission to view reports means your user can't export closures. See Access.
Opening, counting and closing the register, the numbered closure and Export closures in WP Admin are in the free plugin. On the free plugin, Reports shows today on this device's register and its last closure. Pro adds more registers per store and the Closures view: earlier days, every register and every store, recounts and Export CSV in the POS. See More registers with Pro.