Split Payments
One order can be paid in more than one go: part in cash and the rest on a card, or shared between friends. It stays one order, with every payment listed on it, until nothing is left to pay. This page picks up at the tender pane; Checkout walks through a whole sale.
- Part now, the rest another way — Take part of the payment.
- Equal payments, or a set amount first — Split the order.
- Each customer pays for their own items — Pay by item.
- One payment was wrong — Cancel one payment.
Take part of the payment
When the customer pays some now and the rest another way, tap the tile they're paying with, type the part they're paying and press Take. You don't need to set anything up first: the line under the amount reads Part payment · … left after this. After Take, the amount changes to what's left, ready for the next payment: pick the next tile and take the rest.
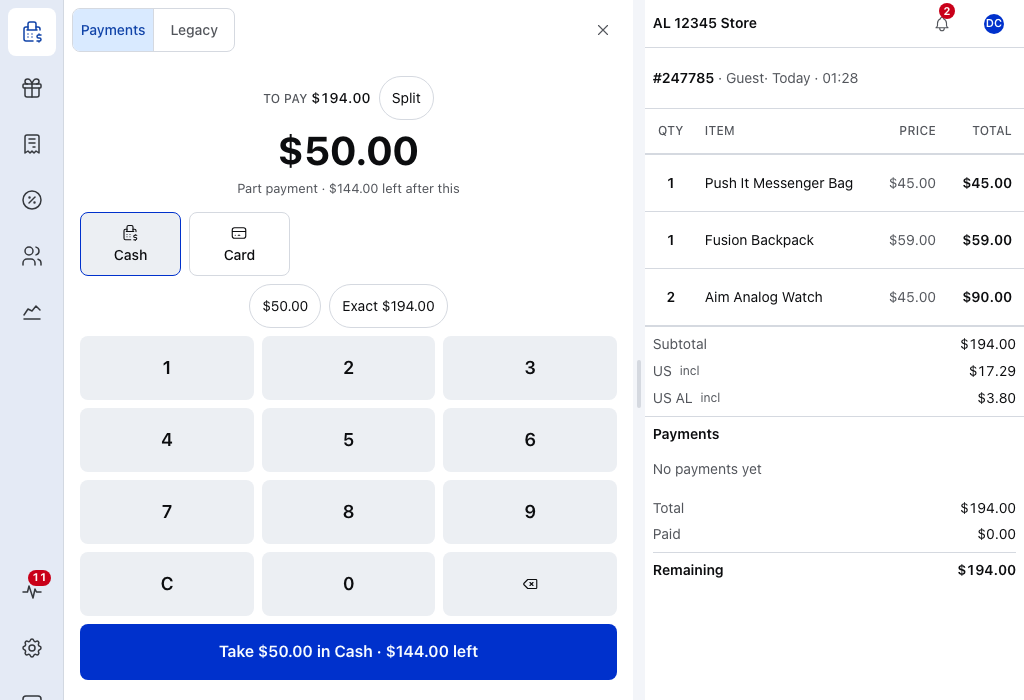
- $50.00 — the part the customer is paying now.
- Part payment · $144.00 left after this — what's still owed once this is taken.
- Split — leave it off for a part payment.
- Cash — the tile they're paying with.
- Take $50.00 in Cash · $144.00 left — takes the part.
- Remaining — the order's balance, until the part is taken.
A card on your own terminal works as it does for a whole sale: take the card there first, then record it here. A paired reader takes the amount from the till; see On a Card Reader. While the reader is still taking a payment, ✕ leaves checkout and the reader carries on; nothing is cancelled.
Once a payment is taken, ✕ doesn't put the sale aside. It asks Cancel this payment?, because money already taken has to go back to the customer. Press Keep taking payment to stay. See The customer leaves before paying the rest.
Split the order
Press Split beside the amount. The tender pane shows a row of ways to split what's left, and the bill beside it becomes the list you pick items from.
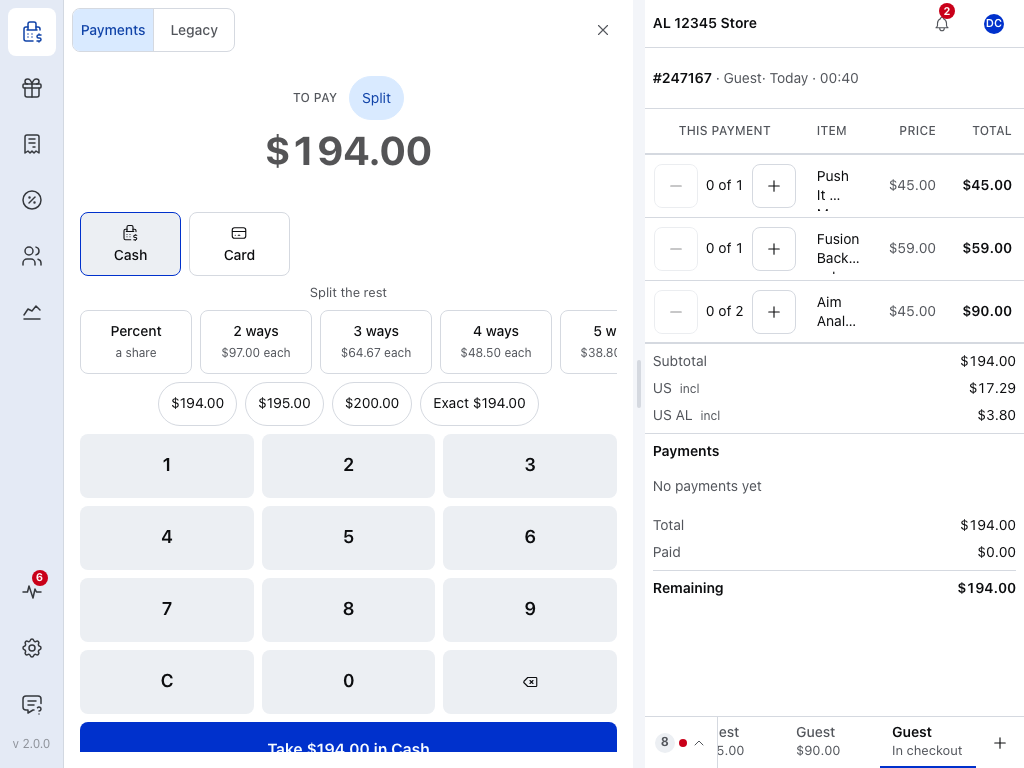
- Split — turns splitting on. Press it again to turn it off and drop the plan.
- 2 ways — two equal payments. Each tile names what every payment would be.
- 3 ways — and so on up to 6 ways. The row scrolls sideways when the tiles don't fit.
- Percent — take a share of what's left. See A percent of the rest.
- An item on the bill — tap it to pay for that item. See Pay by item.
- Take — names the amount, the method and what this payment is.
Each payment can be on a different payment method. When the order doesn't divide exactly, the shares are rounded and the last payment takes what is left, so one can be a cent different from the others. A gateway that charges the whole order can't take a part; see A gateway is not available.
Tap a tile, then take each payment.
A set amount first
Type the first payment on the keypad before you choose the tiles. The row then reads After this payment · …, and each tile shares what's left after it. Tap one: the typed amount comes first, then the rest in that many equal payments.
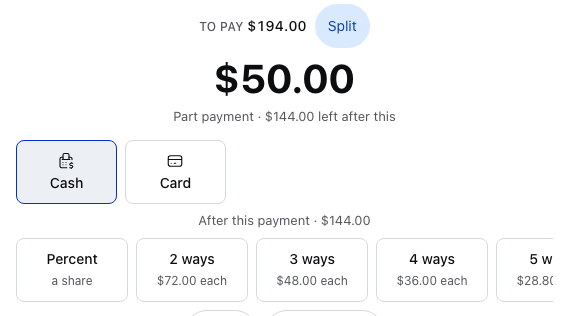
- The amount — the first payment.
- After this payment · … — what's left to share once it's taken.
- 2 ways — the rest in two equal payments after the first.
To take only the amount typed, with no plan, press Take instead of a tile. With a tile, take each payment in turn.
A percent of the rest
Tap Percent, then 10 %, 20 %, 25 % or 50 %, or Type to enter your own share. The amount becomes that share of what's left. Take it as one payment, then split or take the rest.
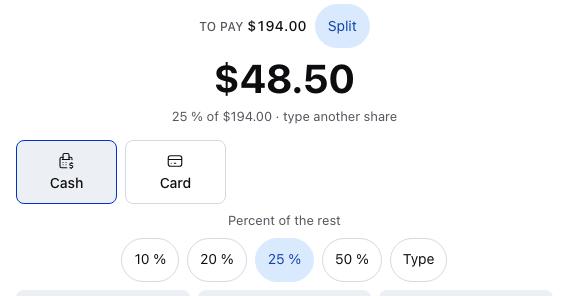
- 25 % — a quarter of what's left.
- Type — enter any other share on the keypad.
- The amount — the share, worked out for you.
- The share — the percent and what it's a percent of.
After Take, tap a tile to split what's left and take each payment, or take the rest in one.
Take each payment
Once you've chosen a split, the tender pane takes you through the payments one at a time, with the next amount typed for you. Press Take for each, on whichever tile the customer is paying with. On a card reader the button reads Send … to …, and the reader takes that part.
Here the first customer has already paid $45.00 for their watch (see Pay by item), and the rest is split three ways.
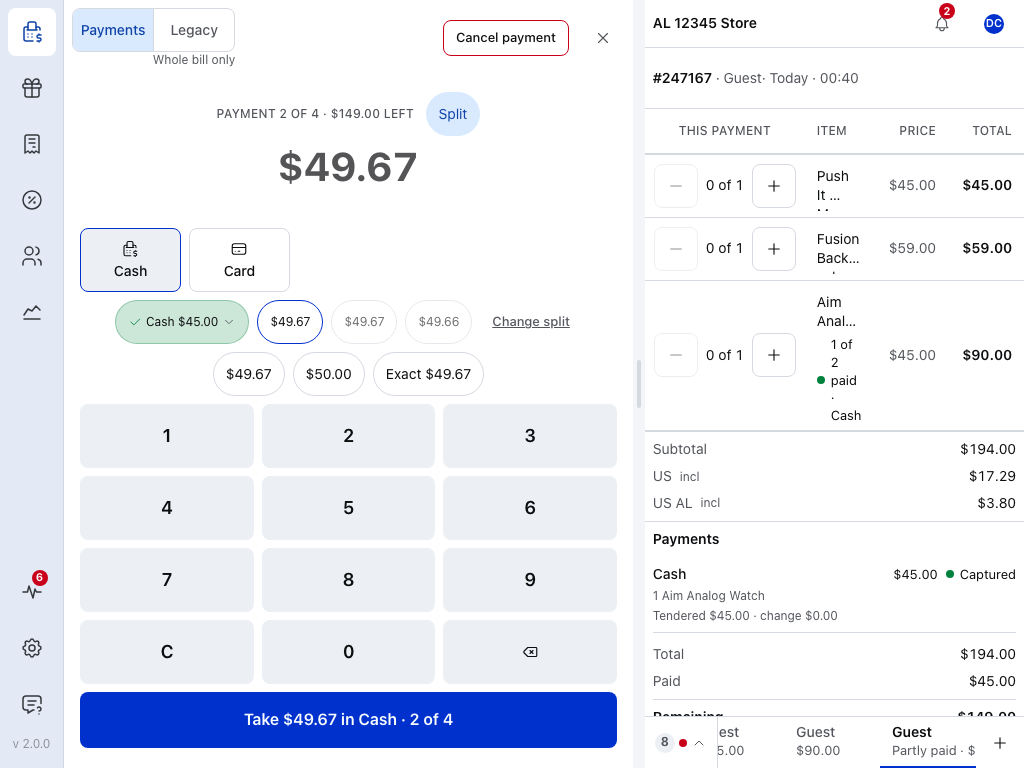
- Payment 2 of 4 · … left — which payment you're on, and what's still due. The first payment counts, so three ways after it makes four.
- Cash $45.00, ticked — the payment already taken.
- The payment now, outlined — its amount is typed for you.
- The next payment, dimmed.
- The last payment, dimmed — a cent less here, because the rest doesn't divide exactly.
- Change split — back to the row of ways, for what's left.
- Take — names the amount, the method, and which payment this is.
When they hand over more than their share
A customer paying cash can hand over more than their share. In the next two shots the same $194.00 order is split three ways from the start, and the first customer hands over $100.00 for a $64.67 share. Type what they gave you on the keypad: the change becomes the big figure, and Take records only their share.
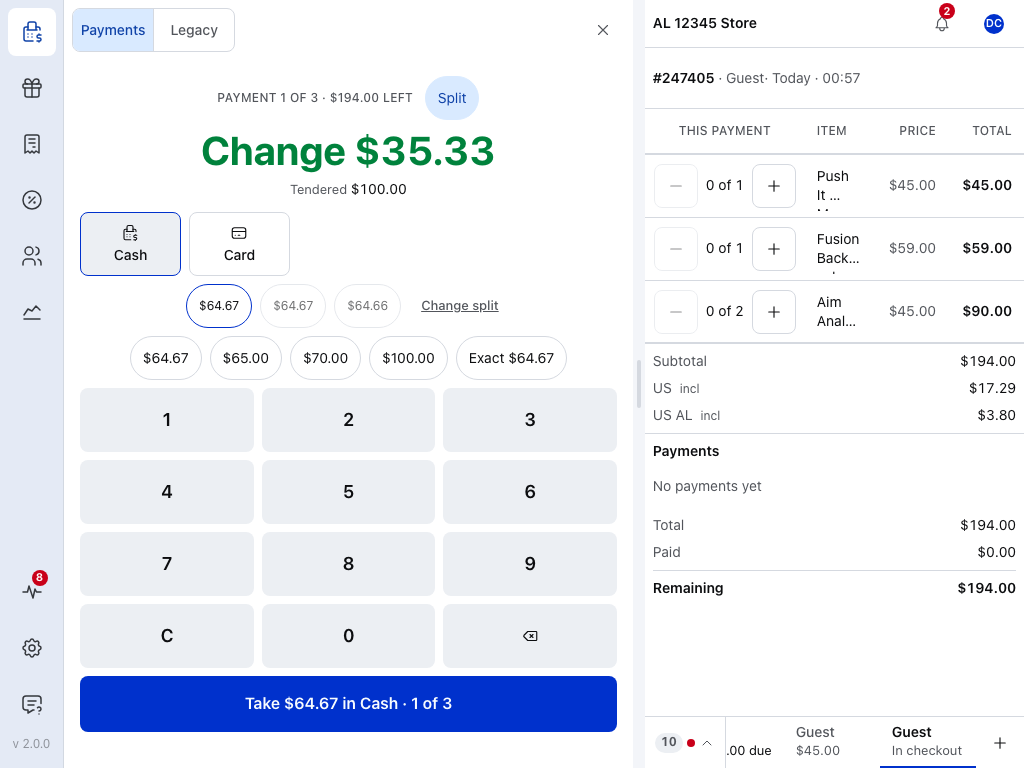
- Change — what to give back.
- Tendered — what the customer handed over.
- Take — records the planned share, not the cash handed over.
The last payment's button reads … of … like the others, here 3 of 3. When it's taken, the sale is done and the receipt is ready, as for any sale. See See it paid.
The change on the paid screen was already given with the payment it came from. Don't give it again.
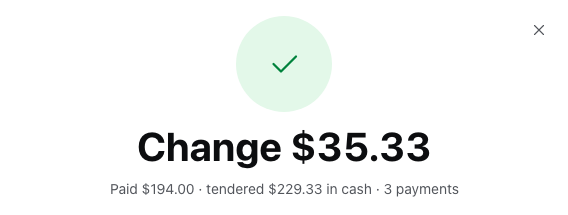
- Change $35.33 — the change from the first customer's $100.00, shown again. With no change in the sale, this reads Paid and the order's total.
- Paid … · tendered … in cash · 3 payments — the order's total, all the cash handed over, and the number of payments. Paid by more than one method, it names each method once, such as Cash + Card.
Press New sale for an empty cart for the next customer.
Pay by item
When each customer pays for what they had, the bill is the list. With Split on, tap an item's name to pay for every unit of it still unpaid. Use − and + to pay for fewer or more of a line, such as one of two coffees. Then pick the payment method and press Take.
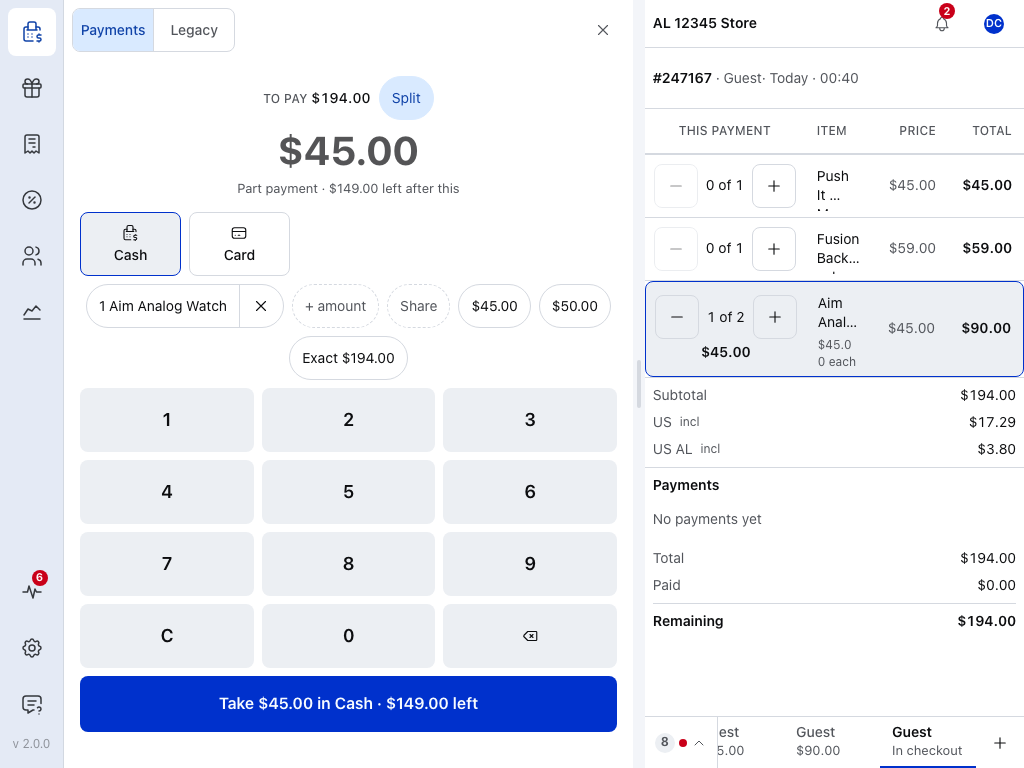
- The item — tap the name to pay for all of it that's left.
- 1 of 2 — how many of this line this payment covers. − and + change it.
- 1 Aim Analog Watch — what this payment covers. ✕ on it takes the item off.
- Share — the picked items paid in two, three or four equal payments, such as a shared bottle.
- + amount — adds an amount you type on top of the items.
- Take — names the items' total, the method, and what's left after it.
On a phone, there's no room for the bill beside the keypad. Press Pick items to show the list, pick there, and press Back to keypad.
After Take, pick the next customer's items the same way, or split what's left and take each payment.
Items already paid for
Once a payment covers an item, the bill marks it with how many units are paid and how. A paid unit can't be picked again, so the next customer only sees what's left. The marks are saved on the order, so they're still there if the order is reopened later or on another till.
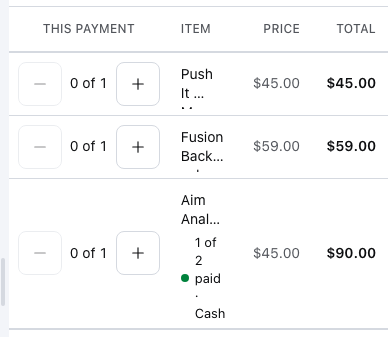
- 1 of 2 paid · Cash — how many units are paid, and how.
- 0 of 1 — what's left of the item to pick; the paid watch can't be picked again.
- Aim Analog Watch — tap the name to pick what's left of it.
The tender pane moves on to the next payment:
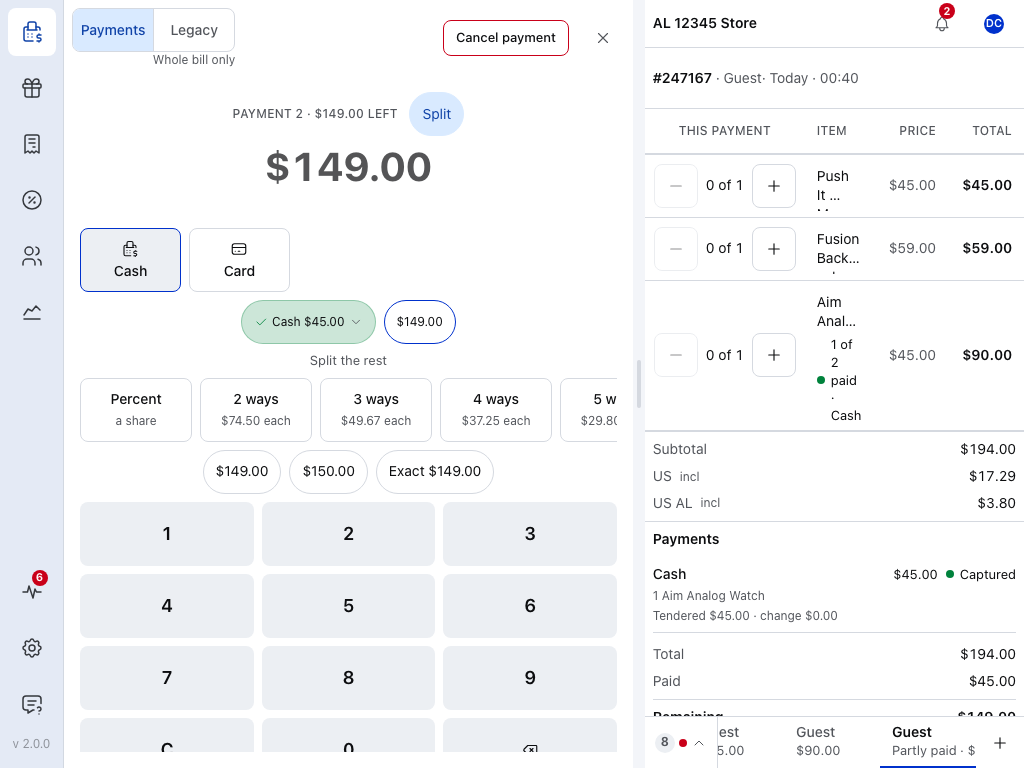
- 1 of 2 paid · Cash — units of this item already paid for, and how.
- Cash $45.00, ticked — the payment taken. Tap it to see or cancel it. See Cancel one payment.
- Payment 2 · … left — which payment you're on, and what's still due.
- Whole bill only — the Legacy tab (WCPOS Pro) can't take a part. See The Legacy Tab.
- 3 ways — split what's left, as before.
- Partly paid · … due — the order's tab in the open orders while money is still owed. See Open Orders.
Cancel one payment
If one payment was wrong, such as the wrong method or the wrong amount, cancel that one and keep the others. Tap the ticked payment above the keypad to list every payment taken, with the items each one paid for.
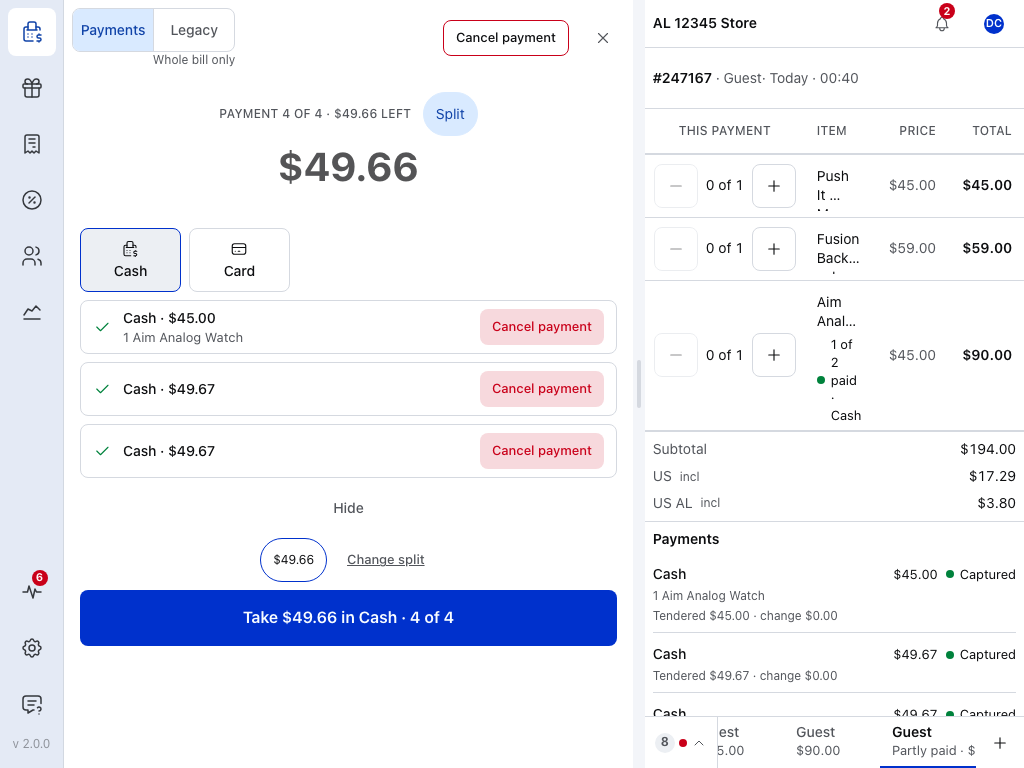
- The first payment — its method, amount and the items it paid for.
- The last payment — each payment has its own row.
- Cancel payment on a row — cancels this payment only.
- Hide — closes the list.
- Cancel payment at the top — cancels every payment taken, not just one. See Cancelling a Payment.
Press Cancel payment on the row of the one that was wrong. The POS asks first:
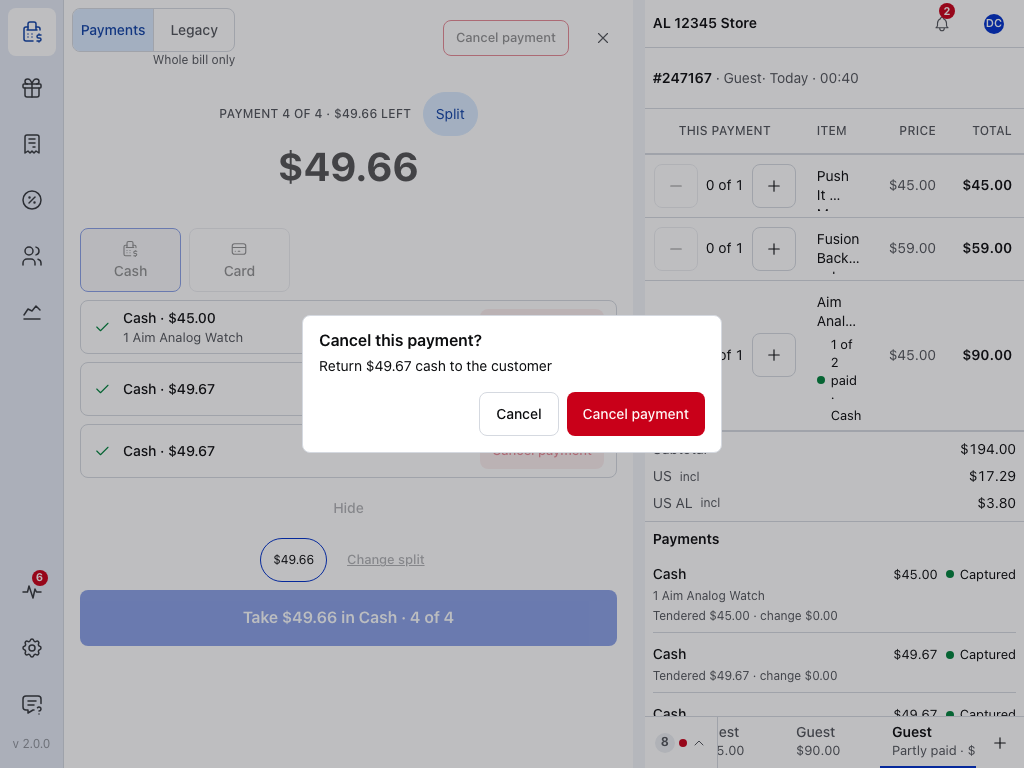
- Cancel payment — cancels it. For cash, give the money back to the customer.
- Cancel — keeps the payment.
For cash, the box says Return … cash to the customer. For other methods, see Cancel one payment on Cancelling a Payment. Once it's cancelled, the order lists it as Cancelled, its items are unmarked, and what's left is split again over the payments to come.
To cancel every payment taken and leave the sale unpaid, press Cancel payment at the top of checkout instead. It lists what has to go back to the customer before you confirm with Cancel and void. See Cancelling a Payment.
If something goes wrong
Less than planned
If the customer hands over less than the planned payment, the line under the amount says Less than planned · … moves to the next payment, or to the payments after it. Take it, and the payments still to come share what's missing.
The customer wants to split it differently
Press Change split and choose a new split for what's left. Payments already taken stay as they are. To drop the plan, press Split to turn it off.
The customer leaves before paying the rest
The payments already taken stay on the order. To serve the next customer meanwhile, press + at the end of the open orders: a new sale starts, and the order keeps its tab, marked Partly paid · … due. Tap that tab when the customer is back, and checkout opens again on what's left, with the paid items still marked. See Open Orders.
A gateway is not available
A gateway that charges the whole order, such as Email Invoice, can't take a part. Once a payment is taken, it leaves the tiles and is listed under … not available right now. Open that line to see why: Takes the whole order, so not once a payment has been taken. The Legacy tab (WCPOS Pro) reads Whole bill only for the same reason. Take the rest on another tile, or cancel the payments taken to use one.