Web Checkout Gateway
You need WCPOS Pro to take payments with Web Checkout.
Web Checkout lets the customer pay for a POS order on your online store's own payment page, with the payment methods your web store offers, such as an online card form or a wallet. Use it when the customer wants to pay a way the till doesn't take.
Go straight to: Take a payment · Set it up · If something goes wrong
Take a payment
Web Checkout is on the checkout's Legacy tab. It needs a connection, and it charges the whole order: if a payment has already been taken, see Part of the order is already paid first.
The till doesn't watch the other tab. It closes the sale only when you press Process Payment on an order the customer has paid, so keep the checkout open while they pay.
- Ring up the sale as usual and press Checkout.
- Open the Legacy tab. Your store's payment page loads inside the POS.
- Choose Web Checkout. Its note and a Pay for this order link appear under it.
- Press Pay for this order. Your online store's payment page for this order opens in a new browser tab; in the desktop app, it opens in your computer's web browser.
- Hand the screen to the customer. They choose a payment method and pay, as they would on your website.
- When the customer has paid, their tab shows your store's order confirmation. Leave that tab open and go back to the POS.
- Press Process Payment. If the order is paid, the till shows the paid screen and the receipt, as for any sale. If it isn't, the till stays on this page: see If something goes wrong.
- Close the customer's tab once the till shows the receipt.
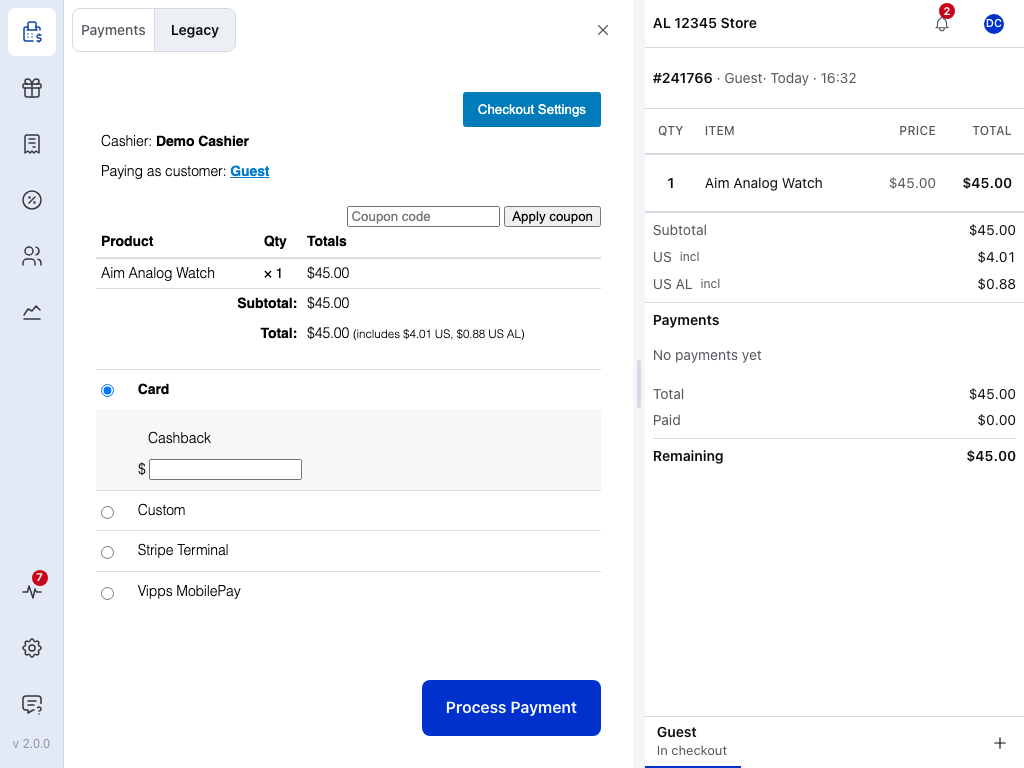
- Payments tab — the tiles: Cash, Card and the gateways that have a tile of their own.
- Legacy tab — gateways that run on the store's payment page. See The Legacy Tab.
- Close — back to the cart without taking payment. The order stays open.
- The store's payment page — the order, then the gateways switched on for the POS. Web Checkout joins this list once it is switched on; the store in this picture doesn't have it. Checkout Settings at the top is for a page that looks wrong; see If something goes wrong.
- Process Payment — press it after the customer has paid. Until the order is paid, the till stays on this page.
- The order — its number, customer and time.
- Remaining — what is left to pay. Web Checkout charges the whole order, so it can't be used after another payment has been taken.
Part of the order is already paid
A legacy gateway charges the whole order, so once a payment has been taken, the Legacy tab says A legacy gateway can't be used once a payment has been taken. You have two choices:
- Take the rest on a tile, such as Cash or Card, on the Payments tab. See Split Payments.
- Cancel the payments taken so far, then use Web Checkout for the whole order. Before anything is undone, the till lists what happens to each payment: cash goes back to the customer, other payments are voided on their payment method, and one that can't be voided is refunded from the order. See Cancelling a Payment.
Web Checkout opens the payment page on the device running the POS. To send the customer a link they can pay from later, use Email Invoice.
Set it up
Someone who manages your store in WP Admin does this once, before the first Web Checkout sale. Web Checkout is a free plugin, but the POS offers it only with WCPOS Pro; without Pro, the till takes Cash and Card. It uses the payment methods your online store already has. It needs no account or keys.
Store manager: install it and switch it on
- Install it. Web Checkout isn't in
WP Admin > POS > Settings > Extensions. Download woocommerce-pos-web-checkout-gateway.zip (not the source-code zip) from the GitHub releases page, upload it inWP Admin > Plugins > Add Plugin, then Upload Plugin, and activate it. - Switch it on for the POS. In
WP Admin > POS > Settings > Checkout, switch on Web Checkout and save. See Checkout Settings. It never shows at your online checkout: customers reach it only through the POS. - Check your online payment methods. The customer pays with whatever is switched on for the web in
WP Admin > WooCommerce > Settings > Payments. At least one must be ready to take money.
Change the name or message
The name and the note on the payment page are the gateway's Title and Description, in WP Admin > WooCommerce > Settings > Payments > Web Checkout Gateway. The default note reads "Go to the checkout page to pay for the order. After payment, click the Process Payment button to proceed to the receipt." To rename it for the POS only, change its Title under POS settings in the gateway's ⋮ menu in Checkout Settings; the note always comes from WooCommerce.
For developers: how it works
The plugin adds a WooCommerce gateway with the ID wcpos_web_checkout. It is switched off for the online checkout in code, so only the POS can offer it. Its payment fields print the description and a link to the order's own payment URL ($order->get_checkout_payment_url()), opened in a new window.
The gateway takes no money itself. When Process Payment posts an order that is already paid, created by the POS, with wcpos_web_checkout chosen, the plugin sends the payment page to the order-received page, and the POS closes the sale from there. An unpaid order is not moved on. The source is in the web-checkout-gateway repository.
If something goes wrong
Web Checkout isn't in the list on the Legacy tab. The plugin isn't active, or Web Checkout isn't switched on in Checkout Settings. Without WCPOS Pro, the POS offers only Cash and Card.
"No legacy gateways are enabled for the POS." No gateway without a tile is switched on. Switch Web Checkout on in Checkout Settings.
Process Payment doesn't move on to the receipt. The store doesn't have the order as paid. Before asking the customer to pay again, look at their tab: if it still shows the payment page, they haven't finished. If it shows the order confirmation, press Process Payment again, and if the till still doesn't move on, check the order in WP Admin > WooCommerce > Orders.
No payment method the customer can use appears on the payment page. Your online store has none switched on that suits them. Switch one on for the web in WP Admin > WooCommerce > Settings > Payments.
The payment page inside the POS looks wrong. A theme or plugin may be interfering with it. See A Gateway's Payment Page Looks Wrong.