Set Up Stores
More than one store needs WCPOS Pro. Without it, the POS runs one store built from your WooCommerce settings.
This page walks through one store from an empty list to a cashier signing in to it. For what stores are for, start with Stores.
Before you start
- WCPOS Pro is installed and the licence is active. Pro then puts Stores at the top of the POS menu in WP Admin.
- Your cashiers can sign in to the POS. Who has POS access at all is set in Access. A store can only narrow that list.
- (Optional) A logo file, PNG or JPG.
Create the store
- In WP Admin, go to POS → Stores.
- Click Add New Store.
- The store opens on its Details page. Type the store's name in Store name, at the top. It shows in the store picker at sign-in and in the POS.
- Click Create, at the top right.
From then on the store saves by itself: a message at the top of the page says Saving…, then Saved. If you try to leave while a change is still saving, the browser asks first. If Couldn't save. shows instead, go to If something goes wrong.
What the Stores list shows
Each store has a row with its Store name, Address, Authorized Users (All when nobody is picked on its Staff page), number of Registers, and an Open POS button that opens the POS at that store.
You can also reach your stores from POS → Settings → General. Once you have a store, its Stores section lists each one with its Address and an Edit button, and Manage stores opens the full list.
Fill in the store's pages
Each of the store's pages opens from its menu, down the left (on a narrow screen, Show store menu). Every page saves as you go. For a new store:
- On Details, enter the store's address (Address 1, Address 2, Country, then city, state and postcode) and its Contact details: Web address, Phone, Email. The address prints on receipts, with the logo if you add one. To rename the store later, change Store name here.
- Set up the registers.
- Choose who can use the store.
The other pages are there for what this store does differently. All stores, at the top of the menu, goes back to the list; to come back to a store later, click its name in POS → Stores.
Store settings reference: what each page sets
The menu has two groups: Store (Details, Opening hours, Currency & language, Tax) and Selling (Receipts, Customer display, Registers, Staff). A plugin that adds store settings, such as ATUM, gets a page of its own under a third group, Extensions.
Once the store is created, some entries carry a badge: Registers shows how many tills are open (1 open), or how many there are when none is; Tax shows Set up when sales at this store won't be taxed (tax is off in WooCommerce, there are no rates, or no rate matches the store); Staff shows how many people are ticked.
| Page | What you set there |
|---|---|
| Details | Logo and address, which print on receipts, and Contact: Web address, Phone, Email. Upload logo, or Use site logo if the site has one. |
| Opening hours | Time slots for each day, Copy to Tue–Fri, and Notes. Printed on receipts. |
| Currency & language | Currency and its Symbol position, Language (the POS screen and receipts), and Timezone (close reminders and report dates). |
| Tax | Calculate tax using this store's address, the shop base address, or the customer's billing or shipping address, with the Rates that apply. Below it, the Tax number printed on receipts: Add tax number (Type, Value, Country, and an optional Label), or leave it empty and receipts print the site's Store Tax IDs. |
| Receipts | Receipt messages (Thank-you line, Returns policy, Footer: plain text, with <strong>, <em>, <b>, <i>, <br> and <p> allowed), the Receipt template list (Same as site until you click Customise; then tick what cashiers can print, the first ticked is the default, and drag to change the order), and a Receipt preview below them. See Per-store templates. |
| Customer display | The Display template the customer-facing screen shows during a sale. |
| Registers | The store's tills and its cash rules. See Set up the registers. |
| Staff | Who can use this store. See Choose who can use the store. |
The rates themselves are set in WooCommerce → Settings → Tax; the Tax page only shows which apply.
Set up the registers
Open Registers in the store's menu. A register is one cash drawer with its own float and count. See Stores, Registers and Devices for how they fit together.
Tills
Every store already has one register. The first store you create takes over the register your site already had; every store after that gets a register of its own. The Tills table lists them once the store is saved; before that it says Save the store first to add registers.
- To name the register as cashiers will see it, choose Rename from its ⋯ menu.
- Type the Opening float you want filled in when a cashier opens this till; a change applies the next time it opens. Until you set an amount here, the POS fills in the last count: the 200.00 the field shows isn't saved.
- Only for another cash drawer, click + Add register. The new one is named Register 2, Register 3 and so on, ready to rename.
The Tills table: status and the ⋯ menu
- Register — the register's name, as the POS shows it.
- Opening float — the cash a cashier starts with at this till.
- Status — Open since a time, with who opened it; Counting, with who is counting; or Closed, with the last closure's number and date.
- ⋯ — Rename, Move to another store, or Retire. A till with a session still open can't be retired: close its session first. A register belongs to one store at a time.
Cash drawer rules
If this store's cashiers should count the drawer at opening and closing and Open and close the register each day is off:
- Click Customise.
- Turn on Open and close the register each day.
It's the rule most stores need: cashiers start with a float and count the drawer at close. Off, the POS goes straight to the cart.
These rules start as the Site defaults from Register in POS → Settings → General; Customise changes them for this store only.
Optional cash drawer rules: manager approval, close reminder, going back to the site's rules
While the register opens and closes each day, two more rules can be turned on:
- Ask a manager when the count is out by more than an amount (5.00 when first turned on). A count out by more needs a manager before the register closes.
- Remind the cashier to close at a time (17:30 when first turned on). After it, the register shows Overdue and the Checkout button becomes Close register while the cart is empty.
Each rule says Site default while it follows the site; once you change it, Use site default puts that one back, and Reset to site defaults puts back all three.
Reports & closures
Closure printout and Sales report choose what prints when a till is closed or a sales report is run. Each is Same as site until you click Customise; Use site template goes back.
Choose who can use the store
Open Staff in the store's menu.
- Everyone with POS access — the default. Good for a single store.
- Only these people — tick each person who can sign in to this store. The list has everyone with POS access, whether it comes with their role or was given to them on their own. Past ten people, Search people narrows the list.
Untick the last person and the store switches to Everyone with POS access, with a note saying so. To take someone off, make sure at least one other person stays ticked.
A cashier who works at more than one store is ticked on each.
What cashiers see
To check the new store, sign in to the POS with the WordPress account of one of its cashiers. What sign-in offers next depends on the device.
If sign-in offers the new store:
- Under Choose a store, pick the new store. If it's the only store they can use, it's already picked, under Store.
- Press Open POS.
If sign-in only offers another of their stores (the device is already working at that store):
- Open the POS at that store.
- Choose Switch store in the cashier sheet (tap the avatar) and pick the new store. See Choosing a store and a register.
Either way, check that the register bar at the top of the cart names the new store.
On a new device, Choose a store lists every store the cashier can use:
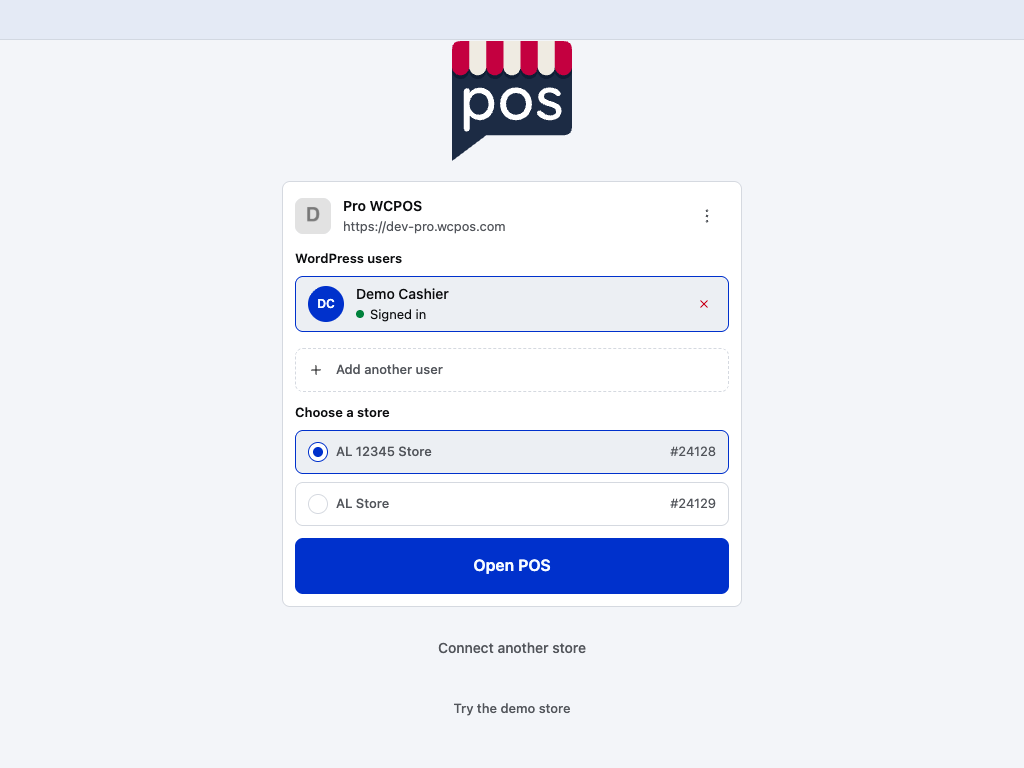
- A store they can use — picked here. The number after the name is the store's ID in WP Admin.
- Another store — a second store this cashier can use, ready to pick instead.
- Open POS — enabled once a store is picked. With only one store, it's picked already and the heading says Store.
If the cashier can't use any store, the screen says No stores for this user: tick them on a store's Staff page, or set it to Everyone with POS access.
The register bar names the register too when the store has more than one. Beside it, a status shows when the register needs something. Open the Register has the bar on screen.
Register statuses: Closed, Counting, Approval needed, Overdue
Each status follows the store's cash drawer rules:
| Status | When it shows |
|---|---|
| Closed | The register isn't open. The cash field starts at the till's Opening float once one is set, otherwise at the last count. |
| Counting | Someone is counting the drawer to close it. |
| Approval needed | The count is out by more than your limit, so a manager has to approve it. |
| Overdue | The register is still open after your close time. |
An open register with nothing to do shows no status.
Each sale is recorded against the store it was rung up at.
Per-store prices and taxes
Pro can give a product its own price or tax at one store, with shared stock. Skip this unless a store needs it.
Optional: set different prices or taxes for this store
- Open the product in WP Admin → Products.
- On the General tab, tick Enable store name specific prices. for the store.
- Enter the Regular price, and a Sale price if you want one.
- Update the product.
Cashiers at that store get that price; every other store uses the normal WooCommerce price. Enable store name specific taxes. does the same for Tax status and Tax class, for a store in a different tax zone. For a variable product the boxes are on each variation, under Variations; a variation's taxes box sets only Tax class.
Per-store prices share one stock count. For stock counted per location, see ATUM Multi-Inventory. With ATUM, a store whose Pricing source is ATUM uses the location's prices instead, where ATUM has a price for the product; see Choose where prices come from.
If something goes wrong
Couldn't save. at the top of the page, with the reason. The site didn't take the change. Press Retry on the message, or reload the page and check what's there.
Save the store first to add registers. Click Create first; the Tills table appears once the store exists.
A register won't retire. It has a session that is open or counting. Count and close it in the POS, then Retire it.
No stores for this user at sign-in. The cashier isn't on any store's Staff list. Tick them, or set a store to Everyone with POS access.
There's no Stores menu. Pro isn't active. Check the licence in POS → Settings → License; see Installing WCPOS Pro.
Edge cases
What happens to old orders when I add a store?
Nothing. A sale is recorded against its store when it's rung up, so a new store doesn't take over older orders. To move one order to another store, open it in WooCommerce → Orders and change POS Store.
How do I delete a store?
Move store to Trash, at the top right of any of the store's pages (it asks first), or Trash in the list. A trashed store leaves the store picker, but its orders still show its name, address and logo, and Restore brings it back with its settings.
Delete Permanently in the Trash removes it for good, and is refused while one of its registers is open or counting. Its orders then show Store # and its ID.
Can a store use a different currency?
Yes, on Currency & language. Prices, totals and receipts at that store use its currency. It changes how money is shown, not the amounts: your payment methods must accept that currency, and exchange rates are yours to handle.
What if Pro is turned off?
The site goes back to its one register. See If Pro is deactivated.