Mercado Pago Terminal Gateway
The till sends the order total to a Mercado Pago Point Smart terminal, the customer pays on the terminal, and the sale finishes on its own when Mercado Pago confirms it. This page is in two parts: taking a payment at the till, and setting it up in WP Admin.
This extension is new. No card payment or refund has been completed with it yet, so take a small payment and refund it before you rely on it.
What has been tried so far
On a live account and a real Point Smart, listing terminals, switching a terminal to PDV mode, and creating and cancelling a payment for it through Mercado Pago have worked. Whether the payment then shows on the terminal, a paid card payment, Mercado Pago's notification for a paid order, refunds, and Mercado Pago's sandbox (Test mode) have not been tried yet.
Take a payment
You need WCPOS Pro and a store that's online, because the payment runs on your store's own payment page, inside the POS. Someone with WP Admin access sets the gateway up first.
With Open and close the register switched on, the till won't record a payment while the register is closed, and a card you've already taken would have to be refunded. See Checkout.
The terminal runs from the Legacy tab of the checkout. In the shot below Mercado Pago isn't set up, so the list shows other gateways, with Card chosen. On your store, Mercado Pago Terminal is in that list:
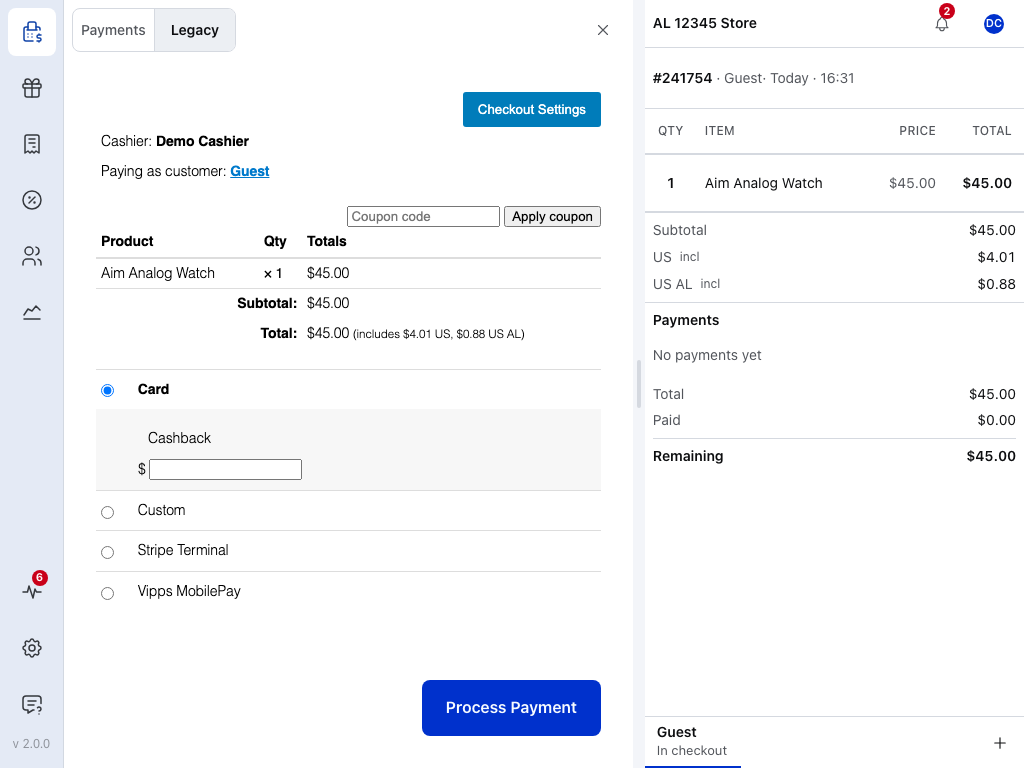
- Legacy tab — opens your store's own payment page inside the POS.
- Your store's payment page — the order total and the store's gateways. Mercado Pago Terminal is in this list once it's set up. Choose it and its panel opens beneath it, with Terminal and Start Terminal Payment.
- Process Payment — not needed for Mercado Pago: the sale finishes on its own when the payment is confirmed.
- Build the cart and press Checkout.
- Open the Legacy tab. Your store's payment page opens inside the POS. See The Legacy Tab.
- Choose Mercado Pago Terminal. Your store may have given it another name.
- Check the terminal under Terminal. The default terminal is already chosen; when the terminal is locked, you can't change it.
- Press Start Terminal Payment. The panel says Sending to terminal…, then Waiting for terminal…, and the full order total goes to that terminal.
- The customer pays on the terminal. The panel says Customer is paying on the terminal… while they do. If it says Confirm the payment on the terminal., finish the step the terminal is asking for.
- When Mercado Pago confirms the payment, the panel says Payment complete — finishing order… and the POS moves on to the receipt.
You don't need Process Payment at the foot of the Legacy tab: the sale finishes on its own when Mercado Pago confirms. Pressed before then, it only says the order hasn't been paid yet.
The terminal is always charged the whole order, so it can't share a sale with another method. Once a payment has been taken on the order, the Legacy tab can't be used; cancel that payment first.
Cancel or wait
- Cancel Terminal Payment replaces Start Terminal Payment while a payment runs. It works only until the terminal picks the payment up. After that the panel says The payment is already on the terminal. Cancel it on the terminal, or wait for it to expire.
- A payment expires on Mercado Pago's side 5 minutes after you start it. The panel keeps checking, so a payment the customer finishes before then still completes the sale.
- Reloading the page picks up the payment already in progress, with Cancel Terminal Payment showing.
- If the till closed during a payment, don't charge the card again. Your store is built to finish a paid order on its own, from Mercado Pago's notification and from a check it runs every 5 minutes, but that has not been run live yet. Open the order, and the payment in your Mercado Pago account, and check whether it was paid.
After the sale
The terminal doesn't print a ticket. Print or email the POS receipt as usual; see Receipts at Checkout.
The order records the payment with Mercado Pago's order ID as its transaction ID.
Refunds
In WP Admin, open the order, click Refund, enter the amount and press Refund … via Mercado Pago Terminal. The whole order goes back as a full refund; any smaller amount as a partial refund. Mercado Pago allows refunds up to 90 days after the payment.
Some card acquirers only allow refunds on the terminal. If Mercado Pago refuses the refund, refund on the Point terminal, then record the refund in WooCommerce with Refund manually. See Refunds.
If something goes wrong
The panel's status line tells you what happened. Open the one that starts with the same words.
The payment won't start
Select a terminal first.
Pick a terminal under Terminal, then press Start Terminal Payment again.
Terminal … is in STANDALONE mode.
The terminal can't take payments from the till yet. Ask whoever set up the gateway to switch it to PDV and restart it.
No terminals found on this Mercado Pago account. / Could not load terminals.
The store can't list its terminals. Ask whoever set up the gateway to check the diagnostics.
Mercado Pago Terminal is disabled.
The gateway is switched off for the POS. Ask whoever runs WP Admin to turn it on.
Mercado Pago Terminal request failed.
The till couldn't reach your store or Mercado Pago. If the customer may have paid, check the order and your Mercado Pago account before starting another payment. Otherwise check the connection and try again. If it keeps happening, send the support bundle.
The payment stalls or fails
Before you start again, look at the terminal. Never charge the card twice: if the customer may have paid, check the order and your Mercado Pago account first.
Still waiting for the terminal.
A minute has passed with no answer. If the terminal shows the payment, let the customer finish; if not, press Cancel Terminal Payment and start again.
The payment is already on the terminal.
Cancel it on the terminal, or wait the 5 minutes for it to expire. The panel keeps checking, so if the customer pays anyway, the sale still finishes.
Payment failed.
The card or the payment was refused. Press Start Terminal Payment to try again, or take another method.
The payment expired on the terminal.
Five minutes passed. Press Start Terminal Payment again.
Timed out waiting for the terminal.
Six minutes passed with no result, and the till asks Mercado Pago to cancel the payment. Check the terminal before you start again.
Mercado Pago reported a payment that does not match this order.
The payment didn't match this order, for example its total or currency changed. Don't charge the card again. Check the order notes and the payment in your Mercado Pago account, and call your manager.
Messages while setting up
Access token rejected by Mercado Pago (HTTP 401). The token is wrong or out of date. Copy a fresh one from Your integrations → Credentials in Mercado Pago and save it in Access token.
Access token is not allowed to use Point (HTTP 403). The application behind the token can't use Point. Check the application in Your integrations.
Could not reach Mercado Pago. The store couldn't connect. Check the token, then reload the settings page.
No Point terminals are linked to this Mercado Pago account yet. Log in on the terminal with this Mercado Pago account, then switch it to PDV and restart it.
Default terminal is a text box, not a list. The terminal list couldn't be loaded. Check the token and the diagnostics, then reload the settings page.
Live mode is selected but the access token is a test token (TEST-…). Payments would go to Mercado Pago's sandbox. Paste your production token, or switch Mode back to Test.
Last verified webhook: never. Mercado Pago hasn't sent a signed notification yet. Check the webhook URL and the Webhook secret. The payment panel still completes payments while it stays open.
Mercado Pago refused the refund. Some acquirers only allow refunds on the terminal: refund there, then record it with Refund manually.
Activation is refused. The server needs PHP 7.4 or newer.
Set it up
This part is for whoever runs the store's WP Admin. Check what you need before step 1.
What you need
1. Install the extension
Open WP Admin > POS > Settings > Extensions, find Mercado Pago Terminal for WooCommerce and click Install. WCPOS downloads it, installs it and activates it in one go. See Installing an Extension.
Without the directory, download the plugin zip (not the source-code zip) from the GitHub releases page, upload it with Upload Plugin in Plugins > Add Plugin, then activate it. WooCommerce must be active.
2. Get ready in Mercado Pago
- Create an application under Your integrations and activate its production credentials. Mercado Pago asks for your industry and website, and for you to accept the terms and pass a reCAPTCHA.
- Create a Store and a POS in Mercado Pago. The extension doesn't create them for you.
- Link your Point Smart terminal: log in on the terminal with the same Mercado Pago account.
3. Fill in the gateway settings
- Go to
WP Admin > WooCommerce > Settings > Paymentsand open Mercado Pago Terminal. - Choose Mode: Test (the default) drives Mercado Pago's sandbox virtual terminal; Live drives real terminals.
- Paste the Access token (
APP_USR-…) from your application under Your integrations → Credentials. Use the token that matches Mode. - If your currency has no cents, such as Chilean pesos, set Number of decimals to 0 under
WooCommerce > Settings > General. Mercado Pago refuses amounts with decimals on those accounts, and the extension sends whole amounts only when this setting is 0. - Save.
4. Add the webhook (recommended)
The webhook lets Mercado Pago tell your store when a payment is done. It is meant to finish a paid order even if the till was closed, but that hasn't been run live yet: check the order before charging again. Without the webhook, the payment panel still completes payments while it stays open.
- In Mercado Pago, open Your integrations → your application → Webhooks.
- Add the webhook URL shown under Webhook secret in the gateway settings. It ends in
admin-ajax.php?action=mptfwc_webhook. - Select the Order (Mercado Pago) event and save.
- Copy the secret signature into Webhook secret, and save. With the secret saved, the store refuses any notification that isn't signed with it. Without a secret, the store still acts on Mercado Pago's notifications but can't check that they came from Mercado Pago, and Last verified webhook stays at never.
5. Set up your terminals
- Reload the settings page. The Default terminal list and the Terminals table now show your account's terminals.
- Terminals ship in STANDALONE mode. For each one, click Switch to PDV, then restart the terminal. Mercado Pago needs the restart.
- Choose a Default terminal.
- Optional: limit Enabled terminals to the ones cashiers may pick. Leave it empty to allow all; the default is always allowed.
- Optional: tick Lock terminal selection so cashiers always use the default terminal.
- Save.
6. Turn it on for the POS
Go to WP Admin > POS > Settings > Checkout, find Mercado Pago Terminal and switch Enabled on. See Enabling a Gateway.
Leave Enable/Disable in the WooCommerce settings off unless you want it online too. The POS uses the gateway once it is enabled here, whether that box is ticked or not.
Settings reference
On WP Admin > WooCommerce > Settings > Payments > Mercado Pago Terminal. The steps above cover the ones you need; open the list for every setting and its default.
All 11 settings, and the diagnostics
| Setting | What it does |
|---|---|
| Enable/Disable | Offers the gateway on the online store too. Off by default. The POS has its own switch, under POS > Settings > Checkout |
| Title | The name cashiers choose on the payment page. Defaults to Mercado Pago Terminal |
| Description | The line shown under the title. Defaults to Pay in person on a Mercado Pago Point terminal. |
| Mode | Test (default) drives the sandbox virtual terminal; Live drives real terminals |
| Access token | From your application under Your integrations → Credentials. Once saved it isn't shown again, only its last four characters; leave it blank to keep it |
| Webhook secret | The secret signature from Mercado Pago's webhook settings. Saved and shown like the token |
| Default terminal | The terminal chosen at the start. A list fetched from your account, or a text box when the list can't be loaded |
| Enabled terminals | The terminals cashiers may pick. Empty allows all; the default is always allowed. Hidden when the list can't be loaded |
| Lock terminal selection | Cashiers can't change the terminal: the default is always used. Needs a default terminal |
| Checkout debug logs | Shows Show logs, Copy and Clear on the payment panel. Off by default; turn it on when gathering logs for support. Payments are logged either way |
| Log level | Off, Errors only or Debug (the default) |
Under the settings, Mercado Pago Terminal diagnostics shows the API check with the number of terminals and how many are in PDV mode, the last verified webhook, the active environment, whether the token and secret are set, the default terminal, the webhook URL and a link to the logs. The Terminals table lists each terminal's ID, label and operating mode, with Switch to PDV where it is needed.
Logs and support bundle
Logs are in WP Admin > WooCommerce > Status > Logs, under the source mercadopago-terminal. Log level starts on Debug, which records every request to Mercado Pago and every answer, every webhook and every change in a payment's state, with tokens, signatures and card numbers removed.
When a payment fails, click Download support bundle on the gateway's settings page and send the .txt file to support with the order number. Nothing in it can be used to take payments.
What the support bundle holds
- Your store's setup: the extension, WordPress, WooCommerce, PHP and WCPOS versions, and whether HPOS is on.
- The gateway settings, with the access token and webhook secret masked.
- Your terminals and their operating modes.
- Payment attempts from the 10 most recent orders that used the terminal.
- The last 500 lines of the
mercadopago-terminallog.
What it doesn't do
- Part-payments: the terminal is always charged the whole order.
- Tips.
- A store priced in a different currency from the Mercado Pago account: the order won't complete.
- Printing a ticket on the terminal.
- The online store's block checkout.
- HPOS (WooCommerce's order tables): the extension doesn't declare support for it yet.
How it works, for developers
The gateway uses Mercado Pago's Orders API for Point (POST /v1/orders with type: point). Starting a payment saves an idempotency key and an external reference on the order, then creates a Mercado Pago order for the order total on the chosen terminal, with a 5-minute expiry (filter mptfwc_order_expiration_time). A retry after a timeout reuses the key, so it can't charge twice.
The panel asks for the status every 2 seconds (filter mptfwc_poll_interval_ms) and gives up after 6 minutes. The webhook (x-signature, HMAC-SHA256) and a scheduled check every 5 minutes can also complete the order; the webhook body is never trusted, and the order is always fetched again from Mercado Pago.
The order completes only when the Mercado Pago order names it, was created by this store for it, is a point order, matches its total and currency, and used the attempt's terminal. Completion runs once, under a per-order lock. The transaction ID is the Mercado Pago order ID.
Related Documentation
- The Legacy Tab
- Checkout
- Checkout Settings
- Extensions
- Report an issue on GitHub. For your account, credentials and terminals, contact Mercado Pago.