Receipt Printers
Printers live under Settings → Printing in the POS. Each device keeps its own list: a printer added on one till doesn't appear on another, so set it up on every device that prints to it.
With no printer added, receipts still print through Print Dialog, the browser's or computer's own print window. It's built in and always there.
Use Cloud Printing. Cloud printers appear on every device by themselves; you don't add them here.
Add a printer
- Go to Settings → Printing and press Add printer. The window reads Looking for printers… and the search starts straight away; there is nothing to choose first.
- Find your printer. Each one the search finds is a card, under Found your printer for one or Which printer is yours? for several. In the web app the search only covers Wi-Fi: for a USB or Bluetooth printer, press Find a USB printer or Find a Bluetooth printer instead (see When the scan finds nothing).
- Press Print a test page below it. If the search found more than one printer, tap yours first: the button then reads Print a test page on and its name.
- Answer Did the test page print? The printer is saved when you answer Yes, and it looks right. See Print a test page.
If the card isn't your printer, press Not this one? Scan again. Stop ends the search early and keeps the printers already found; Close leaves without adding anything. If nothing turns up, see When the scan finds nothing.
The automatic search checks these connections, depending on the app:
- Web app — Wi-Fi.
- Desktop app — USB, Bluetooth and Wi-Fi.
- Android — Wi-Fi; Epson and Star printers on Bluetooth and USB; other makes on Bluetooth Low Energy; and Bluetooth printers already paired in Android's settings.
- iPhone and iPad — Wi-Fi; Epson and Star printers on Bluetooth; other makes on Bluetooth Low Energy. There is no USB on iPhone and iPad.
Print a test page
The test page is a numbered ruler across the paper, so it shows the width is right as well as that the printer works. If the app can't tell how wide the paper is, a Paper width switch, 58 mm or 80 mm, sits below the cards, already set to the likelier one. Check it before you print.
Then it asks Did the test page print?
- Yes, and it looks right — the printer is saved, with a message such as Receipt Printer is set up. Its name, width and cash drawer setting are under its row in Settings → Printing.
- Printed, but the ruler is off — the app asks Which paper is in the printer? Pick the line that matches, such as 48 — 80 mm, most Epson & Star, and the test page prints again. See Getting the receipt width right.
- Nothing came out — the window reads Nothing printed, with a line on the most likely cause. Fix what it names, then press Try again.
If nothing printed: the other choices
- Save without testing — keep the printer anyway, without a test page.
- Open Bluetooth settings — Android only, when a Bluetooth printer isn't paired yet. Pair it there, then scan again.
- Start over, Copy setup report and Open the printer guide — begin again, or gather what support needs.
Nothing is saved until you answer Yes, and it looks right or press Save without testing, so closing the window part-way leaves nothing half set-up in the list.
When the scan finds nothing
The window reads No printer found. Every way forward is a button under it.
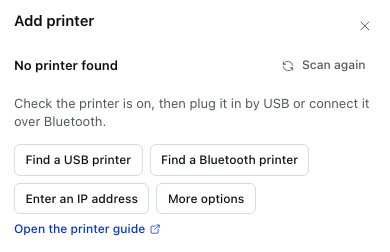
- Scan again — check the printer is on and has paper, then look once more.
- Find a USB printer — opens the browser's own USB chooser. Shown in browsers that can reach USB devices (Chrome and Edge).
- Find a Bluetooth printer — opens the browser's or computer's Bluetooth chooser. Not shown in the mobile apps, where the scan already covers Bluetooth. In the desktop app the list opens in this window, with names that look like a printer first, marked Likely a printer.
- Enter an IP address — check one address instead of scanning. Use it when you know the printer's address and the scan can't see it, which is common on business networks. See Enter an IP address.
- More options — set the printer's name and options before the test print. See Set options before the test print.
- Open the printer guide — opens this page.
Enter an IP address
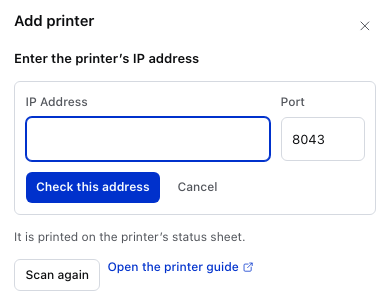
- IP Address — it's printed on the printer's status sheet. To print one, see Give the printer a fixed address.
- Port — filled in for you: 8043 here, the web app's port for an Epson on an HTTPS store (8008 on HTTP). The desktop and mobile apps fill in 9100. Leave it unless the printer uses a different one. See HTTPS or HTTP.
- Check this address — looks for a printer there. If one answers, it appears as a card: press Print a test page below it. If not, the reason shows under the form.
- Scan again — back to scanning.
- Open the printer guide — opens this page.
Set options before the test print
More options opens a card under the buttons. You can leave it alone: everything in it can be changed later in Edit printer.
Optional: the More options card, field by field
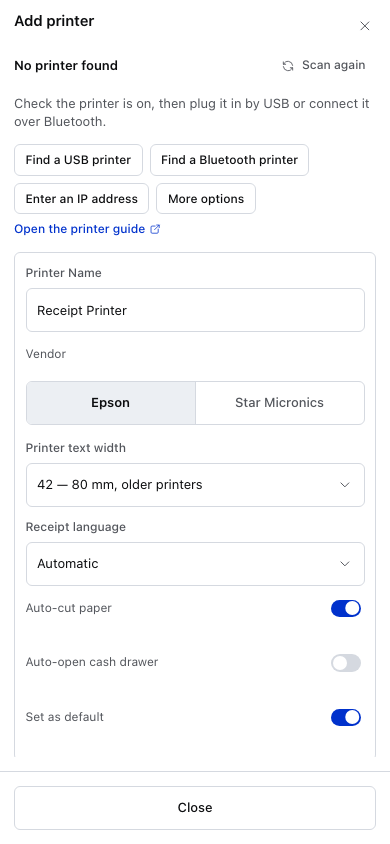
- Printer Name — what the printer is called in the list and on the receipt screen. Receipt Printer to start with.
- Vendor — Epson or Star Micronics in the web app, the two makes a browser can reach.
- Auto-cut paper — cut the paper after each receipt. On to start with.
- Auto-open cash drawer — open a drawer wired to this printer when a sale completes. Off to start with.
- Set as default — send receipts here unless routing says otherwise. On for the first printer on this device, off after that.
Printer text width and Receipt language sit between them. Leave them as they are unless you know the printer: the test page checks the width for you.
Your printers
Once a printer is added, Settings → Printing lists it under Printers, Devices receipts can be sent to. Each row shows the printer's name, its address and make (for example 192.168.1.128:8008 · Epson), and a Default tag on the one receipts go to unless sent elsewhere. Print Dialog is always in the list as Print dialog · built-in, and cloud printers show their provider, such as PrintNode · managed by WCPOS.
Each row has three controls: Test Print, Edit and More actions (⋯). Edit opens the printer's settings; see Change a printer's settings. Print Dialog and cloud printers have no Edit: cloud printers are changed in Cloud Printing.
Test a printer
Press Test Print on its row. A message says Printed on the printer when it confirms the page came out, or Sent to the printer when it can only confirm the job left the till. If it fails, the message says what went wrong.
Make a printer the default
Open More actions (⋯) on its row and press Set Default. It isn't shown on the current default, Print Dialog, or cloud printers.
Delete a printer
Open More actions (⋯) on its row, press Delete and confirm Delete Receipt Printer? (with its own name). The printer is removed from this device only. Any template that was routed to it prints with Auto instead (see Print routing).
Send a setup report to support
Open More actions (⋯) on its row and press Copy setup report. It gathers the app version, the printer's settings and the latest printing log. In the web and desktop apps it's copied, ready to paste into a support message; in the mobile apps the share sheet opens so you can send it.
Change a printer's settings
Press Edit on the printer's row. Edit printer opens as a panel from the right. There's no Save button: each change is saved as soon as the form is complete, and Close saves anything still waiting.
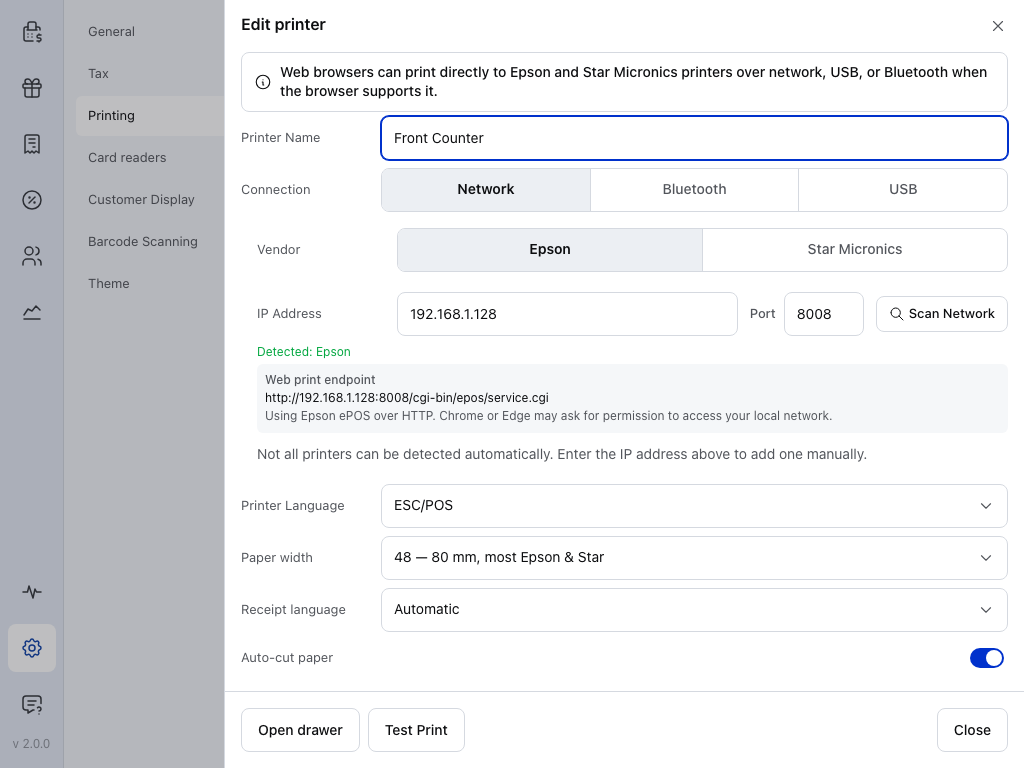
- Printer Name — the name in the list and on the receipt screen.
- Connection — Network, Bluetooth or USB. Changing it clears the address.
- Vendor — Epson or Star Micronics in the web app.
- IP Address — with Port beside it, 8008 here. Detected: Epson under it means the app reached the printer there. In a browser the port also decides HTTPS or HTTP: 8008 is plain HTTP. See HTTPS or HTTP.
- Scan Network — looks for printers again; Use this printer fills in the address of the one you pick.
- Printer Language — follows Vendor, so you rarely change it. The choices are under Connection, vendor and printer language below.
- Paper width — characters per line, set by the test page. See Getting the receipt width right.
- Receipt language — Automatic suits most shops. Change it only if receipts in another alphabet print wrong; see non-Latin receipts.
- Auto-cut paper — cut the paper after each receipt.
With Auto-open cash drawer on, the foot of Edit printer looks like this:
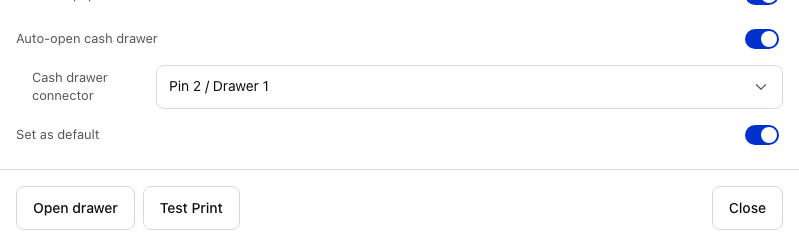
- Auto-open cash drawer — open the drawer wired to this printer each time it prints a receipt. Once on, Cash drawer connector shows under it.
- Cash drawer connector — which pin of the printer's drawer port fires: Pin 2 / Drawer 1 (the usual one) or Pin 5 / Drawer 2. If the drawer doesn't open, try the other.
- Set as default — send receipts here unless routing says otherwise.
- Open drawer — opens the drawer through this printer now, whether Auto-open cash drawer is on or not. Use it to check the wiring and the connector pin. See Connecting a cash drawer.
- Test Print — prints a test page with the settings as they are. With Auto-open cash drawer on, as here, it opens the drawer too.
- Close — saves and closes.
Connection, vendor and printer language
These sit between Printer Name and the switches. You rarely need them once the test page has printed.
| Field | What it does |
|---|---|
| Connection | Network, Bluetooth or USB, as far as this device can use them (no USB on iPhone and iPad; hidden when there's only one). Changing it clears the address, so connect the printer again. |
| Vendor | Epson or Star Micronics. The desktop app also offers Generic for other makes; the mobile apps offer it for Wi-Fi and plain Bluetooth printers. |
| IP Address and Port | For Network. Scan Network looks again and lists each printer as Discovered: …; press Use this printer to fill in its address. Once the app reaches the printer it shows Detected: Epson or Detected: Star. Not every printer answers a scan, so you can always type the address. |
| Connect Bluetooth printer / Connect USB printer | For Bluetooth or USB in the browser: opens its device chooser. The desktop app lists printers already installed (Windows) or paired (Mac) instead. |
| Printer Language | ESC/POS, StarPRNT or Star Line Mode, the command set the printer understands. |
| Receipt language | The character set for ESC/POS printers. Automatic suits most shops; see non-Latin receipts. |
| Print receipts as an image | The last switch. For scripts the printer can't render, such as Arabic, Hebrew or Thai. Slower and larger than text. |
A warning above the switches, Cash drawer kicks depend on printer language/emulation., means Vendor and Printer Language don't match: a Star printer set to ESC/POS, for example, or another make set to a Star language. The drawer may stay shut. Set Printer Language to the mode the printer is set up to use.
When Test Print fails, the reason shows in red in the window, with Having trouble? beside it and Support details under it:
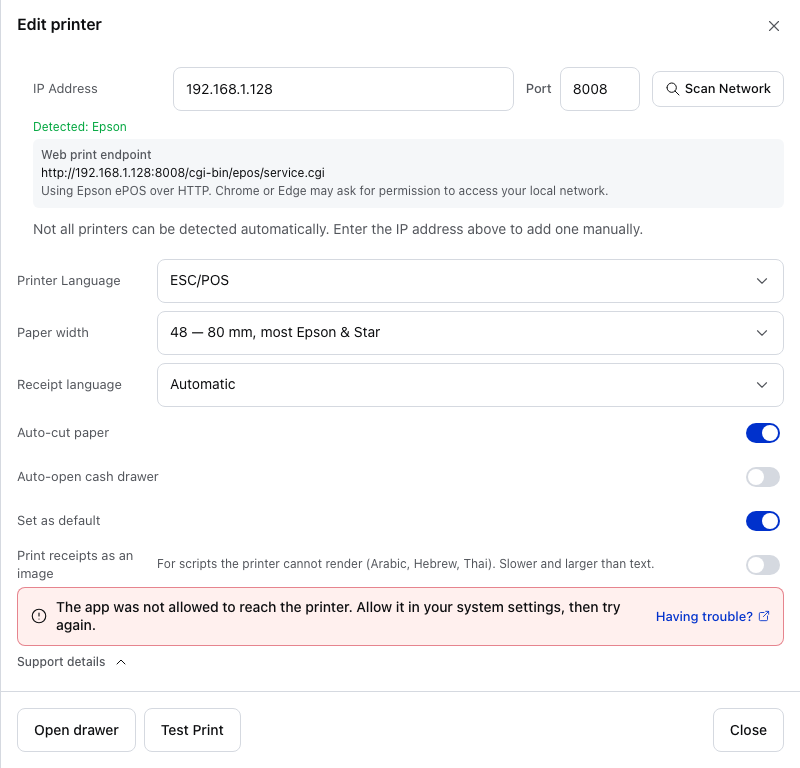
- The reason — what went wrong, in the app's words. In a browser, The app was not allowed to reach the printer means the browser couldn't reach the printer at all: check it's on and the address is right, then see Printing from the browser.
- Having trouble? — opens this printer guide.
- Support details — what the app tried. In the web and desktop apps, Copy support details copies it for a support message.
- Test Print — try again once you've fixed what the message names.
What each app can connect to
The desktop and mobile apps reach Wi-Fi receipt printers that speak ESC/POS, which most makers use, or one of Star's own languages. Supported receipt printers lists the tested models. The web app only adds Epson and Star printers. For another make, use the desktop or mobile app, or a cloud printer.
Every app, over Wi-Fi, USB and Bluetooth
A browser can't open a direct connection to a printer the way an app can. Over Wi-Fi the web app reaches Epson and Star printers through the web server built into the printer, not raw port 9100.
| Over Wi-Fi | Over USB and Bluetooth | |
|---|---|---|
| Web app | Epson and Star, through the printer's own web port. On an HTTPS store, Chrome asks for permission to reach your local network the first time. | Epson and Star by USB or Bluetooth Low Energy, through the browser's own device chooser. Chrome and Edge only. |
| Desktop app | Wi-Fi receipt printers that speak ESC/POS, StarPRNT or Star Line Mode. It scans the network to find them. | USB, Bluetooth Low Energy, and printers already installed (Windows) or paired (Mac) in the operating system. |
| iPhone and iPad | Wi-Fi receipt printers that speak ESC/POS, StarPRNT or Star Line Mode. | Epson and Star through the makers' own software; other makes over Bluetooth Low Energy. No USB. |
| Android | Wi-Fi receipt printers that speak ESC/POS, StarPRNT or Star Line Mode. | Epson and Star through the makers' own software; other makes over Bluetooth Low Energy, or Bluetooth Classic once paired in Settings. |
Print routing
When you print with more than one template, say a thermal receipt and an A4 invoice, routing decides which printer each one goes to. Three layers are checked in this order:
- On the receipt screen. Under Template sits a Printer choice, set to Auto and showing what Auto picked, such as Auto — Print Dialog. Picking a printer here sends this receipt there, and reprints go there too until you change template or leave the screen. Changing template sets it back to Auto.
- In Settings. Under the printer list, Receipt Templates, Report templates and Closure templates each list your active templates: Choose which printer each template prints to. Pick a printer for a template, or set it back to Auto. Cloud printers are in each list too.
- Auto. With no choice made, the app sends each template to a printer that suits it, and to the default printer when several do.
Routing choices are kept on the device, like the printers themselves.
How Auto chooses a printer
There are two kinds of template. Thermal templates are laid out for receipt printers, a fixed number of characters to a line. HTML templates are laid out like a web page, an A4 invoice for example.
- A thermal template goes to a receipt printer whose paper width suits it: a 58 mm template to a printer set to 32 characters, an 80 mm one to 42 or 48.
- An HTML template goes to Print Dialog.
- If several printers suit, the default wins.
When the printer chosen for a template doesn't suit it, an amber warning appears on the receipt screen, and it still prints: a thermal template sent to Print Dialog prints its on-screen preview, and an HTML template sent to a receipt printer prints the built-in receipt layout. The one exception is a cloud printer that only takes thermal templates: it prints nothing for an HTML one, and the warning says so.
Printing when a sale completes is a cart setting, not a printer one. Open the settings in the cart header and turn on Automatically print receipt after checkout. Routing then decides which printer it uses.
If something goes wrong
The scan finds nothing. Check the printer is on and has paper. On Wi-Fi, give it a fixed address and use Enter an IP address: see Give the printer a fixed address. In the browser, allow local network access: see Browser.
Test Print says it failed. Read the line in the message or the window. Then press Copy setup report on the row, or Support details in Edit printer, and send it with your support request. It says what the app tried.
The drawer doesn't open. Press Open drawer in Edit printer. If nothing happens, switch Cash drawer connector to the other pin. If it still won't open, look for the printer-language warning above the switches, then see Connecting a cash drawer.
The receipt prints, but not the way it looks on screen. Look for the amber warning on the receipt screen and pick the printer the template is made for.
Pick the guide that matches:
Setting up
- Getting the receipt width right — the ruler overshoots or falls short
- Give the printer a fixed address — nothing found on Wi-Fi, or a printer that stopped working
- Pairing a Bluetooth receipt printer — it isn't in the chooser
- USB on Windows and USB on Linux
- Supported receipt printers
Epson prints nothing
- Epson Secure Printing — a new Epson that appears to send and prints nothing
- Server Direct Print — its web page works but no job prints
- Printed once and then stopped — power-cycle first
Permissions
Something on the receipt is wrong
- The logo is missing in the browser
- Receipts in Chinese, Thai, Arabic or Cyrillic
- Connecting a cash drawer