Orders
The Orders page needs WCPOS Pro. Without Pro you see a blurred preview of the list, and you manage orders in WP Admin under WooCommerce → Orders.
Orders in the menu lists the sales your store has taken. Use it when a customer comes back: find the sale, reprint the receipt, refund it, or put it back in the cart to change it. You never need to switch to WP Admin for this.
Go straight to:
- Find a sale
- Reprint a receipt
- Change items or quantities
- Change status, customer or addresses
- Refund a sale
Find an order
The list opens on your own sales at this store, newest first. To find a sale:
- Type in Search Orders at the top: an order number, the customer's name, phone or email, or a product.
- If the sale isn't listed, another cashier may have taken it: press × on the Cashier pill to search everyone's sales. If it was taken at another store or online, change the Store pill.
- Tap the sale to open it. See Open an order.
With the Orders page open, scan the order-number barcode on the printed receipt instead of typing. The scan lands in Search Orders and brings up that sale. See Barcode Scanners.
What search matches
The order number, the customer's name, company and phone (billing or shipping), the billing email, and the products in the order by name or SKU. See What Search Matches.
When the page opens, the Cashier pill shows you, and the Store pill shows the store you are signed in to (or POS when the site has only the one store). Newest sales come first, grouped under a heading for each day in the store's time zone.
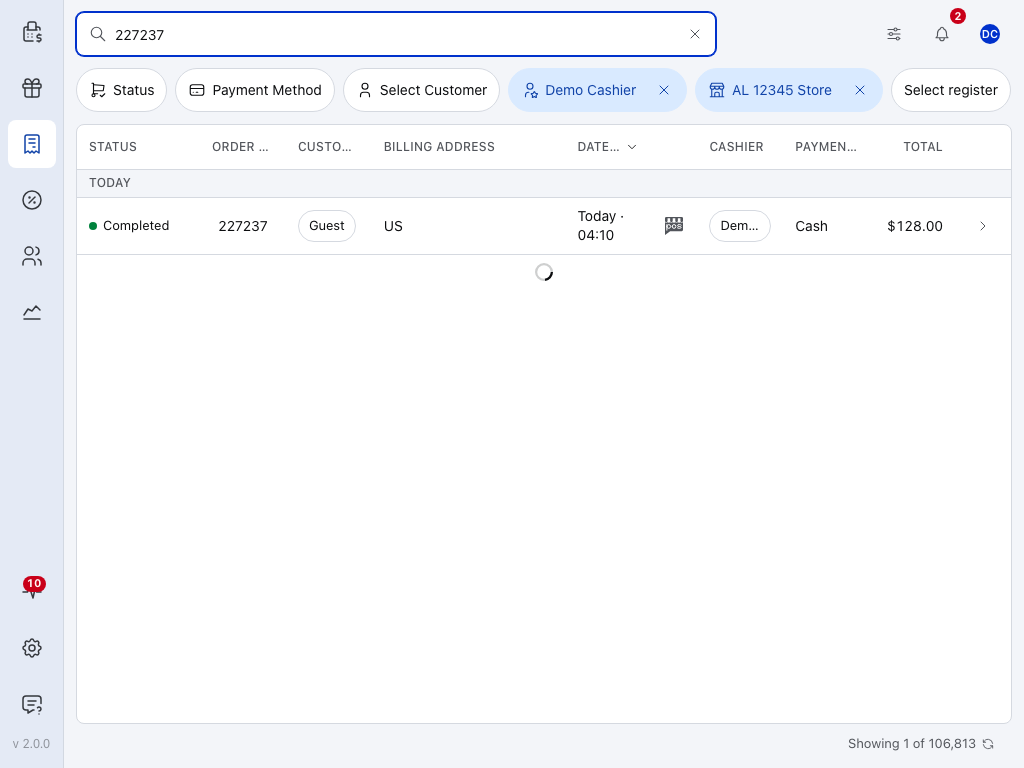
- Search Orders: type an order number, a name, a phone number or a product.
- Filter pills: narrow the list. See Filter the list.
- Cashier: set to you when the page opens. Press × to see every cashier's sales.
- Store: set to the store you are signed in to.
- Display Settings: choose the columns. See Display Settings.
- Day heading: the sales of one day, newest day first.
- Column headers: click one to sort. See Sort and size the columns.
- Status badge: press it to show only orders with that status.
- Open: opens the order. See Open an order.
- Showing N of M and the sync button: how many orders are listed, and fetch new and changed ones.
Open an order
Tap an order's row to open it. With a mouse, click the arrow () at the end of the row, or select a row with the arrow keys and press Enter. The order opens in a panel on the right, on its View tab.
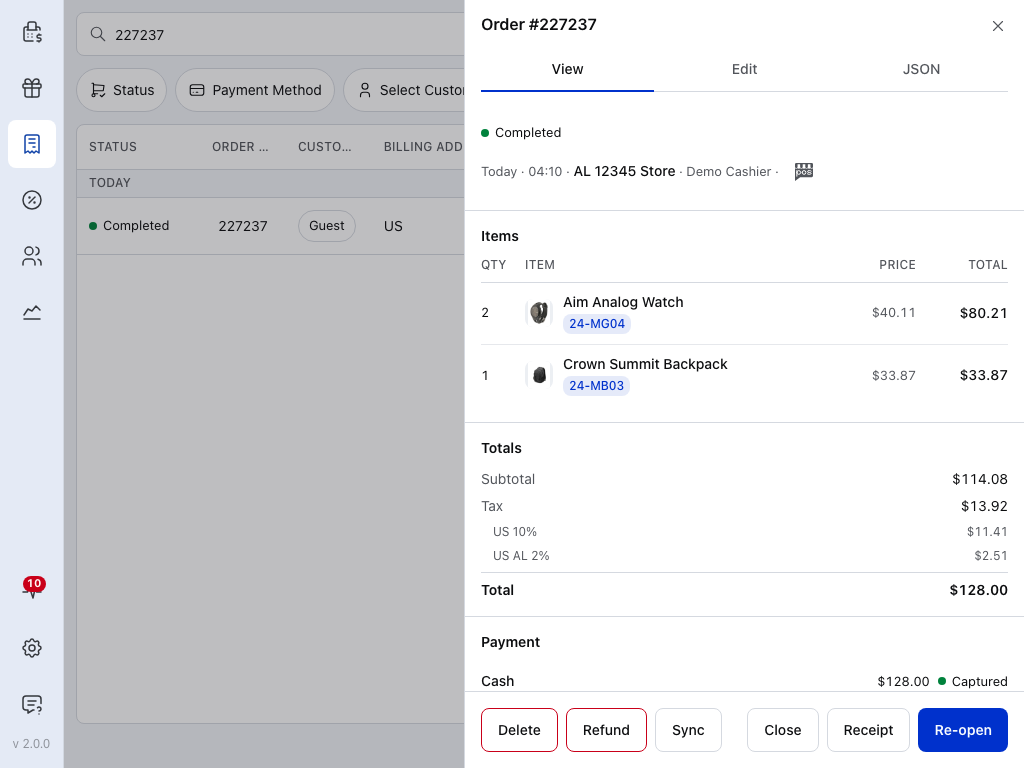
- Order details: when the order was placed, at which store, by which cashier, and where it came from.
- Delete: sends a saved order to the Trash on the store. See Delete an order.
- Refund: opens the refund form. See Refund a sale.
- Sync: fetches the latest copy of this order from the store. See Sync one order.
- Receipt: the order's receipt, to print or email again. See Reprint a receipt.
- Re-open: puts the order back in the cart to change it. See Change items or quantities.
Which buttons you see depends on the order; see Order Actions. If the order isn't on this device, the panel says No order found.
The View, Edit and JSON tabs
- View: the order as the customer bought it. See What View shows.
- Edit: change the order's details in a form. See Change status, customer or addresses.
- JSON: the order's raw data, for support and troubleshooting. Products, customers and coupons have the same JSON tab when you open them.
What View shows
View shows the whole order on one scroll: status, items, totals, payment, refunds and customer.
Every part of View, top to bottom
- Status: the order's status badge. A partly refunded order shows Partially refunded; an open order shows POS open or POS partial.
- Order details: the date and time, the store (when the order has one), the cashier, and an icon for where the order came from.
- Items: each line with its quantity, item, price and total, plus any fees. An order with no lines shows No line items.
- Totals: Subtotal, Discount, Shipping, Fees and Tax, with one line for each tax rate. After a refund, the refunded amount shows in red and the last line is Net Payment; otherwise it is Total.
- Payment: how the order was paid, with the amount. A paid order shows Captured with the date it was paid, and the transaction ID when there is one. An order paid in several parts lists each part under Payments. An emailed invoice shows where and when it was sent.
- Refunds: each refund made on the order, when there are any.
- Customer: name, email and phone, the customer's note, the billing address, the shipping address when it differs, and any tax IDs.
Order Actions
Which buttons an order shows
| Button | What it does | When you see it |
|---|---|---|
| Re-open | Puts the order back in the cart to change it and take payment again. | Always, with Pro. |
| Receipt | Shows the receipt to print or email. | Once the order is saved to the store. |
| Send again | Re-opens the order at checkout with the invoice payment method already chosen, so you can send a new invoice. | When the order is waiting for an emailed invoice to be paid. |
| Sync | Fetches this one order from the store again. | Once the order is saved to the store. |
| Delete | Deletes the order. | Always, with Pro. |
| Refund | Opens the refund form. | When the order is saved to the store and is Completed, Processing or On hold. |
| Cancel invoice | Withdraws the emailed invoice. Needs a connection. | When the order is waiting for an emailed invoice to be paid. |
Reprint a receipt
To print or email a receipt again:
- Open the order and press Receipt at its foot.
- Print it, or email it to the customer. See Reprint a receipt.
For one-click reprints from the list, turn on the Receipt column in Display Settings. Each saved order then has a receipt button on its row. An order that hasn't reached the store yet has no receipt button.
Change status, customer or addresses
Open the order's Edit tab. Line items are not changed here; to change them, re-open the order.
- Status: pick the new one, then press Update status. Status updated shows once the store has it.
- Customer, customer note and addresses: change the field. There is no Save button: each field is saved as you change it, and shows Saved once the change is kept. Not saved means it didn't go through: change the field again.
Other details you can change
The payment method, currency, transaction ID, tax IDs and metadata. Each is saved as you change it, like the fields above.
Change items or quantities
On a sale that had already reduced stock, each line change moves stock straight away.
If the sale now costs less than was paid, the POS doesn't give the extra back. Settle the difference with the customer; see Refund a sale.
-
Press Re-open at the foot of the order. The POS opens on that order's cart (on a phone, on its Cart tab), and the order moves to POS - Open.
-
Change the cart:
- Change a quantity: tap it, type the new number, then tap Done (the tick) or press Enter. In the iOS and Android apps there is no keypad: you type straight into the box. See Change the quantity.
- Take a line off: tap its total, then Remove.
- Add items: tap them in the product grid or scan them, as for a new sale. Each scan adds one.
- Change a price or the customer: see Line Items and Choose the customer.
- Change the note or custom fields: tap ⋮ beside Checkout to open Order details. See Add a note for the customer and Add extra information.
-
Go through checkout again to complete the updated order. Payments already taken stay on the order. Checkout lists them and asks only for what is still owed, shown as Remaining: nothing if the cart is unchanged and nothing was refunded, or the difference if you added items. See Checkout.
Stock and payments on a re-opened sale
If the sale had already reduced stock (payment was taken before it was re-opened), every line change in the cart moves stock straight away: adding a line or raising a quantity reduces the product's stock, removing a line or lowering a quantity returns it. Completing the sale again does not reduce stock a second time.
If you took items off and the sale now costs less than was paid, checkout asks for nothing, and the POS doesn't give the extra back for you. Settle the difference with the customer, for example with a refund. See Refund a sale.
A sale with a card payment still in progress can't be re-opened. The message says which payment is still in motion: cancel that payment first. See Cancelling a Payment.
Refund a sale
You can issue full or partial refunds from the POS, either back to the original payment method (when the gateway supports it) or as cash from the till. Open the order and press Refund at its foot.
For a step-by-step refund at the till, see Refunds at the Till. For refund destinations, partial refunds and how refunds appear on receipts, see Refunds.
Sync one order
Press Sync to fetch the latest copy of this order from the store, for example after someone changed it in WP Admin. If the store can't be reached, you see "Couldn't refresh this order. The copy on this device is unchanged". Check your connection and try again.
Delete an order
Press Delete, then confirm. A saved order goes to the Trash on the store, where an admin can restore it from WP Admin. An order that never reached the store is deleted for good, and the confirmation says so.
With the Cashier role you see You don't have permission to delete orders on the server, and the order stays: ask a shop manager or administrator to delete it.
Permissions for administrators
Deleting needs the WordPress delete_shop_orders capability, and delete_others_shop_orders for another cashier's order or an online order. The Cashier role has neither.
Work with the list
The list keeps loading more orders as you scroll. The footer shows how many are listed (Showing 10 of 240) and the sync button (). Press it to fetch new and changed orders; long-press it for Clear and Refresh, which clears the search, puts the pills back to your own sales at this store, and downloads the orders again.
Filter the list
The pills under the search bar narrow the list. Filtering runs on the server, so it covers all your orders, not only the ones already on the device.
All order filters
| Pill | What it filters by |
|---|---|
| Status | The order status, such as Completed or Processing. |
| Payment Method | How the order was paid. |
| Select Customer | One customer. |
| Select Cashier | Who took the sale. Remove it to see every cashier's sales. |
| Store | One store, or where the order came from: POS, Online Store or WP Admin. With no store chosen the pill reads Created via. |
| Select register | The register the sale was taken on. |
| Date range | A range of days. The calendar has quick picks for Today, Yesterday, This Week, Last Week, This Month and Last Month; press Done to apply. |
Each set pill has an × that removes it. Once you have changed two or more pills, Clear all appears at the end of the row and puts the pills back to your own sales at this store.
You can also filter from a row: press a status badge to show only that status, or a customer or cashier name to show only theirs.
Sort and size the columns
Click a column header to sort by it, and click again to flip between ascending and descending. Status, Order Number, Customer, Date Created, Payment Method and Total can be sorted. The day headings show only while the list is sorted by Date Created. Your sort is kept for next time.
To make a column wider or narrower, drag the right edge of its header. The last column and the Actions column can't be resized, and widths go back to normal when you leave the page.
When the list is empty
No orders yet means this store has no sales from you yet. Sales you take appear here.
No orders match these filters means your search or pills hide everything. Press Clear filters to clear the search and put the pills back to your own sales at this store.
Example: filters hiding a sale
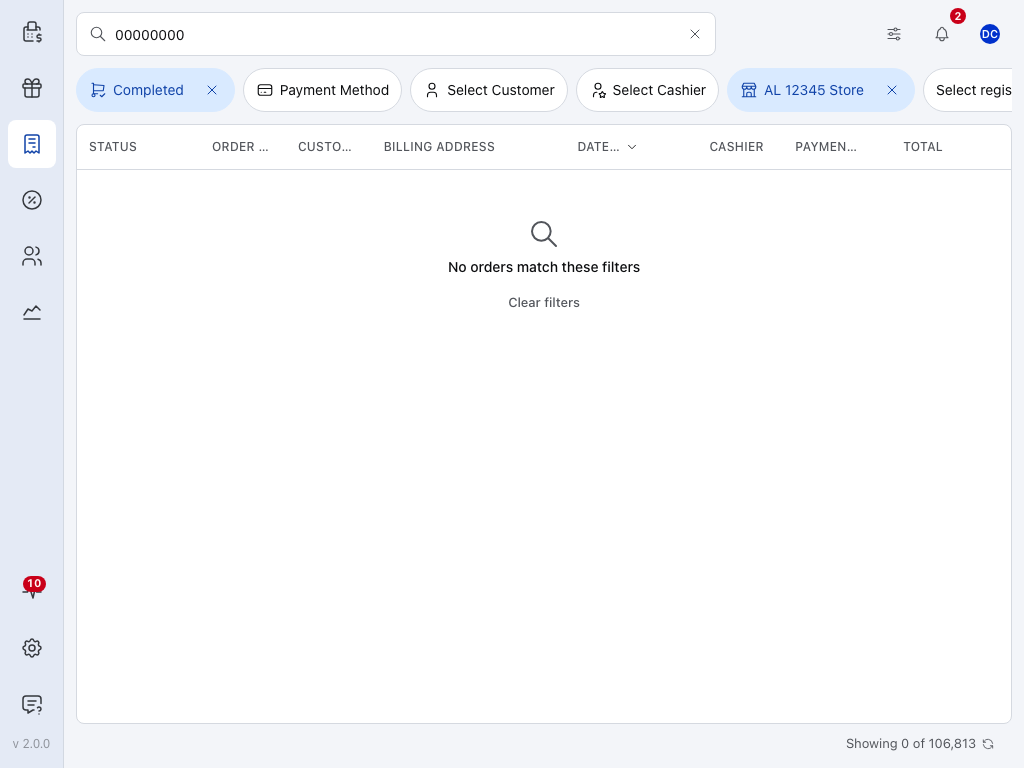
- Status: set to Completed. Its × removes it.
- Payment Method: not set.
- Select Customer: not set.
- Select Cashier: the cashier pill after its × was pressed, so every cashier's sales are searched.
- Store: still set to this store.
- Select register: not set.
- No orders match these filters, with Clear filters under it.
Sales that need attention
Sometimes a payment is taken at the till, but the store then refuses it. For example, the order had already been paid online, or the store could take only part of the payment. When that happens, a red band appears under the search bar: 1 sale needs attention (or 3 sales need attention).
Each entry names the order, the amount and how it was paid, and says what to do, such as "refund that payment" or "refund the difference". The band lists the three newest, then "and N more".
- Press Open order to see the sale.
- Settle it with the customer: refund the payment or the difference, or take the balance.
- Press Handled to clear the entry.
The band never retries a refused payment for you. It shows only the sales you took: another cashier signing in on the same device doesn't see your entries.
Display Settings
Click the sliders icon () at the end of the search bar to open Order Settings. In the panel:
- Switch a column on or off with the switch beside its name.
- Add a line under a column: the indented Billing Address and Shipping Address under Customer show the address beneath the customer's name, and the indented switch under Total shows the payment method. The Billing Address and Shipping Address further down are separate columns.
- Move a column: drag it by the grip on its left.
- Start over: Restore Default Settings puts every column back.
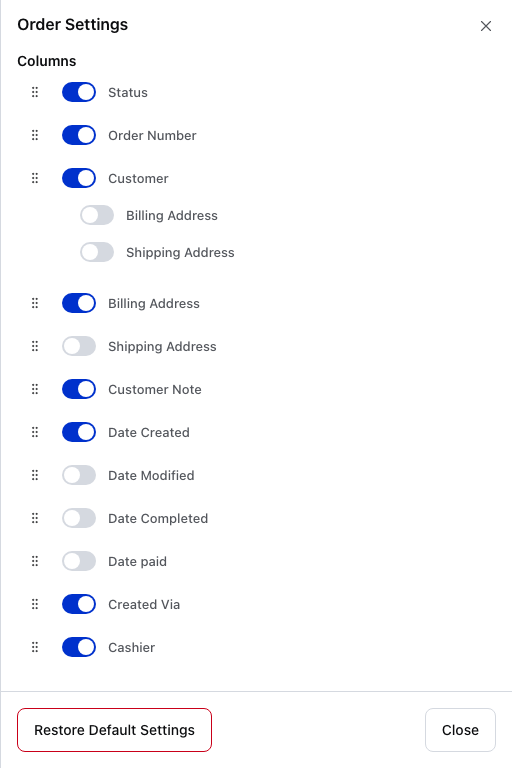
- Restore Default Settings: every column back to how it was at first.
- Close: closes the panel. Your changes are already saved.
Every column, and which are shown at first
| Column | Shown at first | What it shows |
|---|---|---|
| Status | Yes | The status badge. Press it to filter by that status. |
| Order Number | Yes | The order number. |
| Customer | Yes | The customer's name, or Guest. Press it to filter by that customer. |
| Billing Address | Yes | The billing address. |
| Shipping Address | No | The shipping address. |
| Customer Note | Yes | An icon when the customer left a note. |
| Date Created | Yes | When the order was placed. |
| Date Modified | No | When the order last changed. |
| Date Completed | No | When the order was completed. |
| Date paid | No | When the order was paid. |
| Created Via | Yes | An icon for where the order came from: POS, online store or WP Admin. |
| Cashier | Yes | Who took the sale. Press it to filter by that cashier. |
| Register | No | The register the sale was taken on. |
| Payment Method | Yes | How the order was paid. |
| Total | Yes | The order total. |
| Receipt | No | A receipt button, on orders saved to the store. |
| Actions | Yes | The arrow that opens the order. With Actions off, clicking a row opens it. |
Order Statuses
Most POS orders go straight to Completed, because payment is collected at the till. Orders kept open in the cart, and saved to the store with Sync order (⋮ beside Checkout), are POS - Open and can be re-opened later to finish the sale. See Open Orders.
POS orders use the standard WooCommerce order statuses plus two of WCPOS's own.
All order statuses
| Status | Description |
|---|---|
| POS - Open | Saved from the POS but not yet paid (parked or held orders). |
| POS - Partial Payment | Part of the total is paid and the rest is still due. |
| Pending | Awaiting payment. |
| On hold | Awaiting action, such as a payment to confirm. |
| Processing | Payment received, order being fulfilled. |
| Completed | Order fulfilled and complete. |
| Failed | The payment failed. |
| Cancelled | The order was cancelled. |
| Refunded | The order was fully refunded. |
If something goes wrong
The sale you want isn't listed. The list starts on your own sales at this store. Remove the Cashier pill to see everyone's, or change the Store pill.
"No orders match these filters". Press Clear filters, then search again.
A new sale from another till is missing. Press the sync button in the footer. If it is still missing, long-press it and choose Clear and Refresh.
"Couldn't refresh this order". The store couldn't be reached. The copy on the device stays as it was; try again once you're connected.
"You don't have permission to delete orders on the server". Your WordPress role can't delete orders. Ask a manager.
Re-open is refused because a payment is "still in motion". Cancel that payment first, then re-open. See Cancelling a Payment.
Use Cases
Customer Service
- Look up past orders to assist with returns or inquiries
- Verify what a customer purchased
- Reprint receipts on request
End of Day
- Review the day's sales under today's heading
- Filter by cashier or register to check each till
- Cross-reference with Reports for reconciliation
Order Tracking
- Monitor order statuses
- Track which orders are pending vs completed
- Settle the sales that need attention