Mercado Pago Terminal Gateway
Mercado Pago Terminal sends a sale from the till to a Mercado Pago Point terminal. The customer pays on the terminal, and the till records the payment once Mercado Pago confirms it.
This page starts at the till. Store admins: Set up Mercado Pago Terminal covers the access token, the webhook, the terminals and how to check it worked.
Mercado Pago Terminal needs WCPOS Pro 2.0 or later, and version 1.0 or later of the extension.
Version 1.0 hasn't been run on a real Point terminal or a Mercado Pago account yet. Before you take a customer's card, take a small payment on your own card and refund it. Version 1.0 has been tested against a stand-in for Mercado Pago, built from Mercado Pago's documentation. Version 0.1, on a live account and a real Point Smart, listed the terminals, switched one to PDV mode, and created and cancelled a payment. Not yet tried with either version: a paid card payment, a decline, cancelling on the terminal, Mercado Pago's notifications, refunds, and Mercado Pago's sandbox.What has and hasn't been tested
Take a card payment
With Open and close the register switched on, the till won't record a payment while the register is closed, and a card you've already taken would have to be refunded. See Registers for the setting.
- Press Checkout in the cart and tap the Mercado Pago Terminal tile on the Payments tab. Your store may have given it another name.
- Look above the keypad. If you see Choose a terminal, tap the terminal at your counter. If you see Terminal: and a name, that's the one this till uses; press Change to pick another. The till remembers your choice.
- To take part of the balance on the card, type the amount. The rest stays due for another payment. Full balance puts the whole amount back.
- Press Send … to Mercado Pago Terminal. The till shows Waiting for the customer on the terminal.
- The customer pays on the terminal. When the money is taken and nothing is left to pay, the receipt opens. If some is left, take it with another tile.
What the steps on the till mean
While the payment runs, the till lights Sent, On terminal and Captured in turn. Captured means the money is taken. Approved stays dark for Mercado Pago, which takes the money in one step.
The terminal doesn't print a ticket. Print or email the POS receipt as usual; see Receipts at Checkout. There's no tip on the terminal.
Cancel a payment
On the till, press Cancel on terminal. That works only until the payment appears on the terminal's screen. Once the customer can see it, the till can't take it back:
- If the customer can already see the amount, cancel it on the Mercado Pago terminal itself, or ask the customer not to pay.
- Wait for the till. It may stay on Cancelling — waiting for the terminal to confirm while it checks. The customer can still pay until the terminal cancels, so don't take payment another way yet.
- The till shows Payment cancelled once the terminal cancels. If nobody cancels, Mercado Pago drops the payment after 5 minutes, and the till shows Payment failed: Timed out on the terminal.
If the till offers Release this payment instead, don't press it until a manager has checked Mercado Pago: see The till offers Release this payment under Other messages.
If something goes wrong
When the customer may have paid
In these cases the card may already be charged. A manager checks your Mercado Pago account first, where the payment is listed as Order # and the order number.
The card was charged, but the order didn't finish. Mercado Pago took the money, but the till couldn't finish the order. Don't charge again. Reload the app, and the till tries again to finish the sale; if the order is still open, a manager finishes it. See Card charged, order not finished.
Payment failed: The terminal confirmed a different amount. The terminal took an amount other than the one the till sent, so the till didn't record it, but the card may be charged. Ask a manager to find the payment in Mercado Pago and compare it with the order.
The till closed or lost its connection during a payment. Don't send the payment again from another till. If your admin has set up the webhook, your store records the payment even with the till closed. Open the order: if it still shows unpaid, a manager checks Mercado Pago before you take payment again.
Other messages
Payment failed: Card declined
Press Try again to send it to the terminal again, or Choose another way to pay with another tile.
Payment failed: followed by a code
Mercado Pago refused the payment and gave a reason the till doesn't translate, so it shows Mercado Pago's own code. Press Try again, or Choose another way. If the same code keeps coming back, send the support bundle with the order number.
The terminal is still busy with an earlier order
The terminal is holding another payment. Finish or cancel it on the terminal, then press Try again.
Payment failed: Timed out on the terminal
No one paid within 5 minutes. Check the terminal, then press Try again.
The till offers Release this payment
Mercado Pago accepted the cancel but hasn't confirmed it yet. Released doesn't mean cancelled: press it only once a manager has checked your Mercado Pago account and found no approved payment for the order. The order can then be paid another way.
The Mercado Pago Terminal tile is greyed out or missing
Under the tiles, the till says why. See When a tile can't be used for every reason.
- In use by order #… — the terminal is busy with another order's payment. Finish or cancel that one, or press Change and pick another terminal.
- Needs a connection — the till is offline. A terminal payment goes through your store, so take another kind of payment or wait for the connection.
- No terminals set up for Mercado Pago Terminal — none of your terminals is in PDV mode. A manager switches them to PDV.
- No tile at all — the gateway has no access token, or isn't switched on in WCPOS. A manager checks the setup.
Refund a Mercado Pago payment
A refund goes back through Mercado Pago to the customer's card, for the full amount or part of it.
- In the POS, open the order's refund. See Refunds.
- Choose Refund to Mercado Pago Terminal and press Process Refund.
- Your store asks Mercado Pago for the refund and adds the result to the order notes.
A refund in WP Admin, with WooCommerce's Refund … via Mercado Pago Terminal button, works the same way. Sales taken with version 0.1 refund the same way too.
A refund stays pending
Mercado Pago hadn't finished the refund when it answered, and your store may not update it on its own. Find the refund in your Mercado Pago account before you refund again: if it went through, the customer has their money.
Mercado Pago refuses the refund
Some card acquirers only allow refunds on the terminal. Refund on the Point terminal or in your Mercado Pago account, then record it in WooCommerce with Refund … manually.
I refunded on the terminal or in Mercado Pago
Your store isn't told about refunds made there, so the order still shows the full payment. Record the refund in WooCommerce with Refund … manually, so no money goes back twice.
Set up Mercado Pago Terminal
An administrator does this once per store in WP Admin, then picks a terminal on each till. Your store reaches each terminal through Mercado Pago over the internet, so there's nothing to pair, and any till can use any of your terminals.
Requirements
If your currency has no cents, such as Chilean pesos, set Number of decimals to 0 under WooCommerce > Settings > General. Mercado Pago refuses amounts with decimals on those accounts.
Install the extension
Open WP Admin > POS > Settings > Extensions, find Mercado Pago Terminal for WooCommerce, install it and activate it. You need version 1.0 or later; version 0.1 is for WCPOS before 2.0. See Extensions.
You can also upload the plugin zip (not the source-code zip) from the GitHub releases page under Plugins > Add Plugin > Upload Plugin.
Without WCPOS Pro 2.0, WP Admin shows Mercado Pago Terminal requires WooCommerce POS Pro 2.0 or newer. and the gateway isn't added.
Enter your access token
Log in to Mercado Pago Developers with your seller account and open Your integrations. Create an application if you have none, then open it. Under Production credentials, copy the Access token: it starts APP_USR-. That's the token for real payments. The one under Test credentials only reaches Mercado Pago's sandbox, which hasn't been tried with this extension.
Then go to WP Admin > WooCommerce > Settings > Payments and open Mercado Pago Terminal.
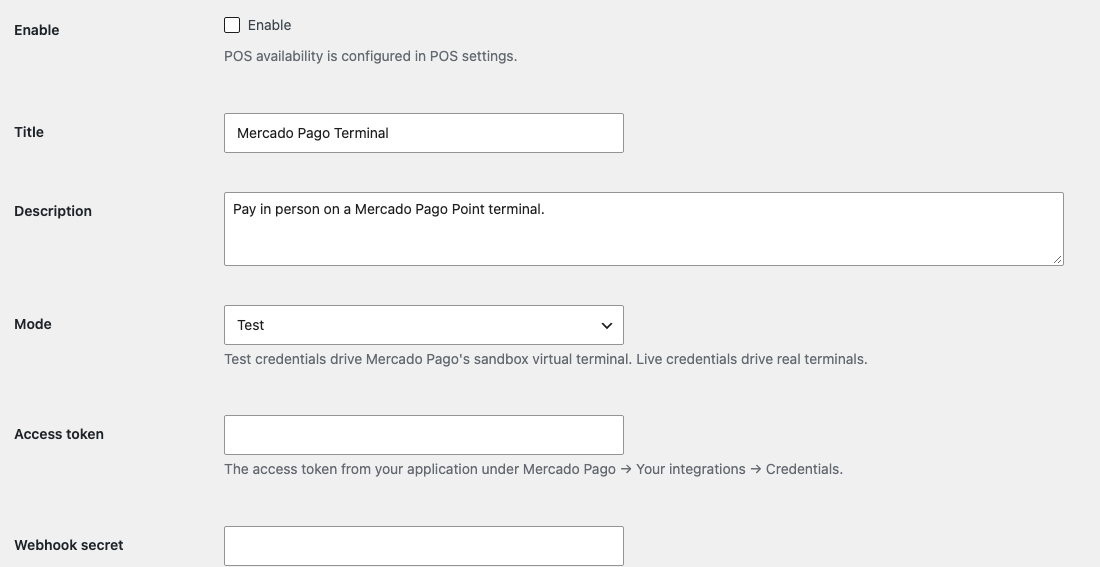
- Enable — leave it unticked. It offers the gateway on your online store; the POS has its own switch.
- Title — the tile's name at the till.
- Description — shown under the title on the store's payment page.
- Mode — shown here at its default, Test. Set it to Live. The hint under it is out of date: the access token, not Mode, decides whether payments are real.
- Access token — paste your production token here. Once saved, the field stays blank: leave it blank to keep the saved token.
- Webhook secret — leave it for now. You fill it in when you add the webhook.
Click Save changes.
Add the webhook
The webhook lets Mercado Pago tell your store as soon as a payment ends. Payments still work without it, because the till and your store keep asking Mercado Pago, but set it up so a paid order finishes even if the till closed.
- Copy the webhook URL from the description under Webhook secret. It ends in
wp-json/wcpos/v2/payments/webhook?provider=mercadopago. - In Mercado Pago Developers, open Your integrations, your application, then Webhooks. Add the URL and select the Order (Mercado Pago) event.
- Copy the secret signature Mercado Pago shows, paste it into Webhook secret and click Save changes.
Your store refuses any notification that isn't signed with that secret, so a webhook without the secret does nothing.
Switch your terminals to PDV
Point terminals ship in STANDALONE mode, where they can't take payments from a till. Only terminals in PDV mode are offered at checkout.
- Log in on each terminal with the same Mercado Pago account, if you haven't.
- Reload the Mercado Pago Terminal settings page. Under Mercado Pago diagnostics, a table lists each terminal with its ID, Terminal name and Mode.
- Click Switch to PDV on each terminal in STANDALONE mode, then restart that terminal. Mercado Pago needs the restart.
The table lists up to 50 terminals.
Switch it on in WCPOS
Go to WP Admin > POS > Settings > Checkout, find Mercado Pago Terminal in the Gateways table and switch Enabled on. That screen saves as you go; there's no Save button.
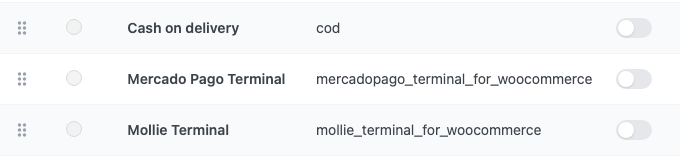
- Mercado Pago Terminal — the extension's row in the Gateways table.
- Enabled — the switch beside the gateway ID; switch it on. The till shows the Mercado Pago Terminal tile once it reloads.
Leave Enable on the WooCommerce settings page off. The POS uses the gateway once Enabled is on here, whether that box is ticked or not. See Checkout Settings.
Choose each till's terminal
On each till, open Settings > Card readers. Your terminals are listed under Smart readers, by the name Mercado Pago gives them. A terminal marked Offline hasn't been switched over yet: see Switch your terminals to PDV. Press Use this reader on the terminal at that counter; its row shows Selected. The cashier can still press Change at checkout.
With only one terminal in PDV mode there's nothing to choose: it's already Selected on every till. See Choose a smart reader.
Check it worked
-
On the Mercado Pago Terminal settings page, the line under Mercado Pago diagnostics is one message:
Credentials accepted. Restart the terminal after switching to PDV.
That means Mercado Pago accepted the access token. If it reads Mercado Pago access token is missing., no token is saved; any other text is Mercado Pago's answer to the token.
-
Each terminal you'll use shows PDV under Mode.
-
On a till, reload the POS and press Checkout. The Mercado Pago Terminal tile is among the ways to pay, with your terminals above the keypad.
-
Take a small sale on your own card, then refund it.
Upgrading from version 0.1
- Update WCPOS, WCPOS Pro and the app to 2.0 first, then the extension.
- Add the new webhook and its secret: see Add the webhook. The 0.1 webhook address is gone, and notifications without a signature are refused.
- A payment in progress during the upgrade carries over. Nothing is charged twice.
- These 0.1 settings are gone: Default terminal, Enabled terminals, Lock terminal selection, Checkout debug logs and Log level. Tills now choose their terminal under Settings > Card readers.
- Mode no longer picks the environment: check that the saved access token is the one you mean to use.
- The payment now runs on the Payments tab. The Legacy tab still works, for the whole balance only.
- Sales taken by 0.1 refund as usual: see Refund a Mercado Pago payment.
Settings reference
On WP Admin > WooCommerce > Settings > Payments > Mercado Pago Terminal:
| Setting | What it does |
|---|---|
| Enable | Offers the gateway on your online store's checkout. Leave it off; the POS has its own switch under POS > Settings > Checkout |
| Title | The tile's name at the till. Defaults to Mercado Pago Terminal |
| Description | Defaults to Pay in person on a Mercado Pago Point terminal. |
| Mode | Test (default) or Live. Set it to Live to match a production token. A label only: the access token decides whether payments are real, whatever the field's own description says |
| Access token | Mercado Pago Developers → Your integrations → your application → Production credentials. Never shown once saved, only its last characters; leave it blank to keep it. Finish open payments before you replace it |
| Webhook secret | The secret signature from your application's webhook in Mercado Pago. Its description shows your store's webhook URL. Saved and shown like the token |
Logs and support bundle
At the foot of the settings page are the support bundle, the diagnostics line and a link to the logs.

- Diagnostics line — Mercado Pago access token is missing. on this store, which isn't set up. Yours should read Credentials accepted., with your terminals listed under it.
- View logs — opens
WooCommerce > Status > Logs, sourcemercadopago-terminal. - Download support bundle — a file for WCPOS support.
The logs record each request to Mercado Pago and its reply, with the token and card numbers removed.
When a payment goes wrong, click Download support bundle and send the file to WCPOS support with the order number. WCPOS Pro adds this button: the bundle covers every POS payment provider on your site, with secrets and card numbers removed. It also says when your store last received a signed webhook.
What it doesn't do
- Tips, or authorising now and capturing later.
- Print a ticket on the terminal.
- Take payments on terminals in STANDALONE mode.
- Record refunds made on the terminal or in Mercado Pago.
- Convert currencies: the store and the Mercado Pago account must use the same one.
- More than 50 terminals per account.
- Set a store-wide default terminal, or limit which terminals tills may use, from WP Admin. Each till picks its own.
- HPOS (WooCommerce's order tables): the extension doesn't declare support for it yet.
How it works, for developers
The gateway uses Mercado Pago's Orders API for Point (POST /v1/orders with type: point), through WCPOS Pro's payment providers. Each payment creates a Mercado Pago order for the amount on the till, with the terminal ID, print_on_terminal: no_ticket, an external reference for the payment and an idempotency key, so a retry can't charge twice. The order expires after 5 minutes (filter mptfwc_order_expiration_time).
The till asks for the status every 2 seconds. The webhook, wp-json/wcpos/v2/payments/webhook?provider=mercadopago, must carry a valid x-signature (HMAC-SHA256 with the webhook secret); its body is never trusted, and the store fetches the order from Mercado Pago again. WooCommerce POS checks unanswered payments every 10 minutes as a backstop.
Terminals come from /terminals/v1/list; only those in PDV mode count as online. The filters mptfwc_order_payload and mptfwc_poll_interval_ms from version 0.1 are gone.
Related Documentation
- Card readers
- The Legacy Tab
- Refunds
- Checkout Settings
- Report an issue on GitHub. For your account, credentials and terminals, contact Mercado Pago.