Barcode Scanners
Almost every barcode scanner works with the POS the moment you plug it in or pair it. This page takes a new scanner from the box to its first scan, and shows where to go when a scan doesn't come through.
Ways to scan
- Keyboard mode — how nearly every scanner comes out of the box. The scanner types the barcode, and the POS tells a scan from typing by its speed. Nothing to set up.
- Camera — no scanner needed. Press the scan button beside the product search and point the camera at the barcode. See Camera scanning.
- Direct connection — the POS knows the scanner itself instead of judging its scans by speed. For when keyboard mode isn't enough: see Connect a scanner directly.
Connect your scanner
- Connect the scanner to your device:
- USB scanner: plug it in.
- Bluetooth scanner: put it in pairing mode (the manual says how) and pair it in your device's own Bluetooth settings, as you would a keyboard.
- Open the POS. If your store uses Open and close the register, open the register first.
- Scan a product's barcode:
- Browser or desktop app: click outside any text field, then scan. The product goes straight into the cart from anywhere in the POS; a scan into a text field counts as typing.
- iPhone, iPad or Android app: tap the product search, then scan. The app hears a keyboard-mode scanner only in that field. A scanner registered on Android works without the tap.
If the product came up, you're done. If it didn't, test a scan to see what the POS received.
Test a scan
Open Settings and choose Barcode Scanning. In the iPhone, iPad or Android app, tap the field under Keypress Event. Then scan any barcode. The Barcode Scanning Test at the bottom shows the keys as they arrived, the code the POS read from them, and whether it counted as a scan. This one came from a slow scanner, so it was treated as typing:
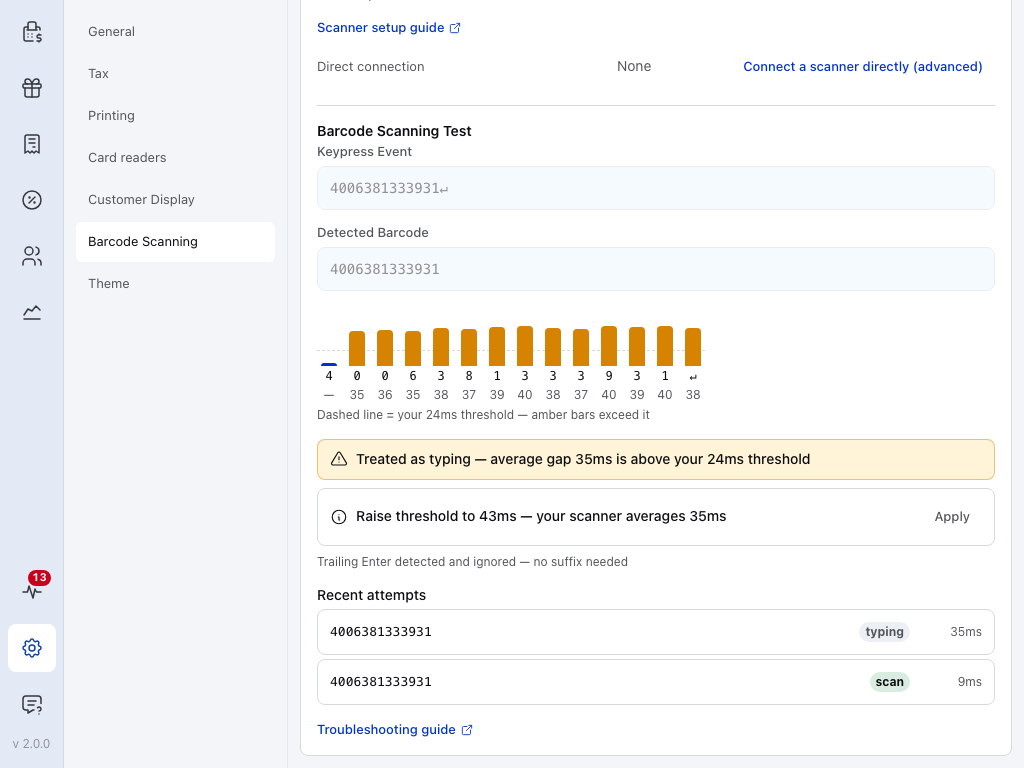
- Keypress Event — every key the scanner sent, including an Enter at the end.
- Detected Barcode — the code the POS will look up, after the prefix and suffix are removed.
- Timing chart — one bar per key, against a dashed line at your threshold. A bar over the line is a key that came too slowly.
- Verdict — Detected as a scan, or why it was treated as typing, with a suggested fix. Apply saves it.
- Recent attempts — your last few tries, each marked scan, typing or too short, with its average gap between keys.
- Troubleshooting guide — opens the Scanner Setup Wizard for a fix by symptom.
In the close-up below, the POS reads this scan's average gap as 35ms, above the 24ms threshold (the dashed line), and suggests 43ms. Press Apply to save that, then scan again to check:
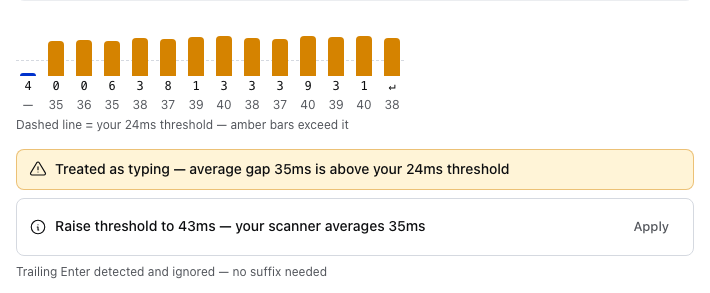
- Timing bars — one per key, with its gap in ms underneath. Amber bars came slower than your threshold.
- Dashed line — your threshold, 24ms here.
- Apply — saves the suggested threshold. Scan again to check it.
If the verdict says the scanner is sending Shift as separate keys, set the scanner to a US keyboard layout with a barcode from its manual, or connect it directly.
Scanner settings
The rest of Barcode Scanning holds the settings the test checks against, and the way to connect a scanner directly.
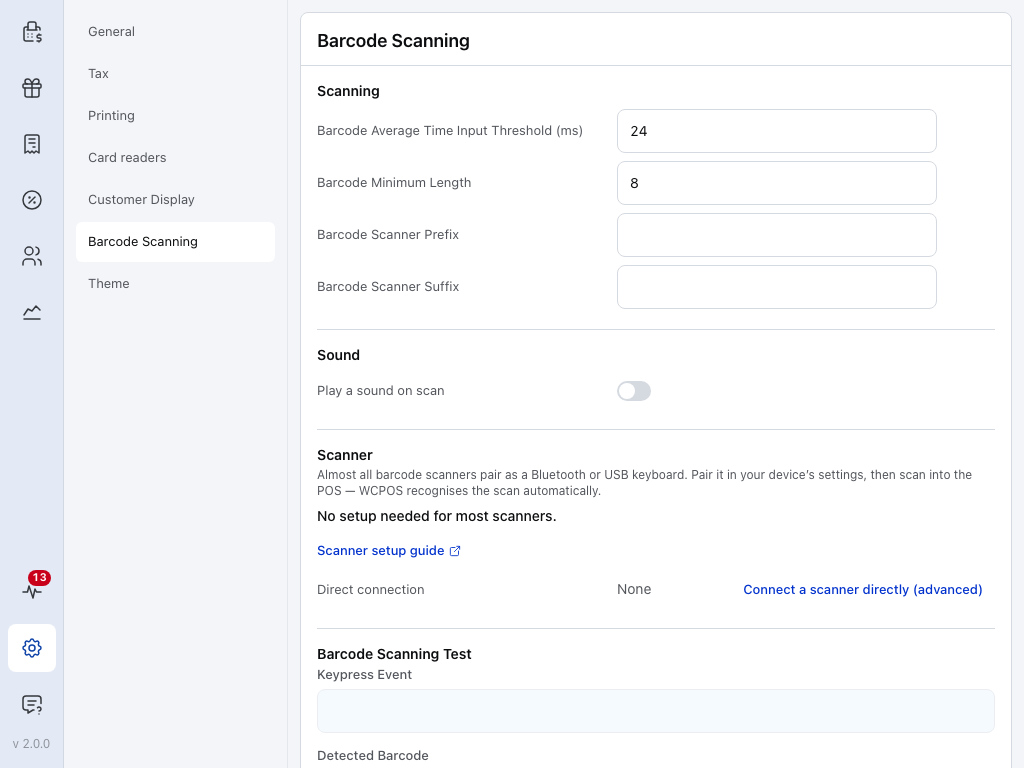
- Barcode Average Time Input Threshold (ms) — how fast the keys must come to count as a scan. The POS starts at 24. Raise it for a slow scanner; lower it if fast typing is being taken for a scan.
- Barcode Minimum Length — the shortest code that counts as a scan. The POS starts at 8, the length of an EAN-8.
- Barcode Scanner Prefix — one character your scanner adds before each code. The POS removes it before it looks the code up. Leave it empty unless your scanner adds one.
- Barcode Scanner Suffix — one character your scanner adds after each code, removed the same way. A trailing Enter needs no suffix: the POS ignores it.
- Play a sound on scan — off until you switch it on. Then choose a Sound theme and Volume, and turn Success sound and Failure sound on or off. The iPhone, iPad and Android app also have Failure vibration.
- No setup needed for most scanners — what this section says while no scanner has been connected directly. A keyboard-mode scanner never appears here.
- Scanner setup guide — opens the Scanner Setup Wizard, which asks a few questions and walks you through setup or a fix.
- Direct connection — None until you connect a scanner directly. See Connect a scanner directly.
- Barcode Scanning Test — scan into this page to see what the scanner sends. See Test a scan.
These settings belong to this device, so set them on each till that has a scanner.
If something goes wrong
Nothing happens when you scan. Check the scanner beeps or lights, and that your device's Bluetooth settings say Connected, not just paired. In the iPhone, iPad or Android app, tap the product search before you scan. Then scan into a notes app: if the code appears there, the scanner works, and the test shows why the POS took it for typing.
The verdict says "Treated as typing". The scanner is slower than your threshold. Press Apply on the suggestion, or raise Barcode Average Time Input Threshold (ms).
Typing in the product search is taken as a scan. This happens in the iPhone, iPad or Android app, where the POS judges search typing by its speed too. Lower the threshold, or raise Barcode Minimum Length. In a browser or the desktop app, typing into a field never counts as a scan.
Scans come out garbled. The scanner's keyboard layout doesn't match the device's. Set it to a US layout with a barcode from its manual, or connect it directly.
Your scanner isn't in the list when you connect directly. In the desktop app, a browser, or on iPhone or iPad, it's most likely still in keyboard mode: scan the mode barcode from its manual and follow the steps for your device again. A Bluetooth serial scanner that still doesn't show may use a service UUID of its own: open Desktop app, Chrome or Edge under Connect a scanner directly and find Bluetooth service-class UUID. On Android there's no list: register the scanner instead.
A directly connected scanner's row says Not in range, Not plugged in or Not connected. The POS can't reach it right now. Switch the scanner on, bring it closer or plug it back in. See Once it's connected.
The scan reaches the POS but no product comes up. The POS says why: Barcode not found, Several matches, Choose a variation. See Scan a barcode. Which product field holds the barcode is set in Barcode Field.
For a step-by-step fix by platform and symptom, use the Scanner Setup Wizard.
Connect a scanner directly
Keyboard mode is right for most stores. Connect directly when scans come out garbled, land in the wrong box, or get lost when no box is selected.
Open the section for the device you run the POS on. Each lists every step, in order:
Desktop app, Chrome or Edge
- Switch the scanner out of keyboard mode with the setup barcode in its manual, such as SPP mode, serial mode or HID POS mode.
- For a Bluetooth scanner, remove it in your device's Bluetooth settings, then pair it again in its new mode.
- Open Barcode Scanning and press Connect a scanner directly (advanced), then pick the way your scanner connects:
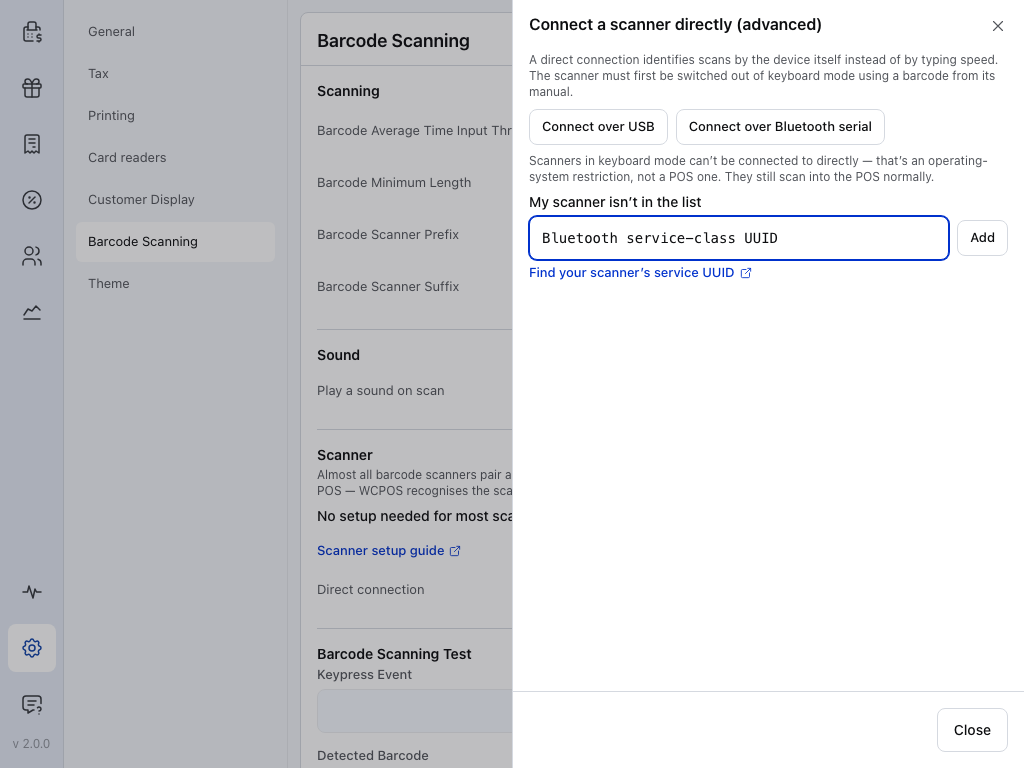
- Connect over USB — for a USB scanner in HID POS mode. Pick it from the list that opens.
- Connect over Bluetooth serial — for a scanner in serial (SPP) mode. A USB scanner in serial mode shows in the same list.
- Keyboard mode note — a scanner still in keyboard mode never shows in these lists. Your device won't let any app take over a keyboard.
- Bluetooth service-class UUID — for a Bluetooth serial scanner that is out of keyboard mode but still missing from the list. Type the UUID from its manual, press Add, then connect again.
- Find your scanner's service UUID — opens the Scanner Setup Wizard, which says where to look.
iPhone or iPad
- Switch the scanner out of keyboard mode with the setup barcode in its manual.
- Remove it in your device's Bluetooth settings, which still know it as a keyboard. Don't pair it again.
- In Barcode Scanning, press Connect a scanner directly (advanced), then Connect Bluetooth scanner. The POS connects to the first Bluetooth LE scanner it finds, so keep any other one switched off.
Android
- Leave the scanner in keyboard mode, paired as it is.
- In Barcode Scanning, press Register a scanner, then Register scanner.
- Scan once with it, name it and press Save scanner. The POS then knows its scans by the device rather than by speed.
Safari or Firefox
Not available: there's no Scanner section. Use keyboard mode or the camera, or switch to the desktop app or Chrome.
Once it's connected
A connected scanner gets a row under Scanner with its status: Connected while the link is live; Not in range, Not plugged in or Not connected while it isn't; Registered on Android. Its ⋮ menu has Remove. Keyboard-mode scanners keep working alongside it.