Discounts
There are two places to take money off a sale. Tap an item's price to lower that one item. Choose Add Discount in the add menu to take money off the whole order, as an amount, a percentage or a coupon.
Take money off one item
Tap the price on a line. A keypad opens under it, with your quick discount keys along the top.
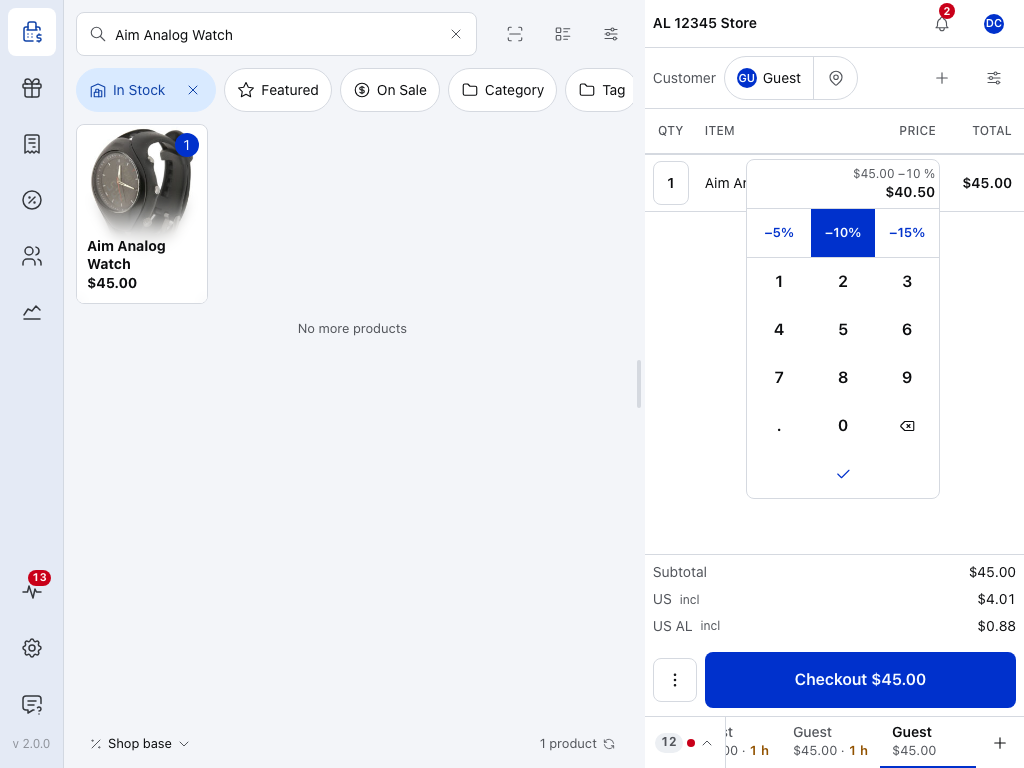
- New price — what the item will cost, and how it was worked out from the price before.
- Quick discount keys — each takes its percentage off the line's price. Pressed the wrong one? Press another before Done; it replaces the first. The lit key is the one in use. You choose the keys; see Set your quick discount keys.
- Digits — type a new price instead.
- Delete — removes the last digit.
- Done — sets the new price. Tapping outside the keypad does the same.
When you press Done, the line total changes to the quantity × the new price.
A quick key works from the price the line had when you opened the keypad. To take another 10% off, press Done, then open the keypad again and press −10%.
Example: two keys on a $45.00 item
−10% shows $40.50. Press −5% instead and it shows $42.75. Press −10% again and Done, and $40.50 is now the line's price. Open the keypad again and press −10%: $40.50 becomes $36.45.
Type a new price
For a price match, a staff price or any other one-off, type the price the customer pays and press Done. On a keyboard, type the price and press Enter.
Each line is priced on its own. To take 10% off three different items, do it on each line, or take it off the whole order with Add Discount. See Line Items for the rest of what you can change on a line.
Take money off the whole order
Press + at the top of the cart and choose Add Discount. The dialog opens on Quick discount. Type the amount, choose $ or %, then press Add Discount.
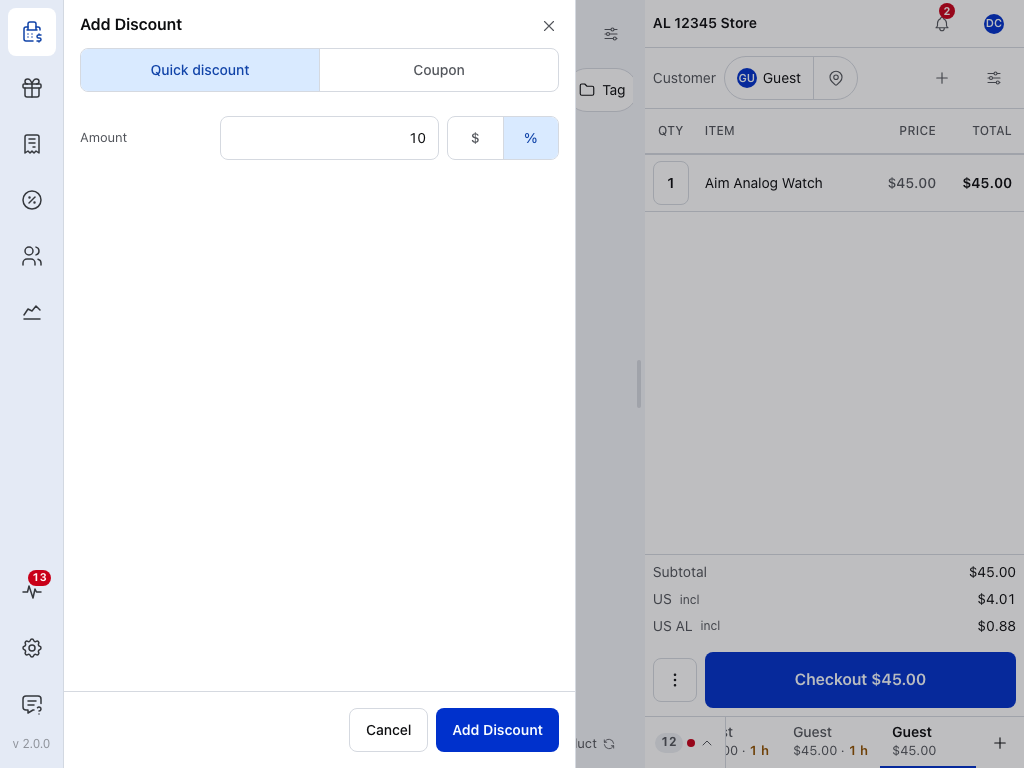
- Quick discount — an amount or a percentage off this order.
- Coupon — one of your store's coupons instead. See Apply a coupon.
- Amount — tap it and type on the keypad.
- $ or % — a fixed amount off, or a percentage of the order.
- Add Discount — puts the discount on the order.
The discount appears with the order's totals, with the line totals adjusted to match.
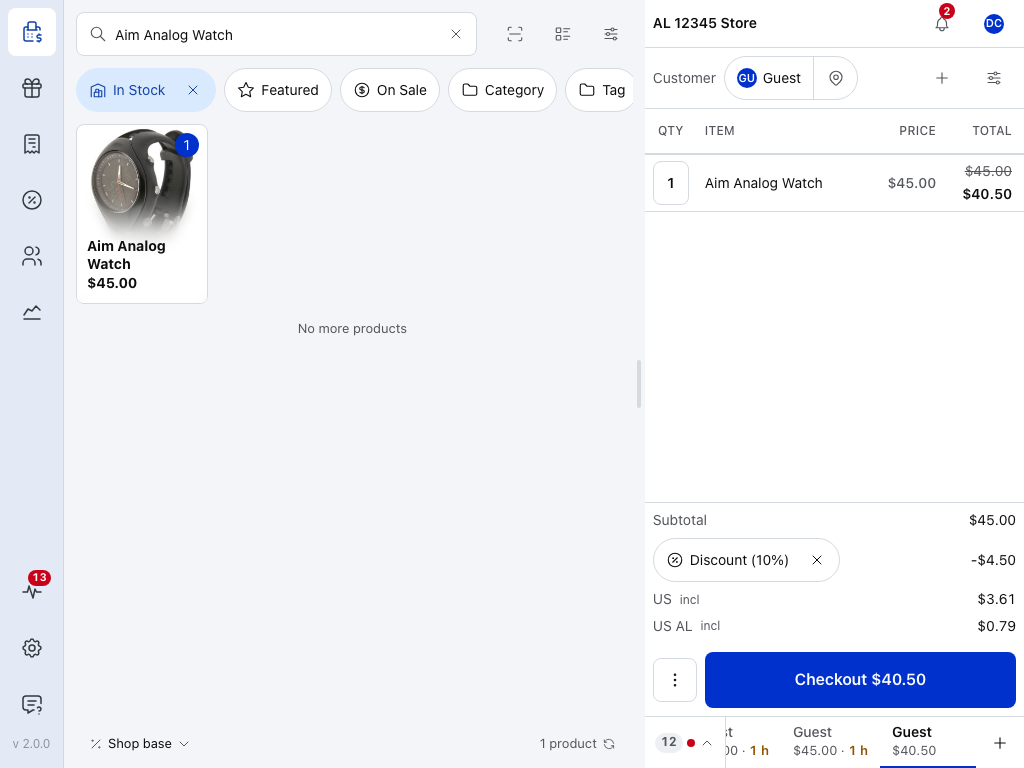
- Line total — the price before the discount, struck through, and what the customer pays now.
- Subtotal — the order before the discount.
- Discount (10%) — the discount and how much it takes off. Discount alone means a fixed amount. Press ✕ to remove it.
- Checkout — the new total.
A fixed amount is shared across the items in proportion to their prices. A percentage comes off every item. You can add more than one discount to an order; each appears on its own row.
Add Discount works offline, and tax is worked out on the lower price. It doesn't create a coupon in your store.
Remove a discount
Press ✕ on its row in the totals. The line totals go back, and a message says Discount removed. Prices you changed on lines stay as you set them.
Apply a coupon
In Add Discount, switch to Coupon. This works on the free plugin too.
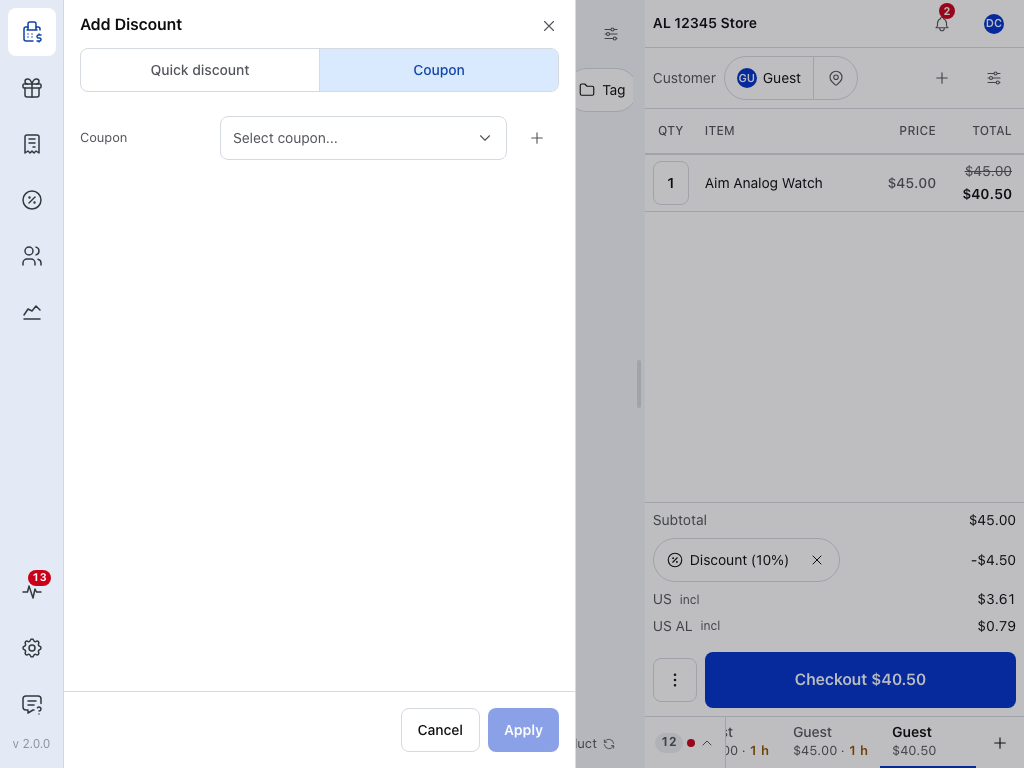
- Select coupon — type part of the code to find it.
- New coupon (WCPOS Pro) — make a coupon now. See Create a coupon at the till.
- Apply — checks the coupon's rules and puts it on the order.
A coupon that can't be used on this order says why. For what each message means, removing a coupon, and coupons offline, see Applying Coupons.
Create a coupon at the till
Making a coupon at the till needs WCPOS Pro. On the free plugin, New coupon says Upgrade to Pro.
- Press New coupon on the Coupon tab.
- Type a code, or press Generate.
- Choose the discount type and type how much it takes off.
- Set Expires, and any other rules the coupon needs.
- Press Add Coupon. The coupon is saved to your store first, then applied to this sale, and a message says … saved and applied to this sale.
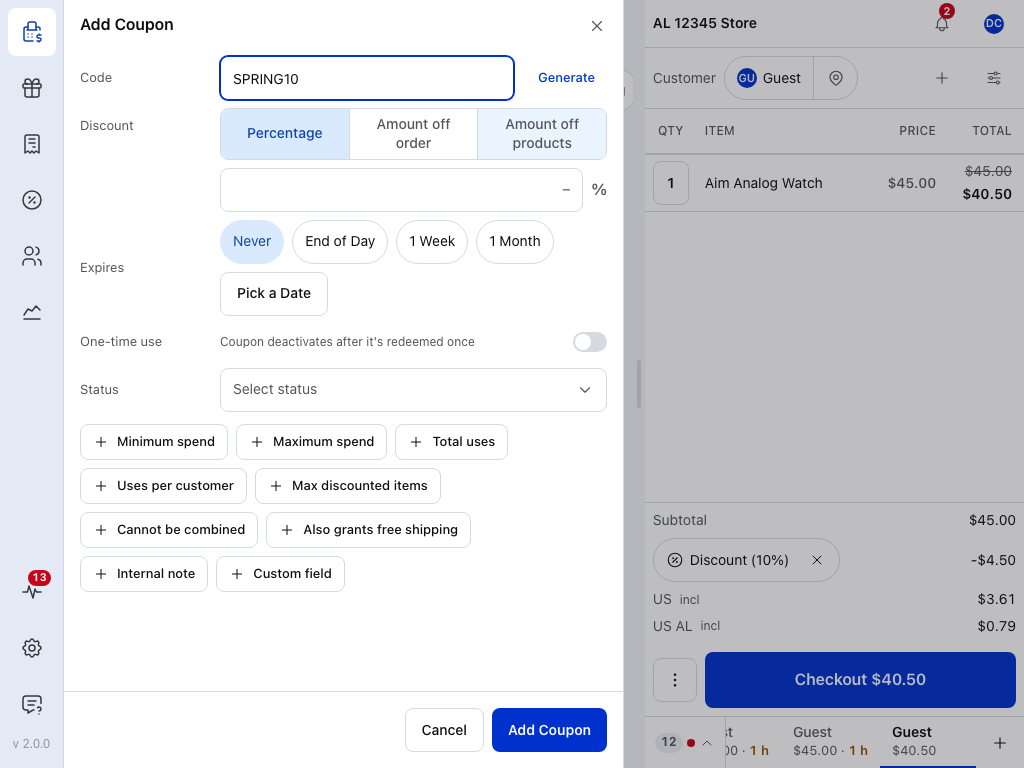
- Code — the code customers will use. It's the only field you must fill in.
- Generate — makes up a code for you.
- Discount — a percentage, an amount off the order, or an amount off the products, and how much.
- Expires — how long the coupon lasts.
- One-time use — the coupon stops working after it's used once.
- More rules — Minimum spend, Total uses, Cannot be combined and the rest each add one of WooCommerce's coupon rules.
- Add Coupon — saves the coupon to your store, then applies it to this sale.
The coupon is a real WooCommerce coupon, so it's there for the next sale, in WP Admin → Marketing → Coupons, and in reports. To make coupons from the Coupons screen instead, see Creating coupons.
Set your quick discount keys
The keys are set on each device. Press the sliders button at the top of the cart to open Cart Settings. Quick Discounts shows the keys as the cashier sees them on the price keypad. A new device starts with 5%, 10% and 15%.
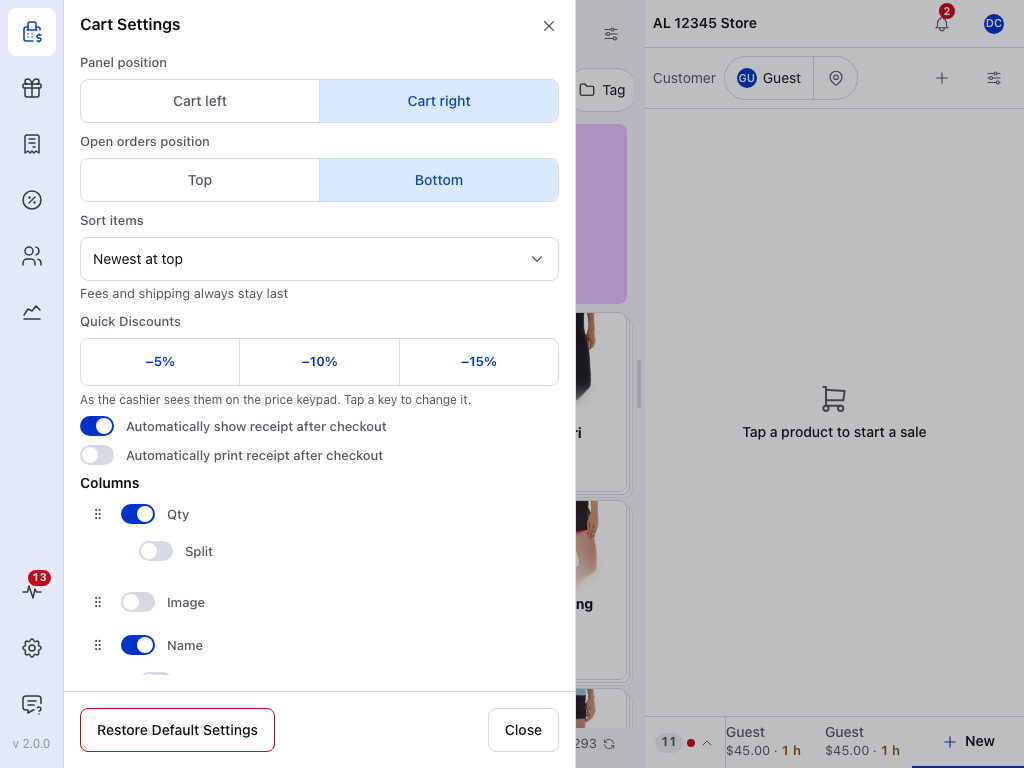
- First key — tap it and type a percentage up to 100, such as 5 or 12.5.
- Second key — the same.
- Third key — the same. You can have up to three keys.
- Split — turn it on to show Split under a line's quantity. See Different prices on the same product.
To take a key away, type 0 on it. The remaining keys stretch to fill the row. With no keys at all, the price keypad shows only the digits. There are no fixed-amount keys; for an amount off, type the new price or use Add Discount.
Different prices on the same product
A customer buys three of something and gets one at a lower price. Turn on Split under Columns → Qty in Cart Settings. A line with more than one item then shows Split under its quantity.
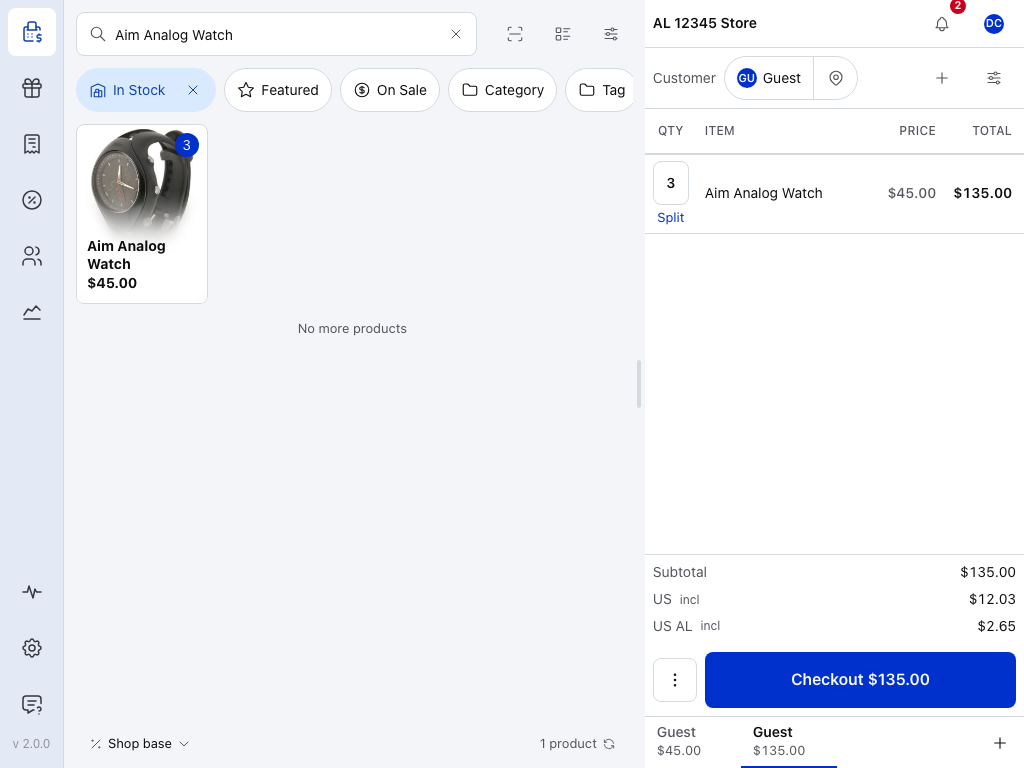
- Split — turns the line into one line per item.
- Price — each new line keeps this price until you change it.
- Line total — all three together. After Split, each new line shows its own.
Press Split and the line becomes one line for each item, every one at the same price. Lower the price on the lines you want to discount. A quantity such as 2.5 splits into two lines of one and a line of 0.5. See Splitting Line Items.
If something goes wrong
- You opened the price by mistake. Press the lit key again, or Delete until it's empty, then Done: the price stays as it was. On a keyboard, press Escape.
- You set the wrong price on a line. Tap the price again and type the right one, or remove the line and add the product again to start from its store price.
- Enter an amount greater than zero or Enter a percentage above 0 and up to 100 — the Add Discount amount is empty or out of range.
- … is already on the order, and it can't be combined with other coupons. — a coupon marked Individual use only is on the order. Remove it first, or leave the discount off.
- New coupon is greyed out — its tooltip says why: Upgrade to Pro, no permission (an administrator grants it in WP Admin → POS → Settings → Access), or Coupons are created when the store is reachable. You can still apply coupons your store already has.
- … saved but not applied — the coupon is in your store, but its rules don't fit this order. Check its rules, or pick it again from Select coupon once the order fits.
- A fee cannot be negative. Use Add Discount instead. — the POS doesn't take money off with a minus fee. Use Add Discount. For fees themselves, including Amount Includes Tax, see Fees.
POS Discounts vs WooCommerce Coupons
A line price (a quick key or a typed price) — one line, set by the cashier. No rules. Best for a price match, a staff price or a damaged item.
Add Discount — the whole order, set by the cashier. No rules of its own, but it can't join a coupon marked Individual use only. Best for a one-off amount or percentage off.
A WooCommerce coupon — whatever its rules allow: usage limits, products, minimum spend, expiry, customer email. Set up in your store (see Creating coupons), or at the till with Pro. Best for promotions you want to limit and report on.
Known Limitations
- No automatic discount rules. The POS doesn't do "buy 2, get 1 free" on its own. Use WooCommerce coupons for structured promotions.
- Quick discount keys are percentages only. For an amount off, type the new price, or use Add Discount with $.
How discounts are recorded
None of this changes what you do at the till. It explains what reports and receipts show, and why older orders can look different. The full background, including how the prices are stored, is in the POS Discount Reference.
For managers: how discounts show in reports and receipts
Why price changes and coupons are tracked differently
A quick discount key or a typed price is recorded the way WooCommerce records a sale price: the item is sold at the price the cashier set. So the Discount total stays at zero, coupons work from the lowered price, and coupons with Exclude sale items skip items whose price was lowered.
Add Discount is recorded as a coupon line, and a WooCommerce coupon as itself, so both count in the Discount total.
How WooCommerce records coupons and sale prices
WooCommerce has exactly one built-in idea of a discount: the coupon. A coupon belongs to the order. It's recorded in its own field, counted in the Discount column of reports, and carries its own rules such as usage limits and expiry dates.
A sale price is not a discount to WooCommerce. It's simply the product's price right now: when an item on sale is sold, the order records the price paid and nothing else. Reports count it as ordinary revenue.
Receipts are the one place customers expect to see what they saved, so WCPOS records the regular price alongside the new price on each line. A receipt can then show sale savings and coupon discounts as separate figures without counting either twice, and without changing WooCommerce's totals or reports.
How POS Price Changes Interact with Coupons
Say a cashier lowers an item from $18 to $16, then applies a coupon. The coupon works from $16, not $18, so the customer isn't discounted twice against the original price.
- An item whose price was lowered at the till counts as on sale, the same as a WooCommerce sale price. A price raised at the till doesn't. A coupon with Exclude sale items skips items on sale, and a fixed cart coupon with Exclude sale items can't be used at all while one is in the cart.
- Removing a coupon leaves each line at the price set at the till.
Add Discount lines are coupon lines named pos-discount, then pos-discount-2, and so on. The wcpos_item_is_on_sale filter changes what counts as on sale. For how till prices are stored and the other filters, see the POS Discount Reference.
Orders with a negative fee
Before 2.0, a cashier could take money off an order with a negative fee. The POS no longer allows that, but older orders can still carry one.
How WCPOS taxes a negative fee, and how WooCommerce differs
WCPOS taxes a negative fee from the fee's own tax settings. With its tax status set to None, no tax is applied to it, and the amount on the fee is the amount taken off: a fee of -10.00 means the customer pays 10 less. Left Taxable, it's taxed at its own tax class, so that tax comes off as well.
WooCommerce on its own does this differently. It spreads a negative fee's tax across every other item in the order, ignoring the fee's tax status. On a store where Prices Entered With Tax is Yes, it would also take 12.00 off for a -10.00 fee at a 20% rate. WCPOS keeps the amount the cashier entered.
This belongs to the order, not to the app you open it in: recalculating a POS order from WP Admin → Orders keeps it. Orders that didn't come from the POS keep WooCommerce's behaviour.
With the fee's tax status set to None, the customer pays the right total but the tax recorded on the order doesn't go down, so it's slightly higher than the lower total warrants. It errs in the tax authority's favour, never the other way. A taxable negative fee takes tax off at its own tax class's rate. Discounts made with Add Discount are coupon lines, so tax is worked out on the lower price.
What changed in v1.9.0
If you upgraded from v1.8 and the Discount total on receipts and reports now shows 0, this is why. Earlier versions recorded a till price change as a WooCommerce discount, which broke coupon math: a coupon applied on top worked from the original price, so the customer was undercharged. From v1.9.0, the price set at the till is the line price, exactly as WooCommerce records a product on sale, and only coupons count as discounts. See Why price changes and coupons are tracked differently.
What this means for you
Receipts, reports, coupons and stored prices since v1.9.0
- Receipts can show the regular price, the saving against it, and a combined Total saved for those savings plus coupons. Price savings stay separate from the WooCommerce Discount field.
- Reports show
discount_total = 0when only line prices were changed. Only coupons are counted, and Add Discount counts as a coupon. - Coupons calculate correctly on items whose price was lowered at the till.
- The regular and selling prices are stored in the line's POS metadata (
_woocommerce_pos_data), so a receipt can show the saving without changing WooCommerce's discount totals.
Showing the original price and savings on receipts
The bundled templates that show prices include the regular price and the saving when a product is on sale or its price was changed at the till. They also show Total saved when WCPOS can work out a complete figure for the order. That total combines regular-price savings with coupon discounts without counting either twice.
Update a receipt template you made before v1.9.0
Templates copied from the gallery are your own copies, and WCPOS updates don't overwrite them. If you made your receipt before this change, either:
- click Use Template on a fresh copy of the bundled template; or
- add the fields from the Receipt Data Reference to your template.
The fields for savings:
| Field | Meaning |
|---|---|
lines[].regular_price_display | Recorded regular unit price |
lines[].selling_price_display | Selling unit price before coupons |
lines[].unit_savings_display | Saving per item |
lines[].line_regular_total_display | Regular-price total for the line |
lines[].line_savings_display | Total saving for the line |
totals.sale_savings_total_display | Total regular-to-selling-price savings from catalogue sales and till price changes |
totals.discount_total_display | WooCommerce discount total: coupons, including Add Discount |
totals.total_saved_display | Combined regular-price savings and WooCommerce discounts |
totals.total_saved_complete | Whether the combined total is complete and safe to display |
Most of these fields are only there when the order has the data behind them. Custom templates should guard each one, and hide the Total saved row when the figure is incomplete or nothing was saved. The Receipt Data Reference has the pattern.
WooCommerce reports are unchanged: their discount totals hold coupons, not sale-price or till-price savings. Use totals.total_saved for receipts, and use a coupon or Add Discount when a saving must also show as a WooCommerce discount in reports.