Close the Register
At the end of the day you count the drawer, close the register and match the card terminal. The count is filed as a numbered closure you can print and find again. This page walks through one close, from checking the drawer to signing out.
Everything here depends on Open and close the register. With it off, there's no drawer to count. See Registers for the setting, and Open the Register for the start of the day.
Check the drawer
Open Reports. The strip at the top is the open session on this register: how the cash in the drawer should add up.
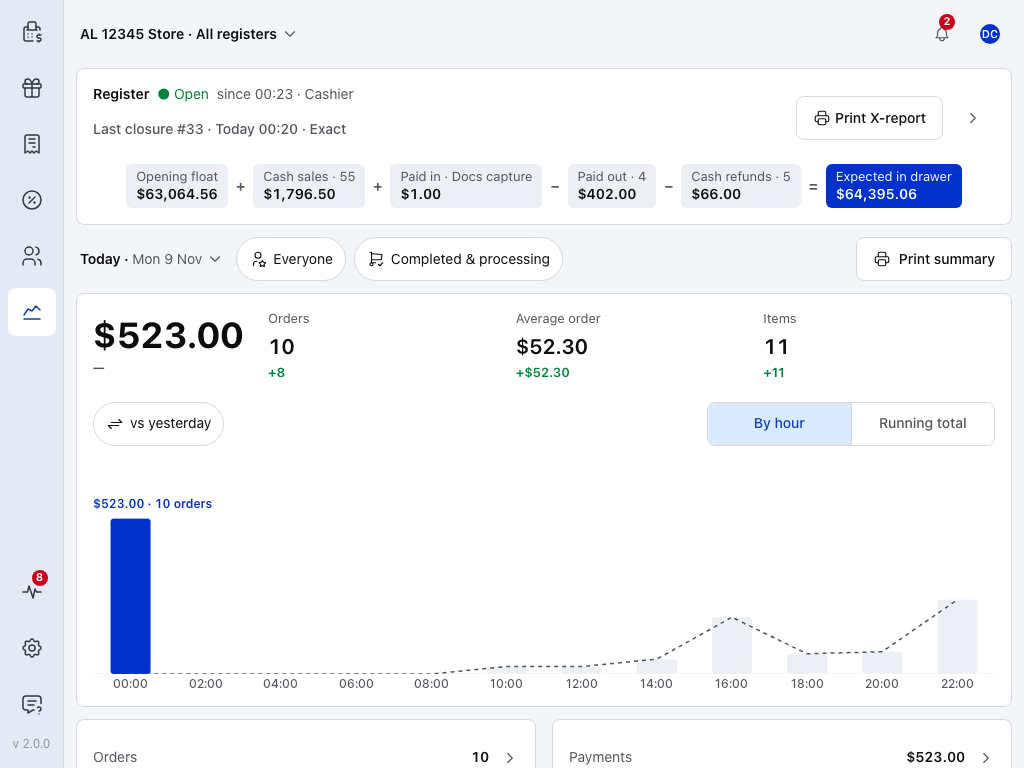
- Open — the register's status: Open now, Closed after the close.
- Since — when the register opened and who opened it.
- Print X-report — prints the session so far without closing it.
- Closures (WCPOS Pro) — every closure, with earlier days and other registers. It leads with the net difference, and each row shows Expected, Counted and Difference. See Reconciliation.
Under them, the strip adds up the drawer, with the last closure above it:

- Opening float — the cash the register opened with.
- Cash sales — how many, and how much.
- Paid out — cash taken out of the drawer, and how many times.
- Cash refunds — cash handed back.
- Expected in drawer — the blue figure: the cash the register expects to find. That's what your count should come to.
Expected in drawer is the opening float plus cash sales and paid in, less cash refunds and paid out. Each of those joins the strip once the session has one: Cash sales, Cash refunds, Paid in and Paid out (see Move cash in and out). On another device than the one that opened the register, the strip shows only Expected in drawer. A cashier who counts blind sees no figures here.
After the close, the same strip shows Closed with the time and who closed it, Last closure with its number, Expected, Counted and the Drawer result. Its button becomes Print closure and prints the closure again.
Count the drawer
Finish the last sale first. Tap your avatar, then In the drawer. The register panel opens with the cash in the drawer at the top.
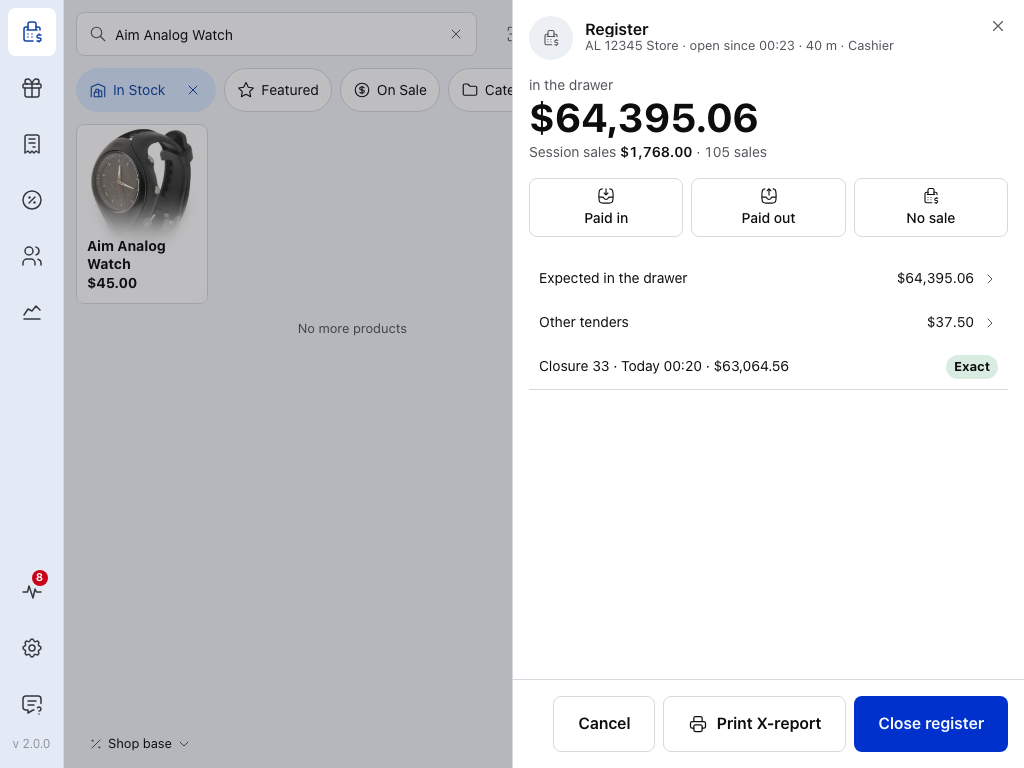
- In the drawer — the cash the drawer should hold now, with the session's sales under it.
- Expected in the drawer — tap it for the lines that make it up.
- Close register — starts the count.
Paid in, Paid out and No sale are for cash moved during the day; see Open the Register.
Press Close register. The register stops taking sales while you count; the back arrow (‹) at the top of the count takes you back to the cart if a customer walks up.
Count the cash, float included, and type the total on the keypad under the amount. When you move on to the note or the buttons, the keypad folds away. To change the amount, tap it.
If you took cards, get the batch total from the card terminal now. Open Other tenders and type it in Card counted before you press Close & print; the closure then shows your card count beside what the POS recorded.
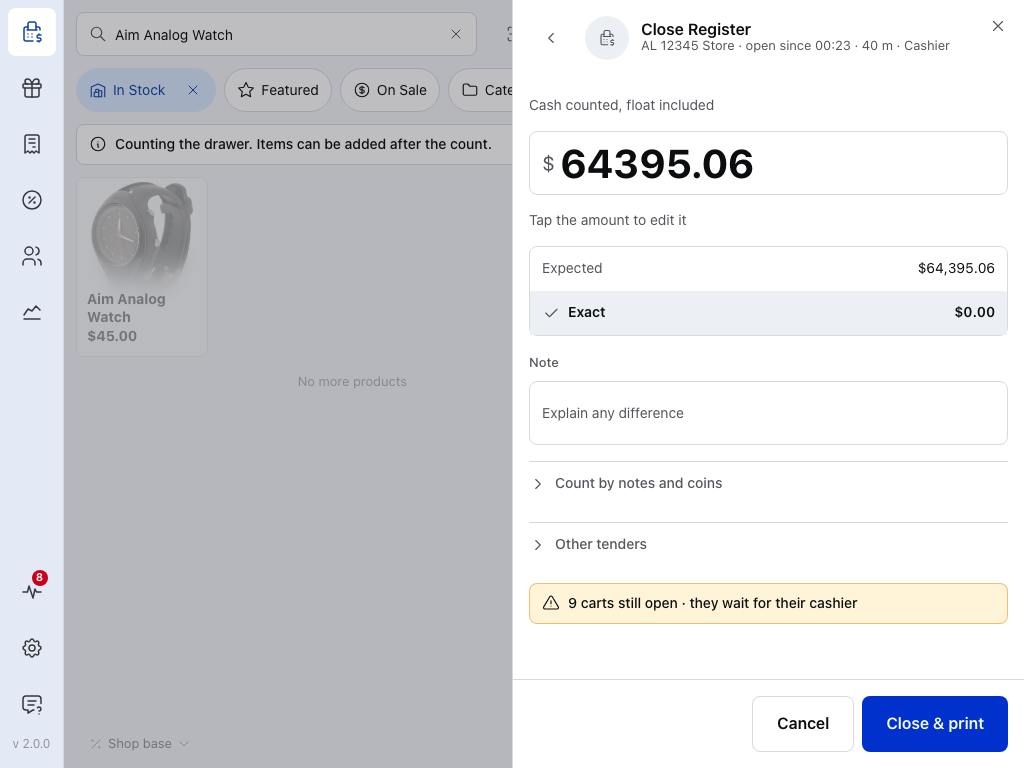
- ‹ Back to selling — leave the count and sell again. Count again before you close.
- Cash counted, float included — what's in the drawer.
- Tap the amount to edit it — tap the amount and the keypad comes back.
- Expected — what the register expects. It appears once you've entered an amount. A cashier who counts blind (their role can't see expected figures) doesn't see it or the difference; see Access.
- Exact — the difference: Exact with a tick, or the amount short or over.
- Note — Explain any difference: a wrong change, a payout with no slip. The note is kept on the closure.
- Count by notes and coins — tap a note or coin once for each one you count, or hold it to add ten. The amount becomes their total; Clear starts again.
- Other tenders — a box for each other payment method this session took, such as Card counted, for the total from the terminal or slips. With cash sales only, it's empty.
- Close & print — writes the closure. It reads Approve & close when the difference is over your limit, and a manager signs in.
File the closure
Press Close & print. The count is written as the register's next numbered closure, and the closure opens with its result first.
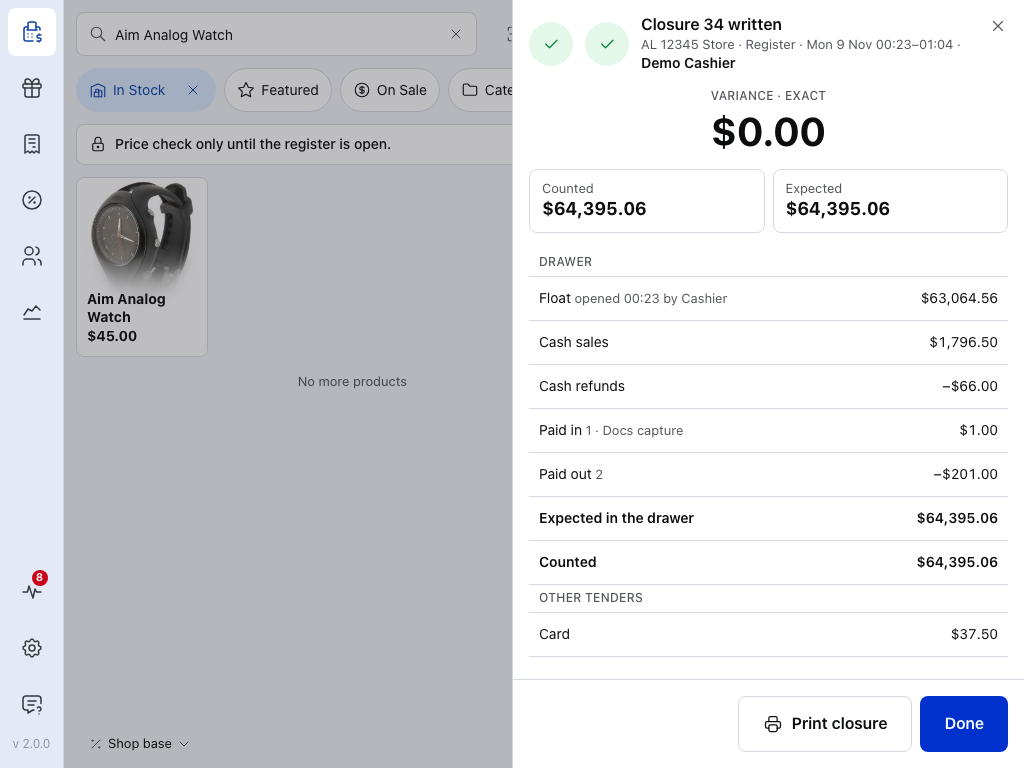
- Closure N written — the closure's number, the store and register, the session's times and who closed it.
- Variance — the result in large type: Exact, or the amount short or over.
- Counted — the cash you entered.
- Expected — what the register expected.
- Drawer — every line from the float to the counted cash, with Expected in the drawer before Counted.
- Print closure — prints it, or prints it again. Once it has printed, the sheet says Printed on and the time. A cashier who counts blind has no print button here.
- Done — back to a closed register, ready for tomorrow's float.
A note from the count sits under the figures as Note. Below the drawer lines come Other tenders and the Session: cashiers, sales, items sold, discounts, average sale and drawer openings. Last is Closure paper, which says whether the closure has printed (printed once, or not printed yet). It opens on the template and printer for this closure, with a preview of the paper.
Which printer the closure prints on
It's set on each device: Settings → Printing → Closure templates. The X-report and the hand-over slip print on those templates too; Report templates cover the summaries printed from Reports. See Print routing.
Match the card and drop the cash
- Check the Card line under Other tenders on the closure: the card payments the POS recorded. It should match the terminal's batch total. If you typed a card count, it shows below that line with its difference. Settle the batch now if your terminal doesn't do it for you.
- Put tomorrow's float back in the drawer.
- Bag the rest with the printed closure for the safe.
Sign out
Tap your avatar, then Sign out. With the register closed, you're signed out straight away.
If the register is still open
The POS asks first.
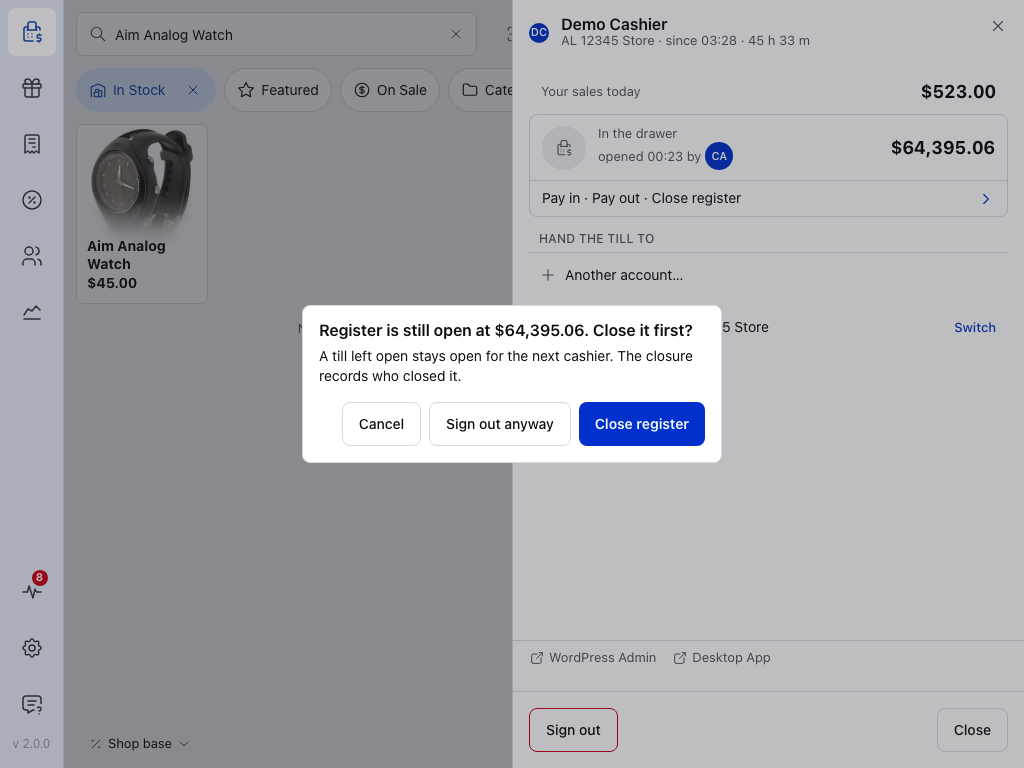
- Still open — the register's name and the cash it expects. A cashier who counts blind sees no amount.
- Close register — goes straight to the count.
- Sign out anyway — leaves the register open for the next cashier. The closure records whoever closes it.
- Cancel — back to your cashier sheet.
If something goes wrong
The count is out. Count again first, coins included. Then enter what you counted and say why in the Note. If the difference is over Ask a manager when the count is out by more than (Registers), a manager approves with their WordPress username and password. Approval needs a connection to the store: offline, the manager's sign-in says Approval needs a connection and its Approve button stays off. The Reconciliation walkthrough lists where differences usually hide.
"N sales not yet on the server — the closure will record them". Sales from this device haven't reached the store yet. You can still close. When they arrive, they're added beside the closure as Late corrections, like any sale that arrives after the close.
"Figures arrive with the next sync." The register is waiting for its figures from the store. Close register stays off until they arrive. Check the connection and stay on the page.
"N carts still open · they wait for their cashier". Open carts don't block the close. They stay for whoever started them.
"$N in cash was refused by the store". The store refused a pay in or pay out from this session, so it has no record of that cash. Tick I understand, close anyway and Close & print comes back on; the closure shows the cash as not on the server. If the store refuses another movement after that, the count asks again.
"N movements refused by the store". The register panel lists them with Retry. Press it to send them again. A closure that was held back by one of them goes back in the queue too, and sends once the movement is on the server.
"The store refused this close. Your count is kept." Your count is still there and the button reads Retry. Check the count and press Retry; Learn more explains the refusal.
A sale arrives after the close. It's recorded as a late correction beside that closure. The closure itself is never rewritten. See A sale went through after I closed.
Reports says "No register on this device". This device hasn't picked a register, or the store doesn't use them. See Choosing a store and a register.
Store health flags a register
Open Health, then Database. The Registers block checks each till's numbering:
- Closures numbered in order — when this check fails, it names closure numbers that were skipped, closures printed with a different number, or closures whose totals disagree with the server. Closures are never renumbered, and this check covers every closure, not only recent ones.
- N skipped numbers — a receipt number was taken but the sale never completed. Nothing is lost.
- Counter restarted on N till — the same receipt number is on more than one sale. Nothing is lost.
- N sales stamped by a clock running ahead — set the date and time on the till it names.
See Store Health.
Pro adds more registers per store, the Reports history beyond today, and the Closures view. Each store can also choose its own closure and report templates in its store settings; see Setting up stores.