HTML Templates
WP admin: HTML templates are edited in WP Admin → POS → Templates.
Change a receipt's wording or layout by editing an HTML template: a receipt laid out like a web page, with {{placeholders}} where the order's details go. To switch to another ready-made receipt instead, see Customise Your Receipt.
HTML or thermal?
Use HTML for browser printing, PDFs, A4 invoices and printers that print web pages. For a receipt printer that takes ESC/POS commands, use a thermal template instead. HTML is the engine we recommend for most stores. The POS fills an HTML template in on the device itself, so it previews and prints even when the connection to your store is down.
Go straight to: Write a template · Syntax · Common patterns · If something goes wrong
Write a template
Don't start from a blank page: copy a gallery template, then edit the copy.
-
In the Template Gallery, press Use Template on the card closest to what you want. You get your own copy under Your Templates; the gallery original stays as it is.
-
Open your copy. Fields lists every placeholder: search it, then Insert, so you don't have to remember the names. Preview fills the template in with Sample Data or one of your POS orders as you type.
-
Change what you need. For example, to add a returns line to your copy of Standard Receipt, find
{{i18n.thank_you_purchase}}near the end. The next</div>closes the footer. Copy these lines after that</div>:<div style="text-align: center;">Returns within 30 dayswith this receipt.</div>Typed text prints exactly as typed, in one language. Put styles on each element (
style="…"), as here, not in a<style>block: see Styles can disappear when you print. -
Press Update. Every receipt printed with your copy now shows your change, such as the returns line under the footer message.
-
In Your Templates, turn on Active, so the POS offers the template at the till.
Make this the first template at the till
The till lists active templates in the order of Your Templates and starts each sale on the first. Move yours up by dragging the ≡ grip on its row, or with the ↑ and ↓ buttons in its Actions column. A store with its own template list keeps its own order. See What cashiers see at the till.
-
Check it in the POS before the till relies on it: see Check it in the POS.
Check it in the POS
The editor's preview forgives mistakes that the POS doesn't, so a template is ready only once it looks right at the till.
For a quick look at the layout, you don't need a sale: put an item in the cart, press ⋮ beside Checkout, then Print. The Template picker and preview open for the cart's order. An HTML template previews there even before the order reaches the store; the Legacy PHP Template asks you to sync the order first.
Before the till relies on it, check every amount on a real sale:
- Ring up an order like your busiest ones: a discounted line, a taxed product, and a cash payment with change.
- On the paid screen, pick your template under Template.
- Read the preview: names, prices, discount, tax rows, tendered and change.
- Print it the way the till will, with Print Receipt or Download PDF, and check the paper or the file too. Styles can disappear when you print.
The paid screen, with the gallery's Standard Receipt picked:
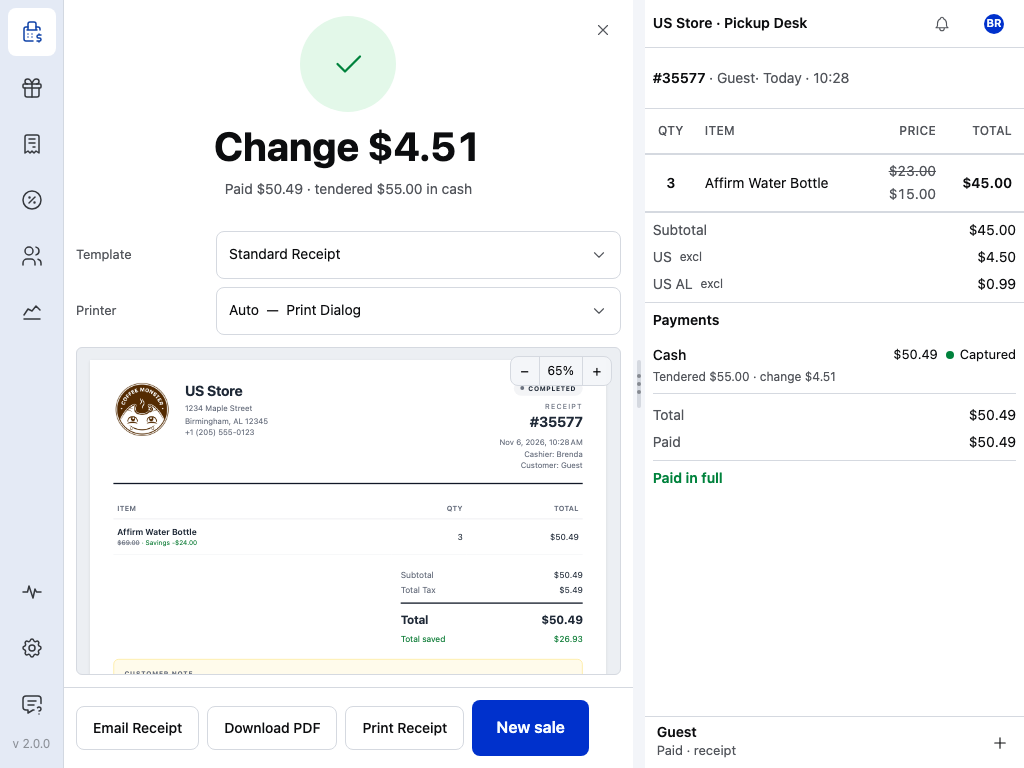
- Change — what to give back. On a receipt, that's
{{change_display}}inside{{#payments}}. - Paid with — the amount and how it was paid:
{{amount_display}}and{{method_title}}on a receipt. - Template — pick your template here. Only active templates are listed; a pick lasts for this sale. See Customise Your Receipt.
- Printer — where it prints. See Print the receipt.
- Preview — your template, filled in with this sale by the POS: the receipt as it will print. − and + zoom it.
- Print Receipt — prints it on the printer above.
- Email Receipt — sends it to the customer.
- New sale — an empty cart for the next customer.
Download PDF, beside Email Receipt, has the store render the receipt as a PDF, so it needs a connection. More on this screen: Receipts at Checkout.
Every Use Template makes a fresh copy. While you experiment, make two copies (Receipt v1, Receipt v2) and switch between them at the till.
Syntax
The placeholders use Mustache, a small template language. It has no logic of its own. It does three things: fills in a value, repeats a block for each item in a list, and shows or hides a block.
Variables
Put a field's name in double curly braces:
<h1>{{store.name}}</h1>
<p>Order #{{order.number}}</p>
<p>Total: {{totals.total_display}}</p>
A field ending in _display is the money already formatted for your store ($12.50 rather than 12.5). The Receipt Data Reference lists every field.
Escaping
{{field}} prints the value as plain text: a < in a product name shows as <, never as HTML. Three braces, {{{field}}}, print it as HTML. That HTML is still cleaned before it prints (see Styling), so a field can never add a script.
Sections (Loops and Conditionals)
{{#section}}...{{/section}} repeats the block for each item in a list, or shows it once when the value is there.
Example: one row per line item
{{#lines}}
<div class="line-item">
  <span>{{name}} × {{qty}}</span>
  <span>{{line_total_display}}</span>
</div>
{{/lines}}
Inside a section, a name is looked up on the current item first, then outside it. That is why {{i18n.tendered}} works inside {{#payments}}. {{.}} is the current item itself, for a list of plain text such as store.address_lines.
Inverted Sections
{{^section}}...{{/section}} shows the block when the value is missing, empty, false or 0.
Example: customer name, or "Guest checkout"
{{#customer.id}}
  <p>Customer: {{customer.name}}</p>
{{/customer.id}}
{{^customer.id}}
  <p>Guest checkout</p>
{{/customer.id}}
Localised Labels
{{i18n.key}} prints a label in your store's language, so one template works in every store.
Example: a translated Subtotal label
<th>{{i18n.subtotal}}</th>
<td>{{totals.subtotal_display}}</td>
The labels follow the store's WordPress language, not the language the cashier has chosen in the app. Every key is in the i18n reference.
What the POS doesn't support
- Partials (
{{> name}}) print nothing in the POS. Put everything in one template. - Lambdas (functions in place of values) aren't possible: the receipt data holds plain values only.
- Comments (
{{! a note }}) and changed delimiters ({{=<% %>=}}) work as in any Mustache.
Common Patterns
Store Header
store.address_lines holds the address already split into lines. Loop over it rather than joining the address fields yourself.
Example: logo, name, address, phone and tax IDs
<div style="text-align: center;">
  {{#store.logo}}<img src="{{store.logo}}" alt="{{store.name}}" style="max-width: 200px;" />{{/store.logo}}
  <h1 style="margin: 8px 0;">{{store.name}}</h1>
  {{#store.address_lines}}<div>{{.}}</div>{{/store.address_lines}}
  {{#store.phone}}<div>{{store.phone}}</div>{{/store.phone}}
  {{#store.tax_ids}}<div>{{label}}: {{value}}</div>{{/store.tax_ids}}
</div>
The logo comes from the store's settings, not the template. See Customise Your Receipt.
Line Items with Discounts
A line's discounts is the discount as a positive number, or 0 when there is none. Mustache treats 0 as empty, so {{#discounts}}...{{/discounts}} shows the block only on a discounted line.
Example: each line with its discount
{{#lines}}
<div class="line-item" style="display: flex; justify-content: space-between;">
  <div>
    <div>{{name}} × {{qty}}</div>
    {{#discounts}}
      <div style="font-size: 0.9em;">
        <s>{{line_subtotal_display}}</s> −{{discounts_display}}
      </div>
    {{/discounts}}
  </div>
  <div>{{line_total_display}}</div>
</div>
{{/lines}}
line_subtotal_display is the line before discounts, line_total_display after. For sale prices and savings, see Displaying regular price and savings.
Tax Summary
tax_summary has one row per tax rate. rate is a percentage, such as 10. It can be empty (a 0% rate, or a receipt printed offline), so the {{#rate}} guard keeps a bare (%) off the receipt.
Example: one row per tax rate
{{#tax_summary}}
<div class="tax-line" style="display: flex; justify-content: space-between;">
  <span>{{label}}{{#rate}} ({{rate}}%){{/rate}}</span>
  <span>{{tax_amount_display}}</span>
</div>
{{/tax_summary}}
Payment Details
Printed before the order reaches your store, offline for example? The receipt leaves out the cash received and the change. Reprint it once the order syncs. The paid screen shows the change either way.
Why, and an example with tendered and change
The paid screen's Change is worked out by the POS itself. The receipt's tendered and change fields come from your store, so until the order syncs they are empty and the {{#tendered}} block is skipped.
{{#payments}}
<div class="payment" style="display: flex; justify-content: space-between;">
  <span>{{method_title}}</span>
  <span>{{amount_display}}</span>
</div>
{{#tendered}}
  <div style="display: flex; justify-content: space-between;">
    <span>{{i18n.tendered}}</span><span>{{tendered_display}}</span>
  </div>
  <div style="display: flex; justify-content: space-between;">
    <span>{{i18n.change}}</span><span>{{change_display}}</span>
  </div>
{{/tendered}}
{{/payments}}
Barcodes and QR Codes
Use the same elements as thermal templates. The value goes inside the element, and the POS draws the code in its place.
Example: Code 128, EAN-13 and a QR code
<!-- Code 128 barcode of the order number -->
<barcode type="code128" height="40">{{order.number}}</barcode>

<!-- EAN-13 of each product, when your SKUs are EAN numbers -->
{{#lines}}<barcode type="ean13" height="30">{{sku}}</barcode>{{/lines}}

<!-- QR code: size sets how big, 4 by default -->
{{#order.payment_url}}<qrcode size="4">{{order.payment_url}}</qrcode>{{/order.payment_url}}
- Always set
type. Without it, the POS draws Code 128 and the store's PDF draws a QR code. - For order numbers, use Code 128. Use EAN-13 only when the SKU is a valid EAN product code.
Barcode types, QR sizes and placeholder types
-
Pick from these types:
code128,code39,code93,ean13,ean8,upca,upce,codabar,itfandqrcode. The POS can draw other bwip-js types such aspdf417, but the editor preview and the PDF draw those as Code 128. -
Use
<qrcode size="…">for QR codes.<barcode type="qrcode">(orqr) also draws one, but the POS sizes it fromheightand the PDF fromsize, so the two don't match. -
typecan be a placeholder, because the placeholders are filled in before the codes are drawn:<barcode type="{{presentation_hints.order_barcode_type}}">{{order.number}}</barcode>
If the value doesn't fit the type, the POS shows a Barcode error or QR code error block with the value in it. Fix the value or pick a type that takes it. The PDF prints the bare value instead.
Styling
Style each element inline, with a style="…" attribute, as the gallery templates do:
<div style="font-family: monospace; font-size: 12px; max-width: 300px; margin: 0 auto;">
  <div style="text-align: center; margin-bottom: 16px;">
    <strong style="font-size: 16px;">{{store.name}}</strong>
  </div>
  <div style="display: flex; justify-content: space-between; font-weight: 700; border-top: 1px solid black; padding-top: 8px;">
    <span>{{i18n.total}}</span>
    <span>{{totals.total_display}}</span>
  </div>
</div>
A <style> block looks fine in the template editor's preview, because the editor shows your HTML as written. The store's PDF and the mobile apps remove <style> blocks before they print, so the same receipt comes out unstyled there. Keep every style inline.
Which HTML is removed?
The receipt is cleaned before it prints, so a template can never run code. Scripts, <link> and <meta> tags and on… attributes are removed wherever it prints. The store's PDF removes <style> blocks, <head> and the other document-level tags; the mobile apps remove <style> blocks too.
Receipts are usually printed on black-and-white thermal or laser printers. Use font weight, whitespace, type size and horizontal rules for hierarchy rather than coloured fills. Coloured backgrounds and grey text either disappear or print as muddy halftones.
Press Use Template on the Narrow Receipt card in the gallery. It's a monospace layout 72 mm wide that prints cleanly from the browser, on printers that print web pages (Sunmi and iMin devices), and on standard paper. For a raw ESC/POS printer, use a Simple Thermal Receipt (58mm or 80mm) instead.
Best Practices
- Use
_displayfields for money: they carry your store's currency format. - Use
{{i18n.*}}labels instead of typed text, so the template works in every store's language. - Wrap optional fields in sections,
{{#field}}...{{/field}}, so nothing prints when they're empty. - Start from a gallery template rather than a blank page.
- Check it in the POS on a real order, with a discount, a tax line and a cash payment, before the till relies on it.
If something goes wrong
Styles show in the editor but not on the receipt. Move them inline. See Styles can disappear when you print.
A field prints nothing. Check its name against the Receipt Data Reference; a misspelt or unknown field prints empty, with no error. Inside a section, the name is looked up on the current item first.
The receipt shows a Barcode error block. The value doesn't fit the barcode type. See Barcodes and QR Codes.
Tendered and change are missing from the receipt. It was printed offline, before the order reached your store; the paid screen still showed the change. Reprint it once the order has synced. See Offline Mode.
The template isn't in the till's Template list. It isn't Active, or a store has its own template list. See Customise Your Receipt.
The editor's preview says "Template rendering error". A section isn't closed, or a closing tag doesn't match its opening one. Every {{#x}} and {{^x}} needs its own {{/x}}.