Open Orders
Every sale you start is an open order until it's paid. Keep several going at once: a customer who went back for one more thing, a table running a tab, a phone order waiting for collection. Each one waits in its own tab under the cart, saved on this device, and nothing is lost when you switch away.
Save to Server is now Sync order, and Void is no longer a red button beside Checkout. Both are in Order details: press ⋮ beside Checkout. See Order details.
Switch between orders
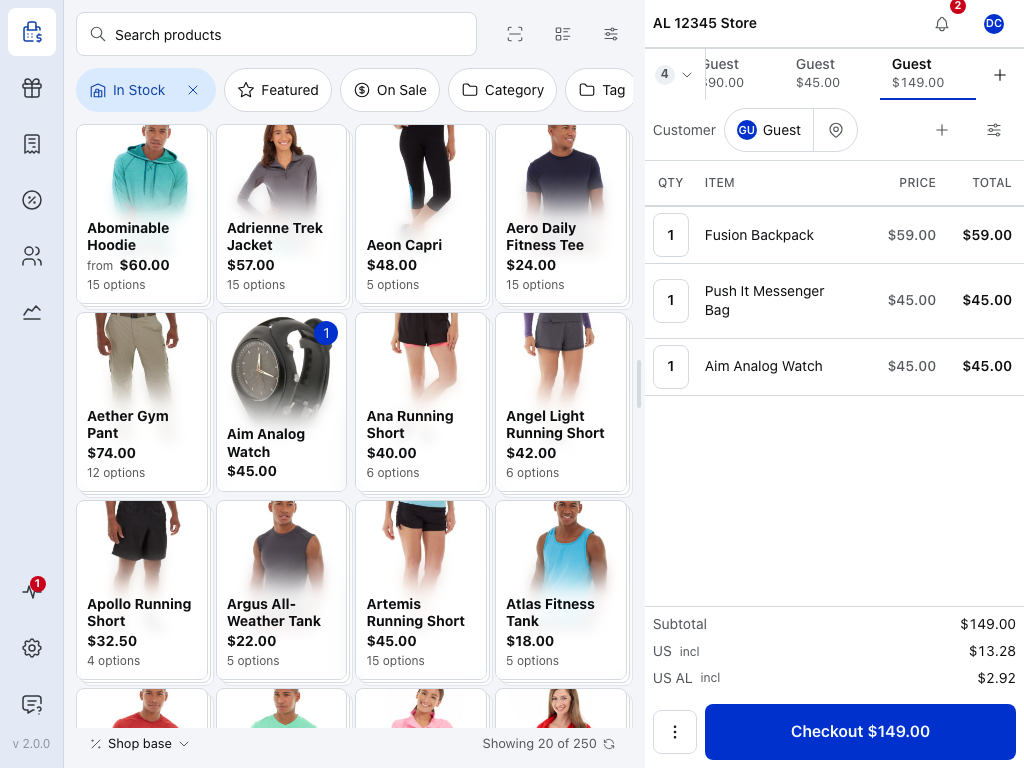
The strip under the cart holds one tab per open order, oldest first. Tap a tab and its cart opens.
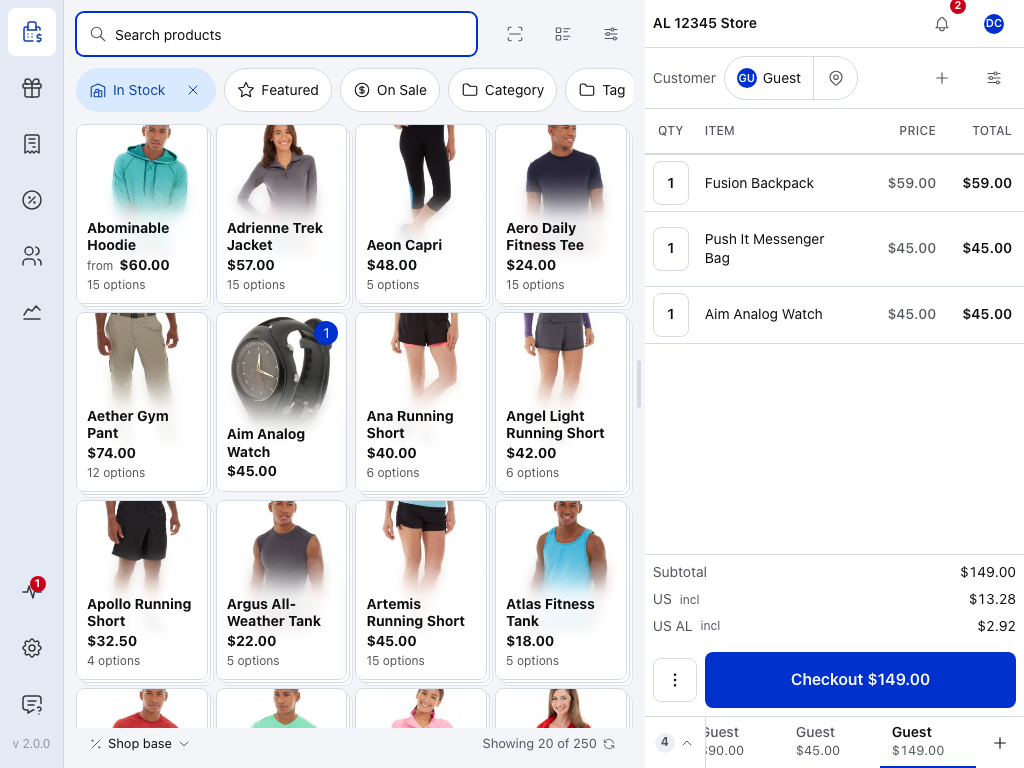
- Open cart — the order on screen, underlined. It shows the customer's name, or Guest, and the total.
- Another open order — tap it to switch. The cart you leave stays as it was.
- Count — how many orders are open. It appears when there are more tabs than fit. Tap it for the list.
- + — starts a new order.
- ⋮ — Order details: hand the order over, print, sync or void it.
- Checkout — takes payment for the order on screen. See Checkout.
- Keyboard: on the web, with a tab focused, the Left and Right arrow keys step to the next order.
- Touch: swipe the strip to scroll through the tabs.
- Age: an order open for an hour or more shows its age beside the total, in a warning colour, so a forgotten sale stands out.
- Status: while an order is part-way through checkout, its tab says so instead of showing the total: for example In checkout, Partly paid · $20.00 due or Waiting for terminal · $45.00. See Split Payments.
The strip shows your own open orders on this store and register. A colleague's orders, and yours on another register, wait in their own strips.
Start a new order
Press +. A blank cart opens and the cell reads + New.
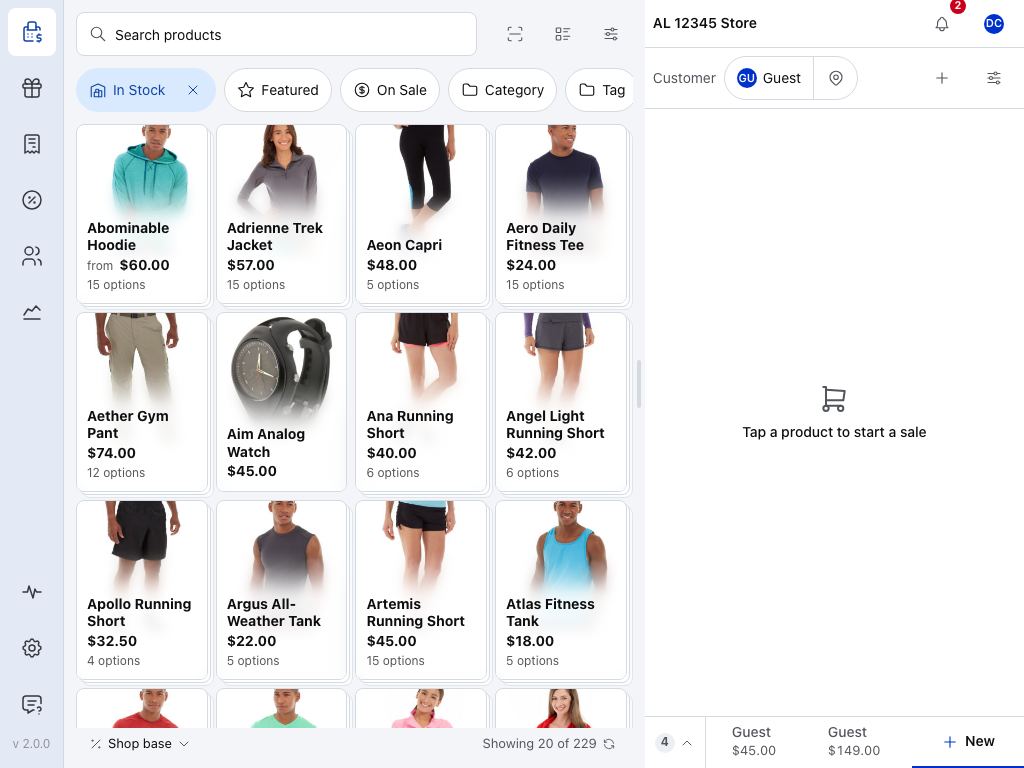
- + New — the blank cart you're on.
- Earlier order — still open; tap it to go back.
- Search — add the first product. See Search and Filtering.
The blank cart isn't an order yet. It becomes one, and gets its own tab, when you add the first product, so pressing + by mistake leaves nothing behind. On a phone, the Cart tab's badge reads New while the cart is blank.
See every open order
When the strip can't fit every tab, a count appears at its start. Tap it and Open orders lists them all, oldest first.
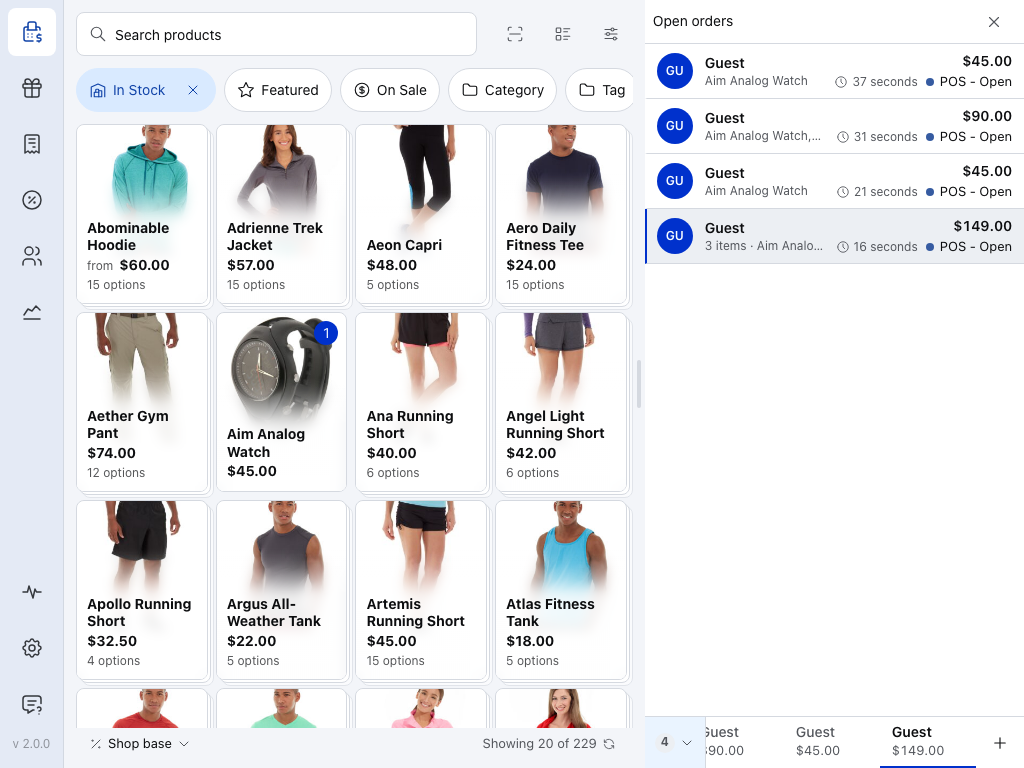
- An open order — the customer, or Guest, with the total, how long it has been open and its status. Tap the row to switch to it.
- Items — what's in it. With three or more products the count comes first: 3 items · Aim Analog Watch, …
- The order on screen — highlighted.
- Close — back to the cart.
Once an order has been open for an hour, its age turns a warning colour, here and on its tab. Use the list to find a sale someone forgot, then finish it or void it.
Order details
Press ⋮ beside Checkout to open Order details for the order on screen. The Hand over box decides where the order waits; the buttons along the bottom act on the order.
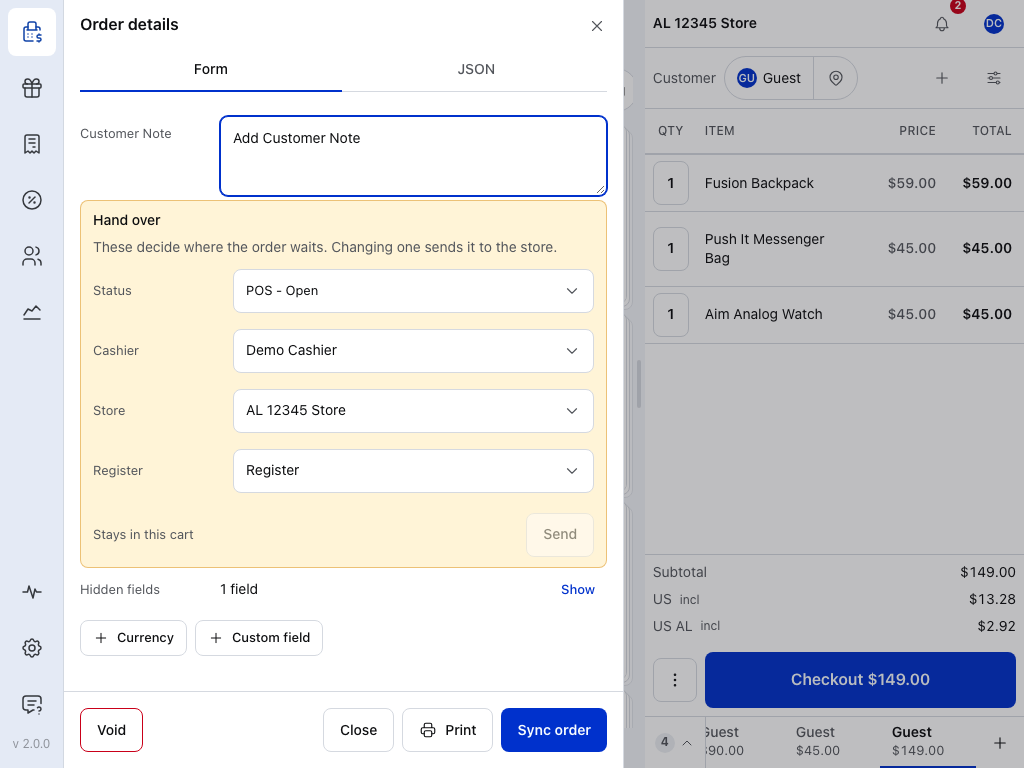
- Status — change it to send the order to the store. See Change the status.
- Cashier — hand the order to a colleague. See Hand an order to another cashier.
- Store (WCPOS Pro) — send the order to another of your stores. It only appears when you have more than one.
- Register — send the order to another register.
- Send — sends the changes above. It stays greyed out until you change something.
- Void — removes the order. See Void an order.
- Print — prints a bill. See Print a bill.
- Sync order — saves the order to your store now. See Save an order to the store.
The rest of the sheet (the customer note, tax exempt, currency and custom fields) is on Order Actions.
Hand an order to another cashier
At a shift change, hand your open orders to whoever takes over.
- Open the order and press ⋮.
- Choose the colleague under Cashier. The box now reads Leaves this cart.
- Press Send. The POS asks Hand this order to …? with your colleague's name.
- Press Send to …, which names them too.
The order leaves your strip and Order sent appears. Once your colleague's POS syncs, it waits in their open orders.
Send an order to another register or store
A customer who started at one counter can pay at another.
- Open the order and press ⋮.
- Choose the other till under Register, or, with WCPOS Pro and more than one store, the other store under Store. A store with a single register gets that register picked for you; with several, choose one before you send.
- Press Send. The POS names where the order is going, for example Send this order to AL Store · Register?, with what changes. Cancel keeps the order here.
- Press Send to …. Order sent appears, the order leaves this cart, and it waits in the open orders there.
Show the transfer and confirmation
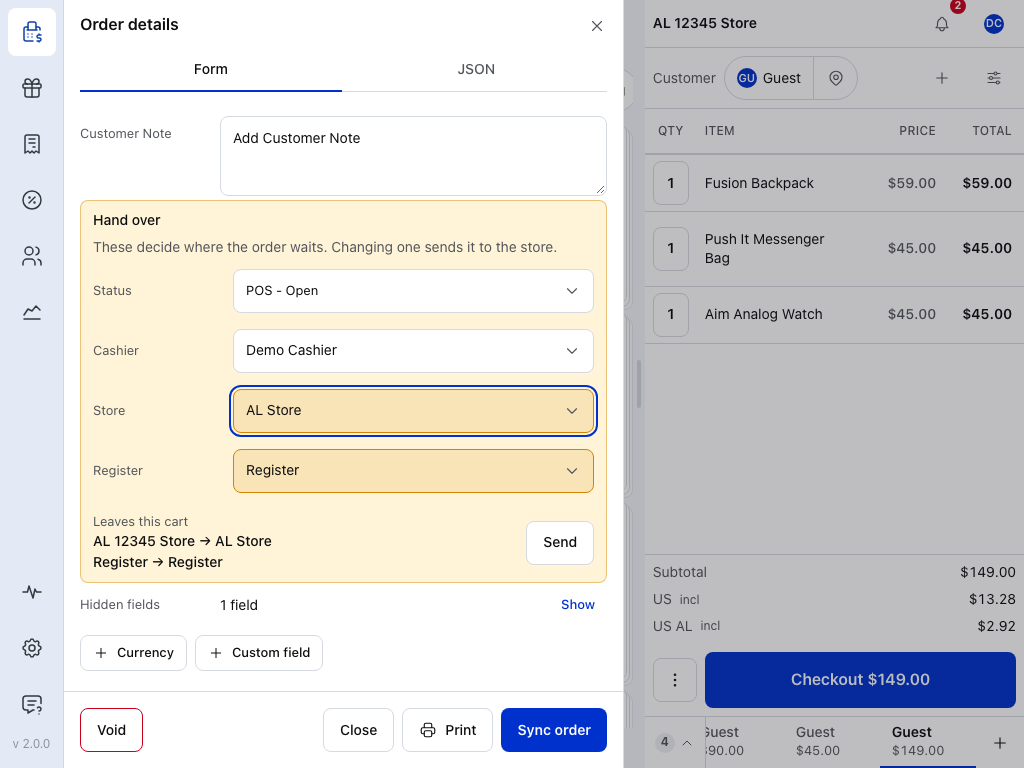
- Store — the store the order is going to.
- Register — the register there.
- Summary — Leaves this cart, with what changes, before and after.
- Send — asks before anything is sent.
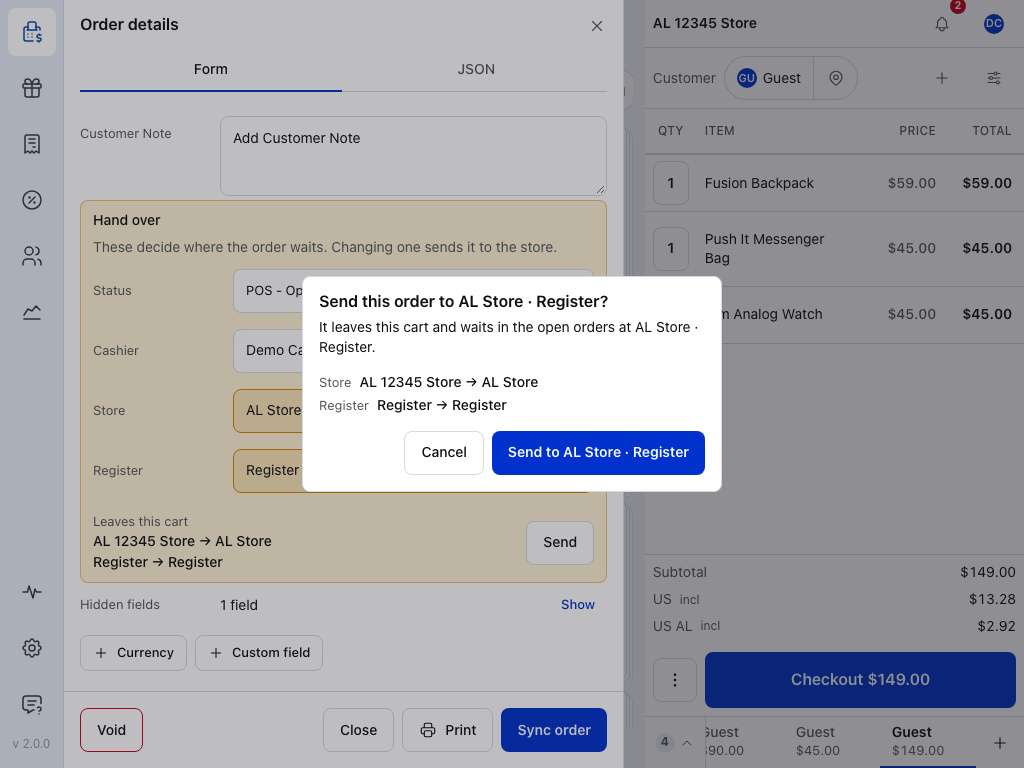
- Cancel — keeps the order here; nothing is sent.
- Send to … — sends it. Order sent appears, the order leaves this cart, and it waits in the open orders there.
If the send fails, Failed to save order appears and the order stays as it was, in your cart. Check your connection and try again.
Change the status
Status offers POS - Open, Pending payment, On hold and Cancelled: the statuses a till may set. When the order already has a status the till can't set, such as a partly paid order, Status shows it greyed out.
- POS - Open or Pending payment keeps the order in this cart. Sending it saves it to the store, and the box reads Stays in this cart.
- On hold or Cancelled sends the order to the store and takes it off your strip. Find it afterwards on the Orders screen.
Print a bill
Print in Order details opens the receipt screen for the order before it's paid: a bill to hand to a table, or a quote.
- Choose the Template and the Printer.
- Check the preview.
- Press Print Receipt.
If the preview is unavailable
Some templates are drawn by your store, so they can't show an order the store doesn't have yet. The preview then reads This template can't be previewed for this order. Press Sync order on this screen: the order is saved to the store and the preview appears. Or choose another template.
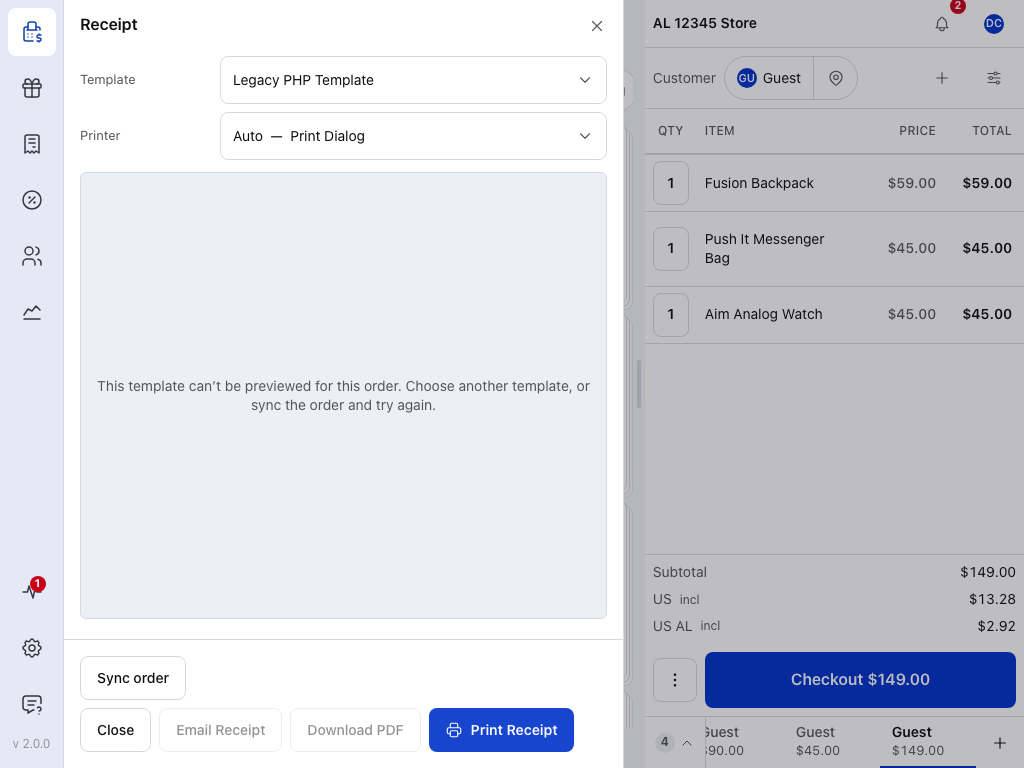
- Template — the layout to print. See Customising Receipts.
- Printer — where it prints. See Print Receipt.
- Preview — the bill as it will print. Here it reads This template can't be previewed for this order.
- Sync order — saves the order to the store. See Save an order to the store.
- Print Receipt — prints it.
- Close — back to the cart.
Save an order to the store
An open order is saved on this device as you go, so you can switch away and come back. To save it to your store as well, press ⋮ beside Checkout to open Order details, then press Sync order. Until you sync it, the order exists only on this device: your store doesn't have it, another register can't see it, and clearing this device's data loses it. A synced order is a real order in WooCommerce › Orders. Order #… synced appears, with the number the store gave it. This was Save to Server in 1.x.
The order stays open, on your strip, until it's paid or sent somewhere else. To serve someone else while it waits, start a new order.
Without a connection the strip keeps working: switch orders, add items and void. Sync order still takes the order: after about 45 seconds This order is still on its way to your store appears, and the order reaches the store once you're back online, so don't press it again. Send needs a connection: offline it ends in Failed to save order and the order stays in your cart.
Void an order
To remove an order you no longer need, press ⋮ beside Checkout to open Order details, then press Void. There's no confirmation step. Order removed appears with Undo; press it straight away if you voided the wrong one. A synced order you void goes to Trash in WooCommerce › Orders, where you can restore it. If the store won't delete it, the order stays in Orders as Cancelled, and the POS says Order voided and marked cancelled. Voiding works with the register closed.
You can't void an order that has a payment on it. The POS says This order has payments on it. Reverse them with Cancel in the tender pane, then void. See Cancelling a Payment.
Move the strip to the top
The strip sits under the cart by default. To put it above the customer instead, press the settings button at the end of the Customer row to open Cart Settings, and choose Top under Open orders position.
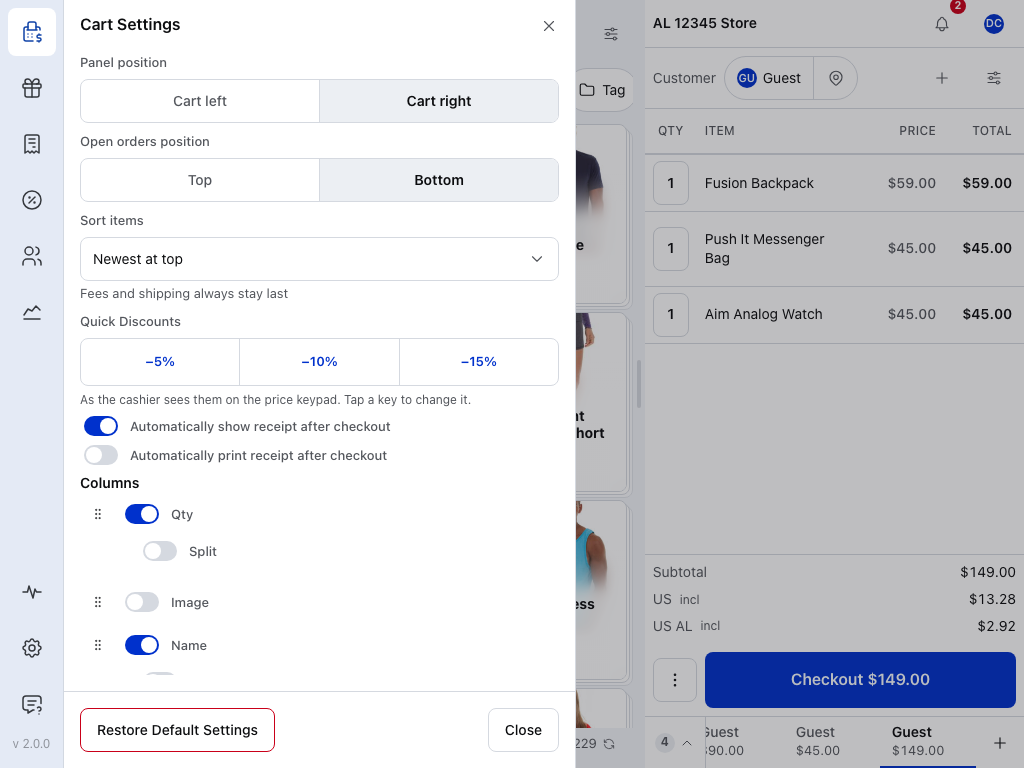
- Open orders position — Bottom, the default, or Top.
The change applies straight away, on this device only.
Show the strip at the top
- Open cart — still underlined.
- Count — the list of every open order.
- + — a new order.
- Cart settings — open it again to put the strip back at the bottom.
If something goes wrong
- An order I handed over isn't on my colleague's strip. It arrives when their POS syncs. Check that it went to the right register and store; an order waits only on the strip of the cashier, store and register it was sent to.
- An order disappeared from my strip. Its status changed to On hold, Cancelled or a status the store set, or it was handed to someone else. Find it on the Orders screen.
- Void says the order has payments on it. Cancel each payment in the tender pane first. See Cancelling a Payment.
- Void says "Order voided and marked cancelled". The store couldn't delete its copy, so it kept the order as Cancelled instead. It has still left your strip.
- Send or Sync order says "Failed to save order". Nothing changed. Check the connection and try again.