WP Admin Settings
WP admin: WP Admin → POS → Settings, shared by every till.
You need the Manage POS settings permission to see these settings: Administrators and Shop Managers have it, Cashiers don't (Access).
For one till's printer, barcode scanner, theme or display, open Settings inside the POS instead. Those settings apply only to that device.
Find a setting
Common jobs:
- Change the shop's name, phone or returns policy: Store details.
- Choose the payment methods the till offers: Choose payment methods.
- Decide what cashiers can do: Access.
- Sign out a lost or shared device: Sessions.
- Set the opening float: Register.
- Choose which product field the barcode scanner reads: Barcode Field.
- Choose the customer each sale starts with: Default POS Customer.
- Download every register closure as a spreadsheet: Export closures.
- Read the errors and warnings WCPOS has logged: Logs.
- Activate your WCPOS Pro licence key: Installing WCPOS Pro.
The menu down the left of POS > Settings has three groups: Settings, Tools and Account. On General and Checkout each change saves as soon as you make it; only a payment method's POS settings have a Save button.
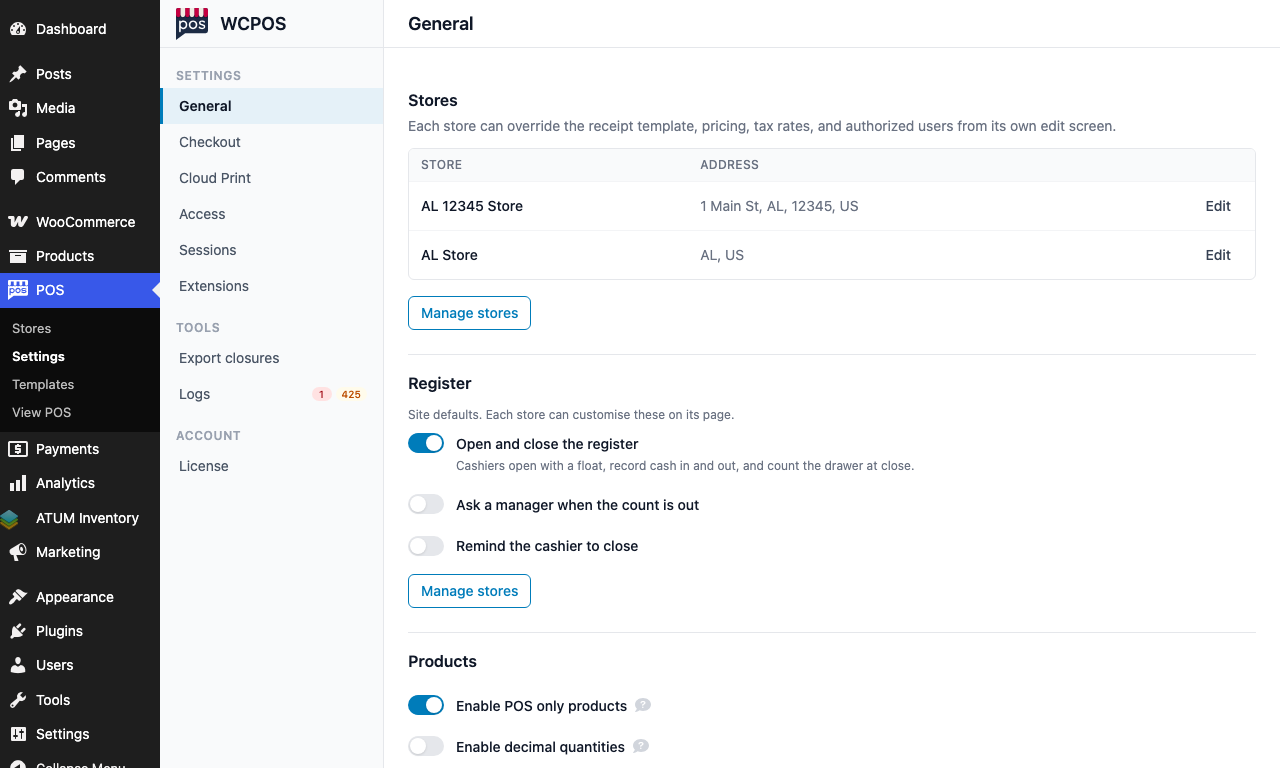
- Settings — General, Checkout, Cloud Print, Access, Sessions and Extensions.
- Tools — Export closures and Logs.
- Account — License.
Everything in the settings menu
Settings
- General: store details, the register, products, customers, privacy and Force SSL. See General Settings, or open What's on General further down.
- Checkout: overselling, the POS emails, and the payment methods (Gateways) with the order status each one sets. See Checkout Settings, or open What's on Checkout further down.
- Cloud Print: printers that fetch receipts over the internet, the rules that print orders automatically, and the print queue. See Cloud Printing.
- Access: what each WordPress role can do in the POS, including the Cashier role. See Access.
- Sessions: who is signed in to the POS, on which devices, and signing a device out. See Sessions.
- Extensions: browse, install, update and turn off WCPOS extensions. A number beside the name counts the updates waiting. See Extensions.
Tools
- Export closures: Download CSV of every register closure this store has recorded, one row per closure, with the figures as they were at closing. See Reconciliation.
- Logs: the store's own WCPOS log, with errors and warnings. Beside the name, one number counts the errors you haven't read and another the warnings. See Logs.
Account
- License: with WCPOS Pro installed, enter and Activate your License Key, or Deactivate it. Without Pro, the page offers the upgrade. See Installing WCPOS Pro.
An extension can add a page of its own under Tools or Account.
What's on General: store details, register, products, customers, privacy, Force SSL
- Store details: name, phone, email, returns policy and Store tax IDs. See Store details.
- Register: open and close the register, the opening float and the close rules. The free plugin has one register; more registers need Pro. See Register.
- Products: POS only products, decimal quantities, restore stock on order delete, and the Barcode Field. See General Settings.
- Customers: generated usernames, the Default POS customer, Let customers download receipts, and customer Tax IDs (Customer Tax IDs). See General Settings.
- Privacy: anonymous usage data and error reports. Until an admin answers, it shows Allow and No thanks buttons. See General Settings.
- Advanced: Force SSL. See Force SSL.
What's on Checkout: overselling, emails, payment methods
- Prevent overselling. See Checkout Settings.
- The Admin emails, Customer emails and Cashier emails switches. See Email Notifications.
- The payment Gateways table. See Checkout Settings. In it you:
- choose which payment methods the till offers, and in what order (with the free plugin, only Cash and Card can be switched on or changed; other payment methods need Pro);
- pick the Order Status a POS order gets when it is paid with each method;
- open a method's POS settings to change the name and description the till shows and, for cash, the Rounding: No rounding or an increment from 0.05 to 10. See Cash rounding.
Email notifications, registers and tax IDs
Email Notifications are the three email switches on Checkout. Registers is the Register section of General. Store Tax IDs are part of Store details, and Customer Tax IDs are under Customers, both on General.
Store details
Open WP Admin > POS > Settings > General and change the fields at the top. Each change saves as soon as you make it. These details are used on POS receipts and invoices:
| Field | What it holds |
|---|---|
| Store name | Your shop's name. |
| Phone | The shop's phone number. |
| The shop's email address. | |
| Refund & Returns Policy | A short statement printed on POS receipts. |
| Store tax IDs | The shop's tax numbers. See Store Tax IDs. |
Leave a field blank to keep the value WooCommerce already has, which the empty field shows in grey. If WooCommerce has none either, Store name falls back to the site title and Email to the sender address of your WooCommerce emails.
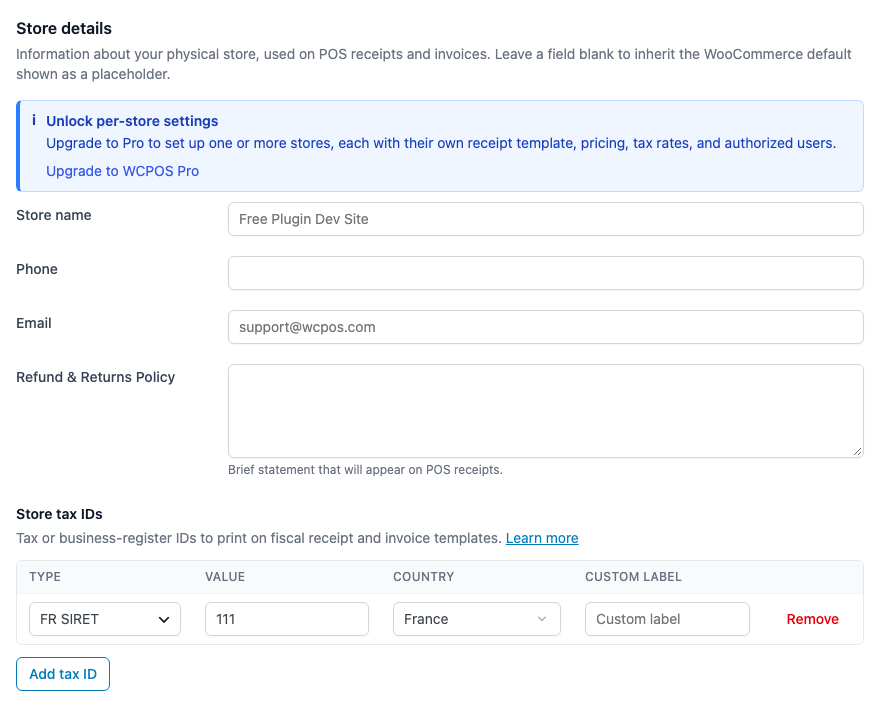
- Store name — empty here, so the grey site title is used.
- Phone — none by default.
- Email — empty here, so the grey address is used.
- Refund & Returns Policy — printed on POS receipts.
- Store tax IDs — the shop's tax numbers. See Store Tax IDs.
Until you create a store, Store details shows these same fields and a Manage stores button. Once you have one, the section becomes Stores, a list of your stores with an Edit button each, and each store's details are set on the store. See Set up a store.
Force SSL
Leave Force SSL on. It is under Advanced at the bottom of General, it is on by default, and it keeps every connection between the POS and your site secure (HTTPS).

- Force SSL — on by default. Leave it on.
What Force SSL changes, and when to turn it off
With Force SSL on, opening the POS at an http:// address sends you to the https:// one, and the POS's sign-in, checkout and receipt links use HTTPS even when the site's own address starts with http://, as it can behind a proxy that handles SSL.
Turn it off only on a site that has no SSL certificate, such as a test site on your own computer. The POS then follows the site's own address.
With WCPOS Pro
Pro adds POS > Stores to the WP Admin menu. Each store has its own details, receipt templates, registers and staff, and its own Customer display page. See Set up a store.
Choose a customer display template for a store
On the store's Customer display page, the Display template list starts with Same as site, followed in brackets by the name of the site's display template (Store default when the site has none active). Leave it there and the store follows whatever template the site uses. Pick another template to give this store its own. A template appears in the list once it is enabled under POS > Templates, on the Display tab.
If something goes wrong
There is no POS menu in WP Admin. WordPress shows the whole POS menu, Settings included, only to users with the Manage POS settings permission, and your account doesn't have it. Ask an Administrator to give it to your role, or see Access.
General shows Stores where Store details was. You have WCPOS Pro and at least one store. Press Edit on a store to change its details.
Receipt fonts could not download
The warning starts: "WCPOS could not download its receipt fonts from cdn.jsdelivr.net." It shows in WP Admin to anyone who manages WooCommerce. Until the download works, receipts use a basic font that only covers Latin letters, so text in other alphabets may not print properly. WCPOS tries again every hour. If your host blocks outgoing requests, ask them to allow cdn.jsdelivr.net.
Receipt fonts could not be set up
The warning starts: "WCPOS could not publish its receipt font map." WCPOS could not save the file that tells receipts where the fonts are. Receipts use the basic Latin font until it works, and WCPOS tries again every hour. Ask your host to check that the WordPress uploads folder is writable.
"Your store is behind Cloudflare" at the top of General. WCPOS has noticed your site runs through Cloudflare, whose security checks can stop the POS reaching your store. If the POS shows HOST121 or a security-check window, see Cloudflare.
Checkout warns that it gets slower
The warning at the top of Checkout starts: "Checkout in WCPOS gets slower as your catalog and order history grow". Your store still keeps its orders in WooCommerce's legacy order storage. Switch to High-Performance Order Storage: the warning links to the WooCommerce setting, and it stays until you switch. See Order storage.
"Help us make WCPOS better" in WP Admin
WCPOS is asking whether it may send anonymous usage data and error reports. Press Allow or No thanks. You can change your answer any time under General > Privacy.
Until someone with the Manage POS settings permission answers, the box shows on the Dashboard and Plugins screens. For 7 days after you install or update WCPOS, it shows on most WooCommerce screens too. Dismissing it hides it from you for 7 days.