Settings
Settings live in four places. Most of what you change at the till is in Settings in the POS, and it changes this device only. What every till shares, the store owner sets in WordPress. With WCPOS Pro, each store also has its own page there. And some screens have their own button for how that screen looks.
- Settings in the POS changes this device, for the store it's on. Anyone who can open the POS can change it.
WP Admin > POS > Settingschanges every till on the site. The store owner sets it, and a few of its settings reach a till only once: see who can change it, and which.- With WCPOS Pro, each store's own page in
WP Admin > POS > Storessets that store's name and address, currency and language, tax, receipts, customer display, registers and staff. - A screen's own display settings change how that one screen looks, on this device. Anyone who can open the POS can change it.
Open Settings in the POS
Press the gear at the foot of the menu, between Store health and Support. Settings opens on General, with its seven pages down the left. Press a page to open it. Each change saves as you make it: there's no Save button to press. On a phone, open the menu at the top left first: see On a phone.
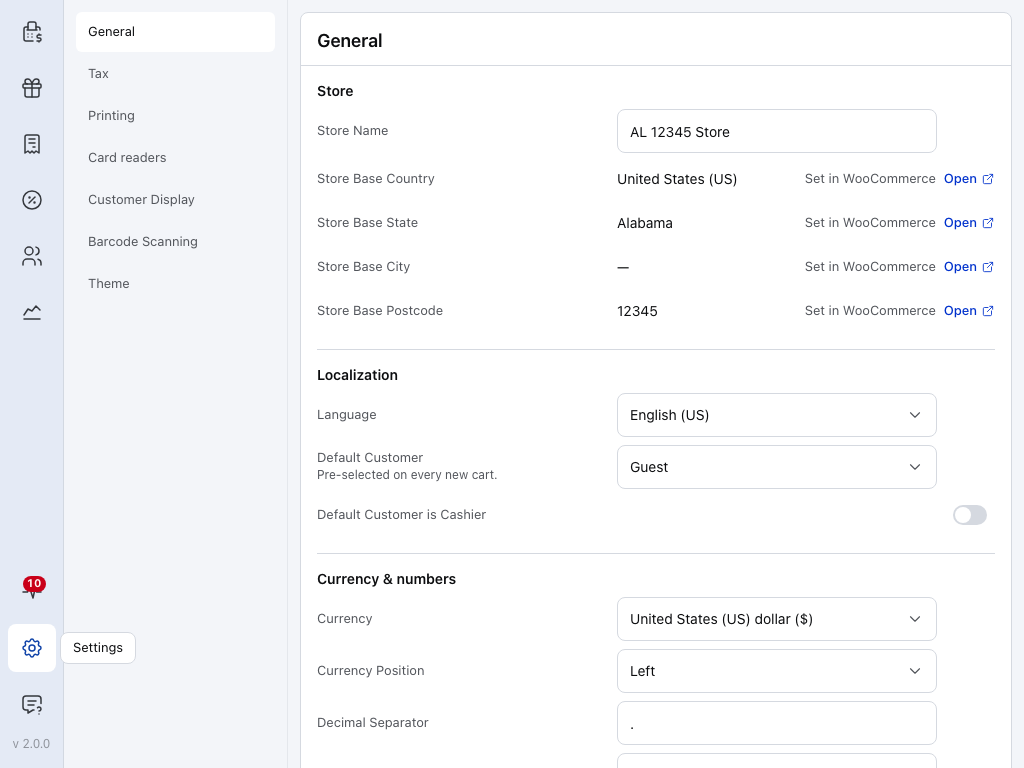
- Settings — the gear at the foot of the menu. Press the register icon at the top of the menu to go back to selling.
- General — the store's name and address, the language, the customer every new cart starts with, and the currency and how money is written. The address is set in WooCommerce, or on the store's own page with WCPOS Pro; the rest you can change for this device: see What stays on this device. See Store Details, Language and Currency.
- Tax — how the POS works out tax and how it shows it. The tax rules themselves are set in WooCommerce. See Tax Settings.
- Printing — the printers this device prints to, a Test Print for each, and which printer each receipt template uses. See Printers.
- Card readers — the card readers this till takes payments with. A reader is set up first with its payment gateway in WooCommerce, then it shows here to connect. Card readers come with WCPOS Pro. See Card reader compatibility.
- Customer Display — pair a second screen that shows the customer their sale, with a pairing code. Customer displays come with WCPOS Pro. See Customer display.
- Barcode Scanning — how the POS tells a scan from typing, a sound on each scan, and a box to test your scanner. See Barcode Scanning.
- Theme — how the POS looks on this device: the theme, the Scale of buttons and text, the icons and the fonts. See Theme.
Keyboard shortcuts aren't a setting: they're fixed, and none of them opens Settings. Press Alt + / on the POS screen to see them all, or see Keyboard Shortcuts.
On a phone
Open the menu at the top left and press Settings. On a phone the seven pages are a list: press one to open it. Each page is described above.
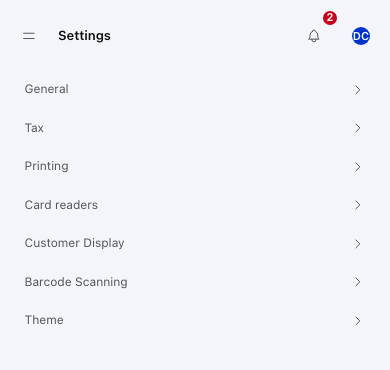
A page fills the screen. Press Settings at the top left to go back to the list.
- Settings — back to the list of seven pages.
What stays on this device
What you change in Settings in the POS changes this device only, for the store it's on. Another till in the same store keeps its own settings, and nothing you change here reaches WordPress. Turning off Manage POS settings for a role in WordPress doesn't hide this screen: see Access and Roles.
General is the page to watch. The store name, language, default customer, and currency and number format are copied from your store once, and you can change them here for this device. The store's address is copied the same way, but you can't change it here. After that first copy, a change made in WooCommerce or WP Admin reaches none of them until you press Restore Server Settings at the foot of General.

- Restore Server Settings — at the foot of General. Press it, then confirm.
Restore Server Settings loads your store's settings from WooCommerce again and puts them back over any change made on this device: every value on General except Thousands Group Style, the address included, and every choice on Tax. Printers, card readers, the customer display, barcode scanning and the theme stay as they are.
Settings every till shares
The store owner sets these in WordPress, in WP Admin > POS > Settings. They apply to every till on the site: for example the Barcode Field used to scan products, the customer a new cart starts with, which payment gateways show at checkout, the emails sent for POS orders, and who can use the POS at all. With WCPOS Pro, the register rules here become site defaults, and a store can change them on its own Registers page: see More registers with Pro. See Settings in the WordPress Admin.
To change them you need a WordPress user that can manage the POS. Administrators and shop managers can; a cashier can't unless the owner turns on Manage POS settings for their role. See Access and Roles.
A few of these settings, such as the customer a new cart starts with, are copied to each till's General page when the till is set up. A till keeps its copy until someone presses Restore Server Settings there: see What stays on this device.
A screen's own settings
The product panel and the cart each have a sliders button (), Product settings and Cart Settings. The Products, Orders, Customers and Coupons screens have the same button, called Display options. They set how that screen looks: which columns or details show, how it sorts, what it opens on. Each change saves as you make it, on this device only. Each screen's settings are explained with that screen:
If something goes wrong
A change on one till doesn't show on the other. Settings in the POS are kept per device. Make the same change on each till or, for something every till should share, ask the store owner to change it in WP Admin > POS > Settings.
The store name or currency is still the old one after a change in WooCommerce. Open Settings, then General, and press Restore Server Settings. This overwrites this device's changes on General and Tax (see What stays on this device). See Store Details, Language and Currency.
There's no POS menu in WP Admin. Your WordPress user can't manage the POS. Ask an administrator to turn on Manage POS settings for your role. See Access and Roles.