顧客
プロ機能
顧客画面にはWCPOS Proが必要です。無料ユーザーは、注文に既存の顧客を選択できますが、完全な顧客リストを表示したり、顧客詳細を編集したりすることはできません。
顧客画面では、POS内で直接顧客管理を行うことができます。WooCommerce管理画面に切り替えることなく、顧客の表示、編集、新規作成が可能です。
インターフェース概要
ヘッダーのアクション
画面の上部には次のものがあります:
- 検索バー - 名前、メールアドレスなどで顧客を検索
- 顧客追加 () - 新しい顧客を作成
- 表示設定 () - 表示する列を設定
顧客テーブル
メインエリアには、顧客が表示されます:
- アバター - 顧客のプロフィール画像(またはプレースホルダー)
- 名 - 顧客の名前
- 姓 - 顧客の姓(並べ替え可能)
- メール - 連絡用メールアドレス
- 請求先住所 - 完全な請求先住所
- 作成日 - 顧客が追加された日
- アクション - 三点メニュー
フッター
- 同期ボタン付きの顧客数 ()。長押しでクリアとリフレッシュオプション
主な機能
顧客検索
以下の方法で素早く顧客を見つけることができます:
- 名または姓
- メールアドレス
- 住所情報
新しい顧客追加
POSから直接顧客を作成します:
- ヘッダーのアイコンをクリック
- 顧客詳細を入力
- 新しい顧客を保存
顧客はWooCommerceに作成され、すぐに注文に使用可能です。
顧客の編集
顧客情報を更新します:
- 顧客の三点メニューをクリック
- 編集を選択
- 詳細を修正(名前、メール、住所)
- 変更を保存
変更は自動的にWooCommerceに同期されます。
表示設定
スライダーアイコン()をクリックして、表示する列をカスタマイズします。
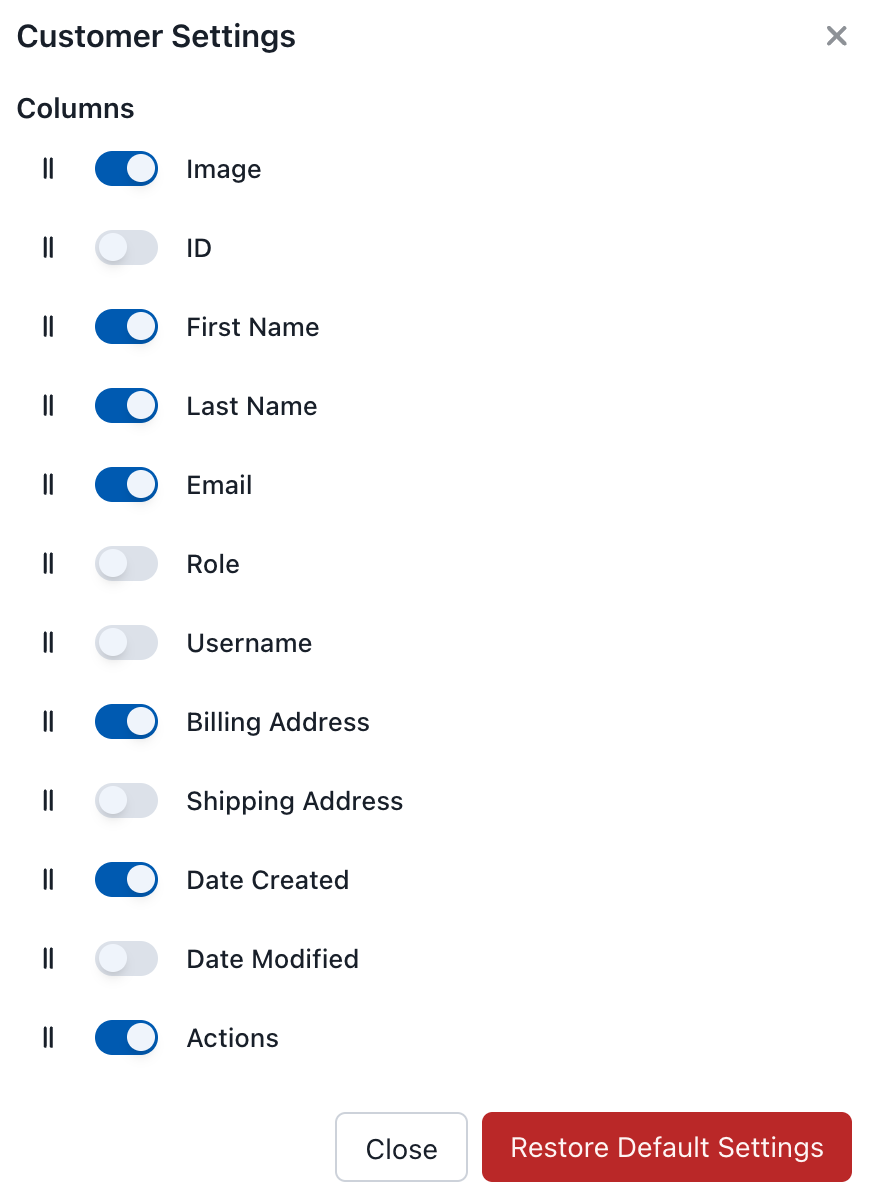
顧客表示設定
利用可能な列
| 列名 | 説明 |
|---|---|
| 画像 | 顧客のアバター |
| ID | WooCommerce顧客ID |
| 名 | 顧客の名前 |
| 姓 | 顧客の姓 |
| メール | メールアドレス |
| 役割 | ユーザーの役割(顧客、購読者など) |
| ユーザー名 | WordPressユーザー名 |
| 請求先住所 | 請求情報 |
| 配送先住所 | 配送情報 |
| 作成日 | 顧客が追加された日 |
| 最終更新日 | 最後の更新 |
| アクション | 編集、同期、削除 |
顧客アクション
三点メニュー(⋮)をクリックしてオプションを表示します:
- 編集 - 顧客詳細を修正
- 同期 - サーバーから顧客を更新
- 削除 - ローカルデータベースから削除
ノート
POSから顧客を削除しても、ローカルでのみ削除されます。顧客はWooCommerceに残り、次回の同期で再表示されます。
注文に顧客を使用する
顧客を注文に割り当てるには次のようにします:
- カートパネルで、顧客バッジをクリック
- 名前またはメールで顧客を検索
- 顧客を選択
- 顧客が注文に関連付けられました
顧客情報(請求/配送先住所)は自動的に注文に使用されます。
同期
顧客データはPOSとWooCommerce間で同期されます:
- リアルタイム更新 - 変更はすべてのデバイスに同期
- WooCommerce統合 - 顧客はWooCommerceに保存
- オフライン機能 - オフラインの際も顧客を表示