Open the Register
A register session runs from the moment you count the float into the drawer to the moment you count it out again. This page covers the start of the day and everything in between: opening with a float, the drawer figure, and cash paid in and out. Counting and closing at the end of the day are on Close the Register.
Everything here depends on Open and close the register. With it off, the POS goes straight to the cart and there's nothing to open or count. See Registers for the setting. With WCPOS Pro and stores, each store has its own setting: see Setting up stores.
Open the register
While the register is closed, the register bar reads Closed and the products show Price check only until the register is open. You can search and read prices, but nothing goes in a cart. The cart column holds the Open register card instead:
- Cash in the drawer — a large figure, filled in with the float the register suggests: the Opening float from Registers, or the last count if none is set.
- Default float and Last count — tap one to put that amount back in the figure. Blind cashiers don't see the last count.
- Keypad — count the cash in the drawer and type it. The first key you press replaces the suggested amount, so you never clear it first. ⌫ takes off the last digit.
- Opening variance — appears when your figure differs from the suggested float. The session keeps it alongside the float you counted.
- Open register — starts the session. A message confirms the float you opened with.
- Last closure — the number and the count of the closure before this one.
A register already open on another device doesn't ask for a float: this device joins the session. See Stores, Registers and Devices.
Your cashier sheet
Tap your avatar at the end of the register bar. This is where the drawer lives, and where you hand over to someone else.
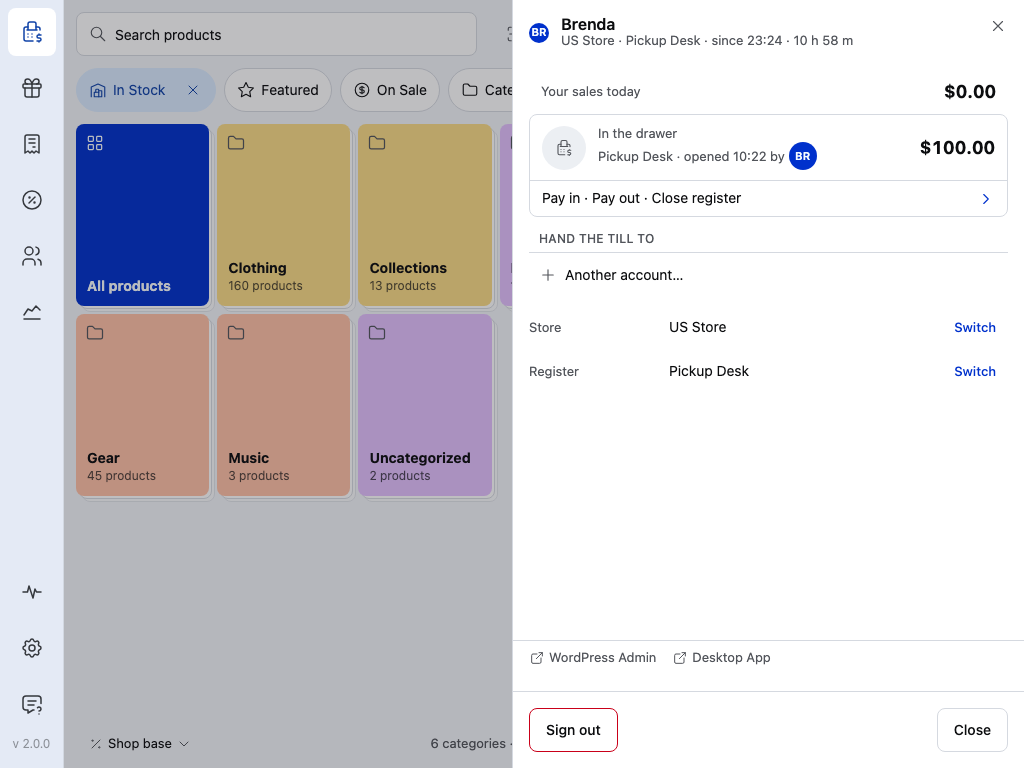
- In the drawer — the cash the register expects right now. Tap it to open the register panel. Without the view reports capability you count blind, so this shows a number of sales instead of money. See Access.
- Your sales today — what you've rung up.
- Hand the till to — pass the till to another cashier. The drawer stays open and the POS reloads as them. Open carts wait for their cashier.
- Switch register — only with several registers. Finish or park the current sale first. See Choosing a store and a register.
- Switch store — only with several stores (WCPOS Pro).
- Sign out — a register left open stays open for the next cashier, and the POS asks whether to close it first.
Move cash in and out
Tap In the drawer on your cashier sheet to open the register panel. It leads with the cash the drawer should hold.
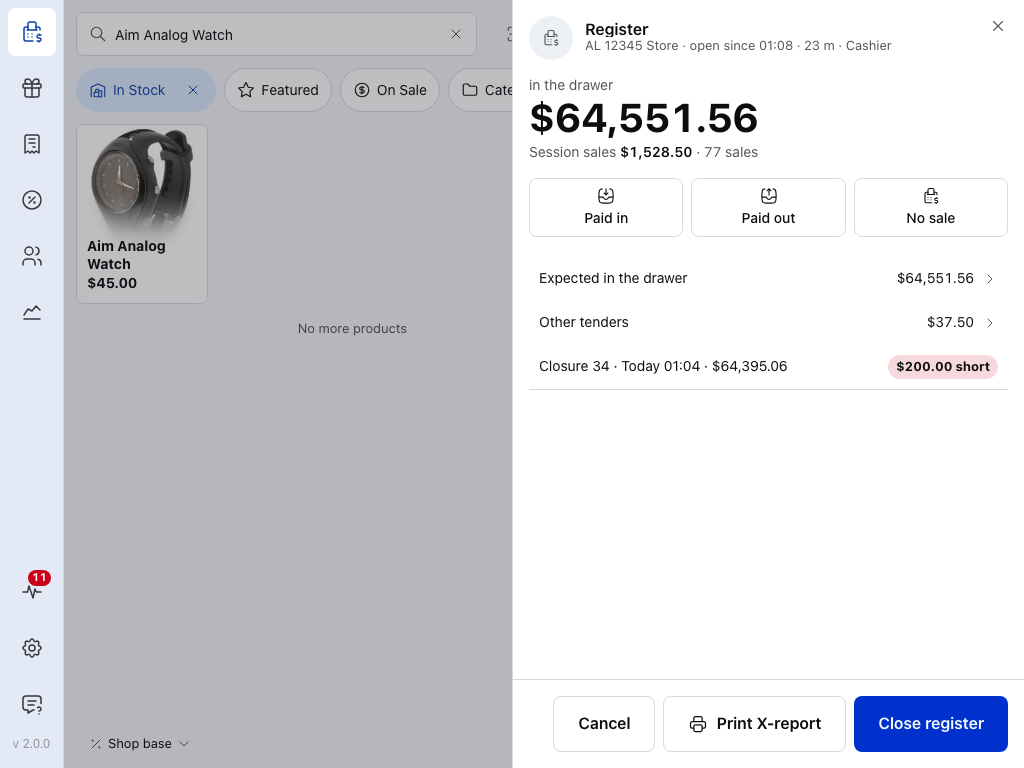
- In the drawer — the cash the register expects, updated with every sale and movement. Blind cashiers don't see it.
- Session sales — the total and the number of sales since the register opened.
- Paid in — put cash into the drawer.
- Paid out — take cash out of the drawer.
- No sale — open the drawer with no money moving.
- Expected in the drawer — tap it to unfold the sum behind the drawer figure: the float, cash sales, cash refunds and every movement. Other tenders below it unfolds card and the other payment methods.
- Last closure — the closure before this session, with its number, its count and how it ended: Exact, Short or Over.
- Print X-report — a report of the session so far, without closing it.
- Close register — start the count. See Close the Register.
Pay in
Press Paid in. The sheet asks How much is going into the drawer? Type the amount, then give a reason. Every movement needs one: tap a reason or Other… and type your own.
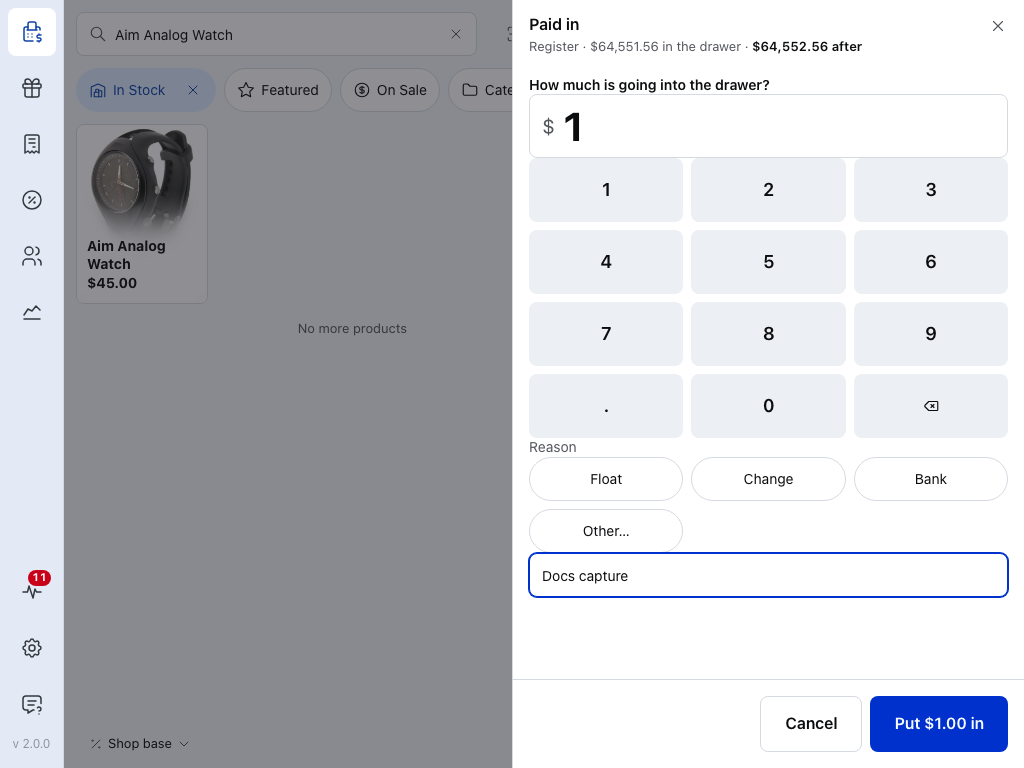
- In the drawer, and after — what the drawer holds now, and what it will hold after this movement.
- Amount — what you typed.
- Keypad — type the amount.
- Reasons — Float, Change or Bank. Tap one to fill in the reason; tap it again to clear it.
- Other… — clears the reason so you can type your own.
- Reason — the reason kept with the movement. Type here directly, or edit the wording a reason filled in.
- Put … in — records the movement. Until there's an amount and a reason, the sheet says which is missing.
Pay out
Press Paid out for cash leaving the drawer: a supplier paid at the door, petty cash, banking or tips. The sheet asks How much is leaving the drawer? and works the same way. On a phone the reasons sit in two columns.
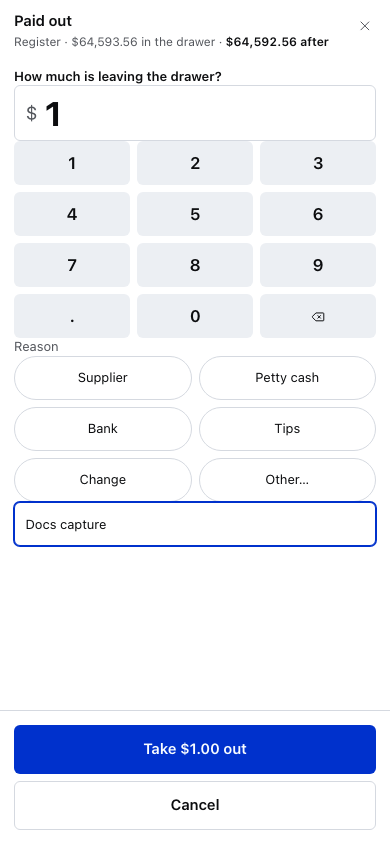
- In the drawer, and after — the drawer now and after the payout.
- Amount — what you typed.
- Keypad — type the amount.
- Reasons — Supplier, Petty cash, Bank, Tips or Change.
- Other… — type your own reason.
- Reason — the reason kept with the movement.
- Take … out — records the payout.
No sale opens the drawer without moving any money. It still asks Why open the drawer?: tap Change, Mistake, Drawer check or Other…, then press Open the drawer.
See the movements
A message confirms each movement, such as Paid in $1.00, with Undo on it. To see every movement in the session, tap Expected in the drawer.
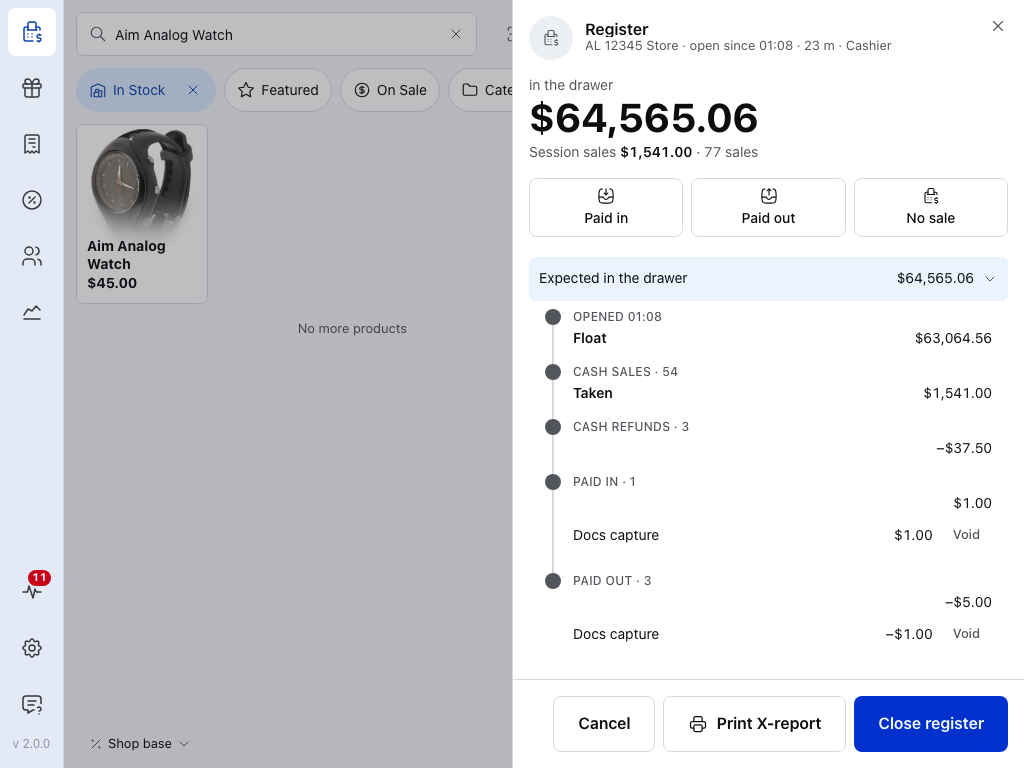
- In the drawer — already includes the movements.
- Float — what the session opened with, and when. The sum starts here, then adds cash sales and takes off cash refunds.
- Paid in — how many, their total, and each one with its reason.
- Paid out — the same for cash taken out.
- Void — cancels that movement. Only while the register is open.
- Close register — when the day is done. See Close the Register.
Count and close
At the end of the day, press Close register on the panel, count the drawer and file the closure. The count, the closure and what to do when the drawer is out are on Close the Register.
If something goes wrong
You entered the wrong movement. Press Undo on the message that appears, or Void on its line under Expected in the drawer. Either way it leaves the panel and the drawer figure goes back. A voided movement can't be restored: enter it again. Void only works while the register is open, not during a count.
The button says "Enter an amount" or "Add a reason". The movement isn't complete. Type an amount, then tap or type a reason.
The panel says "Figures arrive with the next sync". The register is waiting for its figures from the store, and Close register stays disabled until they arrive. Stay on the page and check the connection.
A movement is refused. A notice at the top of the panel says how many the store turned down. Press Retry on it.
The register was closed on another till. The Open register card says who closed it and when. Count the drawer and open it again.
Someone else is counting. "Counting on another till" names who started the count and when. Wait for them to finish.
"No register for this store" or "Can't reach this store's registers". The POS has nothing to open. Check the connection and press Try again. If the store really has no register, a manager adds one. See Stores, Registers and Devices.
The count is out at closing. See Close the Register.
Pro adds more registers per store and the full closure history in Reports. See More registers with Pro.